
Last Updated: July 25, 2022

Activity 11 - Obtain Compliance & Define Performance
Update and Analyze Status - Application 4 [jump to]
Updating Commands Simulation - 20 minutes [jump to]
Customize Ribbon Simulation Part III - 30 minutes [jump to]
Enter Actuals and Analyze Status - 40 minutes [jump to]
Final Application
Finalize, Baseline and Update the MS Project Master Class Plan.mpp file. (jump to)
Review of Best Practices [jump to]
Activity 13: Update Project Exam - 8 minutes (jump to)
Simulation Files (jump to)
Process Bridge [jump to]
Page Outline
Learn Update Project Workflow - Application 1
Activity 11 Workflow Simulation - 15 minutes (jump to)
Update Project Content Links [jump to]
Update to Status Date - Application 2 [jump to]
Customize Ribbon Simulation Part I - 20 minutes [jump to]
Status Date Simulation - 20 minutes [jump to]
Select Update Calculations - Application 3 [jump to]

Learn Update Project Workflow
Review
Review and learn the Activity 13: Update Project workflow in the chart below.

Figure 1. Activity 13: Update Project.

Note: This is Activity 13: Update Project Workflow in the Project MAP project lifecycle.
Updating a project consists of two activities:
Entering actuals such as progress (% Complete and % Work Complete) and actual timing, work, and cost.
Modifying the plan by changing current and future tasks based on a wide range of inputs.
Updating a project within an organization hinges on a reporting cycle like the one in the figure below. Rarely do project managers keep a project up to date (regardless of how well-intentioned they may be) outside of a formally established reporting cycle. A reporting cycle is a discipline, and just like many related disciplines like exercise, diet, sleep, etc., most people fail to adhere to the practice unless it is a requirement.
Chart 21- Weekly Reporting Cycle in the figure below is an example of a weekly reporting cycle. Most reporting cycles are weekly.
Updating in Microsoft Project is a process. See a suggested updating process in Chart 20 – Updating Steps.pdf in Figure 3 below.
After setting the Status Date in Microsoft Project, the manager can select from a list of updating calculations in Project Options. This gives the manager the freedom to make different calculation settings for different updated tasks. These selections all work based on a new update to a task and do not re-calculate everything in the project plan.
Perhaps the most important selection is between Simple and Detailed Updating, terms we use to describe the selection Updating Task status updates resource status. Updating is simpler when this selection is checked because an update to progress (% Complete) will also update the Work on the tasks. An update to Work will automatically update % Complete.
In addition to this Update Project Workflow, it is essential to establish an Updating Process, as illustrated in Figure 3 below. As we have seen throughout this program, many of the positive outcomes of planning in Microsoft Project are a function of following a sequence of established steps. Following a different set of steps can result in a slightly different outcome. The same is true of updating. If two managers are provided copies of the same project plan with a list of updates to enter, the results will undoubtedly be different unless they are following the same basic steps.

Journal
What area of Microsoft Project do you think people struggle with the most? If you guessed resource management, you would be wrong; it is updating. If everything went according to plan, it would be easy, but things don’t, so it is complex to enter what happened while modifying the project simultaneously. As with everything complex, it helps to have a process or steps.
Do you think there is a better workflow for Activity 13 – Update Project? If yes, what is that workflow?

Best Practice
A formal reporting cycle, as an organizational business practice, will go a long way in helping project managers work more successfully with their teams.
Establish an Updating Process. Having a process or series of steps will both increase your efficiency, better updating accuracy, and satisfaction with using Microsoft Project.
Figure 2. Weekly reporting cycle. Clicking on the image will enlarge the image into a lightbox.

Download as *.pptx
Download the Chart 21 - Weekly Reporting Cycle.pptx using the download icon above. It is a PowerPoint file is case you would like to edit for your own use.
Figure 3. Microsoft Project updating steps. Clicking on the image will enlarge the image into a lightbox.

Download as PDF
Download the Chart 20 - Updating Steps.pdf using the download icon above. It is a PowerPoint file is case you would like to edit for your own use.
Figure 4. Activity 11 - Obtain Compliance & Determine Performance Workflow.

Download Workflow as PDF

Activity 13 Workflow Simulation (15 minutes)
Before we get started on this simulation, open your MS Project Master Class Plan.mpp file. Using the Table of Contents in the Master Class Book and the Outline above, update the plan by:
Entering detail tasks for this Activity.
Entering duration estimates.
Assigning yourself to each detail task.
Linking detail tasks.

Download *.mpp file
To start this simulation, download the Update Workflow.mpp file by using the icon above and opening it in Microsoft Project. Rename the file to 13 - 1 Update Workflow.mpp. Make sure your global settings in Project Options are correct and that you are using Microsoft Project 2019, 2021, or Microsoft 365 updated, for best results.
The project's status date is the pivotal part of a reporting cycle. In this project, the Status Date is every Monday at 5 PM. If you format the date to include the date and time, you will notice the Status Date is through to 5 PM.
This project is updated through 8/1/22 5 PM.
The project is almost finished. We will change the Status Date to the following Monday and update a few tasks. Do the following to set up this project for updating:
Change the Status Date to 8/8/22 at 5:00 PM.
Filter out completed tasks by applying the Incomplete Tasks filter.
Select Phase 4 - Proceed With Startup Plan and zoom Selected Tasks.

Figure 5. Changing the Status Date and setting things up for updating.
The Microsoft Project skill to update to the reporting cycle Status Date does not happen organically; it is a learned skill. Updating involves entering actuals and changing or modifying the project based on new information since the last update. The result of each update is that all of the tasks up to the Status Date are completed, and all tasks after the Status Date are uncompleted. Simply, you can’t go back in time and complete work, and you can’t work in the future, so your taskbars should not appear as if you can.
This type of updating is more challenging than it will first appear. It takes a solid set of skills to update correctly and as quickly as possible so that you are not wrestling with the software and spending a lot of time each week updating.
In the open project, three tasks need to be updated. Obtain needed insurance is scheduled to be completed, and Establish security plan and Train staff are scheduled for progress.

Figure 6. Identifying tasks that need to be updated.
In addition, let’s say, Move in has been delayed until September 2, 2022. There are several ways this could be scheduled in Microsoft Project, and the best practices you are trying to follow will determine how you do this. Let’s make this schedule change by entering three days of lag in the predecessor link for the task. This modification to the plan is one type of updating.
Move in is now scheduled for September 2.
Obtain needed insurance is completed, so enter 100% complete. This type of update is a function of entering what happened on the task.
Select Establish security plan is completed, and it only took one day. Change the duration to one day and then mark it as 100% complete. Notice that Move in has now moved forward by a day, using the same approach as before, enter four days of lag in the predecessor.
Last, Train staff is 50% complete, but not much else is accomplished, so the uncompleted work needs to be moved to the Status Date. Select the task and click the Update Project command under the Project tab. Select the Reschedule uncompleted work to start after the status date and apply this for Selected tasks.
The task is split, and the remaining work is scheduled after the Status Date. This is a modified type of update.
Save your project.
Simulation Results
The file 13 - 1 Update Workflow.mpp, should look like the next figure. Do the taskbars match? Are the Duration and dates for the task Obtain needed insurance match?, The tasks Establish security plan, and Train staff should also match in Figure 7.

Figure 7. General updates and using the Update Project command.

Note: Filters in Microsoft Project are not dynamic; they are applied and become static. The first two tasks were not filtered out when edited and marked as 100% complete. But, if you applied the filter again, they would no longer show.

If you are working with a coach, save and email them this file (13 - 1 Update Workflow.mpp, file should look like Figure 7). If you are planning to apply for either of the Master Class Certificates or the “MS Project Certificate of Mastery” (MSPCOM), archive this completed simulation file so that you can submit it for review when applying.

Return to the Master Class Book and review the next section for this Activity.
(jump to top of page)
Update Project Content Links
The More Info button opens a Microsoft Support review on a particular topic. Not all online Microsoft Project Support is valuable enough to create a hyperlink, but when we do, we certainly believe it is worth the time for a short review.
When you click on the More Info button, a new window is opened, and you will not lose your position on this page.

Setting the Status Date begins the process of updating. Setting the Status Date does these five things:
It provides a visual reference point for identifying what needs to be updated.
It provides a reference point for all status reviewers.
It is the basis for update calculations.
It is used for Earned Value Management metrics such as the Schedule Performance Index (SPI).
It is used as a reference point for several updating commands such as the Reschedule Work command.

Best Practice
ALWAYS enter a Status Date before updating a project.

Several updating commands are useful when updating a project. These include:
% Complete
0 %
25%
50%
75%
100%
Mark on Track
Update Tasks
Move Task
Move Project
Update Project
Move Completed Parts to the Status Date
Move Incomplete Parts to Status Date

Best Practice
Create an Updating tab on the ribbon with all of the updating commands, the updating views typically used for updating, status views for analysis, and reporting.

Wikipedia says this about Earn Value Management:
“Earned value management is a project management technique for measuring project performance and progress. It has the ability to combine measurements of the project management triangle: scope, time, and costs.
In a single integrated system, earned value management is able to provide accurate forecasts of project performance problems, which is an important contribution for project management.
Early EVM research showed that the areas of planning and control are significantly impacted by its use; and similarly, using the methodology improves both scope definition as well as the analysis of overall project performance. More recent research studies have shown that the principles of EVM are positive predictors of project success.”
Earned Value answers the basic questions on status, such as:
What did we plan to have accomplished as of the status date?
What had we planned to spend as of the status date?
What did it cost us to complete what we did as of the status date?
Are we on schedule and within budget?
What is it going to cost us at completion?
Standard Earned Value fields for tasks:
ACWP (Actual Cost of Work Performed)
Baseline Cost (BAC - Budget At Completion)
BCWS (Planned Value - Budgeted Cost of Work Scheduled)
BCWP (Earned Value - Budgeted Cost of Work Scheduled)
Cost (EAC - Estimate At Completion)
CPI (Cost Performance Index)
CV (Earned Value Cost Variance)
CV% (Cost Variance Percent)
EAC (Estimate at Completion)
SPI (Schedule Performance Index)
SV (Earned Value Schedule Variance)
SV% (Schedule Variance Percent)
TCPI (To Complete Performance Index)
VAC (Cost Variance at Completion)
Standard Earned Value fields for resources:
ACWP (Actual Cost of Work Performed)
Baseline Cost (BAC - Budget At Completion)
BCWS (Planned Value - Budgeted Cost of Work Scheduled)
BCWP (Earned Value - Budgeted Cost of Work Scheduled)
Cost (EAC - Estimate At Completion)
CV (Earned Value Cost Variance)
SV (Earned Value Schedule Variance)
VAC (Cost Variance at Completion)

Update to Status Date
Review Status Date
Review the Content Link above on the Status Date, including illustrations for five of the updating calculation selections.
When updating a project in Microsoft Project, the user can be distracted by the numerous places they have to navigate within the software to make changes to update calculations, apply status views and reports and access the various updating commands. To address this issue, we will create an Updating tab on the ribbon. Our objective is that by the end of this online activity, you will know how to update and have a valuable tool to continue learning about updating and reduce the endless clicks required to update a project.

Customize Ribbon Simulation Part 1 (20 minutes)
This simulation will review updating tasks to the Status Date, a key component to any defined reporting cycle. Before reviewing updating, we will start creating a custom Updating tab on the ribbon and learn the updating commands, features, and calculations along the way.

Download *.mpp file
To start this simulation, download the Update Calculation.mpp file by using the icon above and opening it in Microsoft Project. Rename the file to 13 - 2 Update Calculation.mpp. Make sure your global settings in Project Options are correct and that you are using Microsoft Project 2019, 2021, or Microsoft 365 updated, for best results.
First, create a new tab on the ribbon and name it Updating. You are going to create an Updating tab with updating commands, views and reports like in the figure below.

Figure 8. Customized Updating tab on the ribbon.

Figure 9. Customize the ribbon by adding tabs, groups and commands.
To create this Updating tab:
Project Options / Customize Ribbon
New Tab button
Rename button
Use the scroll buttons to place the tab where you want it on the ribbon
Then create five groups on the Updating tab; Status Date, Updating Tools, Updating Calculation Settings, Status Views, and Status Reports:
Use the New Group button
Rename each group
Use the scroll buttons to place where you want the groups in the tab
Add two commands; Status Date and Gridlines, to the Status Date group:
All Commands drop-down menu
Add the Status Date and Gridlines commands
Use the scroll buttons to position the commands
Once you begin adding commands to a Group, the Group appears on the ribbon.

Figure 10. Adding commands to Groups under a Ribbon Tab.
Add these commands to Updating Tools group:
Reschedule Work
Update Tasks
Update Project
Move Project
Move Task
0% Complete (the name is redundant, remove name)
25% Complete (remove name)
50% Complete (remove name)
75% Complete (remove name)
100% Complete (remove name)
Add these commands to the Calculation Setting group:
Options
Completed Parts to Status Date
Incomplete Parts to Status Date
Add this command to the Status Views group:
Gantt Chart (the first one listed)
Add these commands to the Status Reports group:
More Reports
In Progress
When you are done, your ribbon should look close to the one in the figure below. We will add more commands as we move along.

Figure 11. Custom tab on the ribbon.

Note: These changes to the ribbon are not associated with the project, rather they are permanent changes to the ribbon. This new tab can be removed and the Reset button will restore the original ribbon. This ribbon can also be exported as an *.exportedUI file and shared with another user, all they have to do is import the file.
The first command on the new Updating tab is the Status Date command. Use this command or the Project Information command to enter the Status Date. The Status Date is used for several update calculations, the update commands, and Earned Value Management analysis. When updating, setting the Status Date should be the first step. If no status date is entered (Status Date = NA), MS Project uses the current date for Earned Value analysis (Earned value management metrics are calculated against the Status Date).

Note: There is no feature in Microsoft Project to put the Status Date on a regular schedule, such as every Thursday at 5:00 PM.

Status Date Simulation (20 minutes)
Start this simulation by using the same file in the simulation above (13 - 2 Update Calculations.mpp).
Add two additional commands to the Updating tab on the ribbon:
Add Project Information to the Status Date group
Add Mark on Track to the Updating Tools group
Take a screen capture of the Updating tab and paste it into the notes field for the project summary task.

Figure 12. Added commands to the ribbon.
Project Example
When I worked for Symantec 32+ years ago, I was part of the product group that created the first project management software for the PC. The Project Start date was formatted in blue in that software, and the Status Date was formatted in Red. I have been using that same formatting ever since. The core project management functionality of Microsoft Project today is not that much different than that of some of the original project management software programs. Likely it won’t change much during the next decade, especially since Microsoft has moved to a subscription-based sales model and no longer is as motivated to persuade us to always upgrade with new features. What you learn now and the skills you develop will likely serve you well into the future.
We are going to update the first two tasks. Notice that the Current Date, representing today, is after the Status Date. When you have an established reporting cycle, that is typical because collecting actuals from the people doing the work usually takes some time. In this case, if we send out a report tomorrow, 1/18, to our client after we update the project today, we need to be clear that the status report is “as of” 1/13.
Project Example

It isn’t uncommon for defense contractors on huge projects to be reporting earned value with a status date a month or more ago. I was working with one group at Lockheed Martin that the status date was two months before the current date. I remember my contact telling me that it takes that long to collect the actuals.
Working with another group at Lockheed Martin, we focused on learning to position updated taskbars to the status date. Learning to do this correctly and quickly is an important skill set for any project manager that needs to communicate status, in part, with an updated Gantt Chart. At the time, progress on the summary level was abysmal and they really struggled with this, and they went to great lengths to address the issue by exporting to Excel, running additional calculations and importing the project. I wish I could have provided the following tip at that time.
Tip: This is a great bar styles tip. The Gantt Chart, out of the box, does not show progress for summary tasks. If you want the progress lines to be drawn right up to the status date on the summary level, use this formatting selection for summary tasks. Add a new row in Bar Styles, copy the Show for ... Tasks content for summary tasks and paste it into the new row. Select the shape, pattern, and color and then select Task Start in the From column and then Summary Progress in the To column.
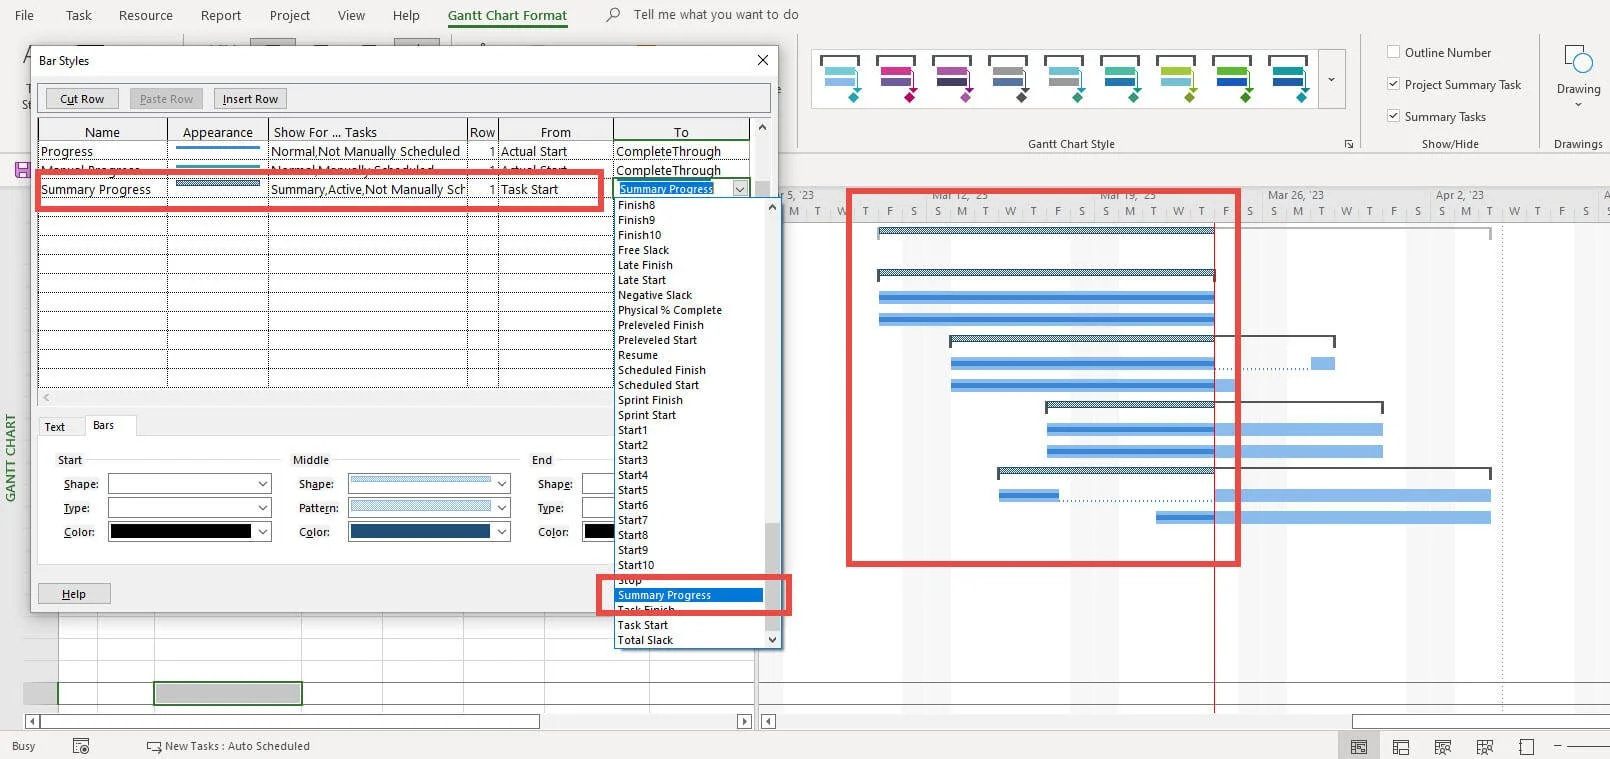
Figure 13. Showing summary task progress.
Open Project Information and note that the start of this project is 1/4/22. With Project Information open, add a Status Date of 1/13/22 and temporarily change the Current Date to 1/17/22. The change to the Current Date is temporary. When the project is opened again, the Current Date will reflect the system clock.
Using Gridlines, format the Project Start date solid blue and the Status Date solid red. The Current Date is a solid yellowish-brown, and the Project Finish date is solid black.

Figure 14. Formatted Start Date, Status Date, Current Date and Finish Date gridlines.
Select the first three tasks, and click the Mark on Track command. This command uses the status date for a reference point, not the baseline.
Task 1 was scheduled to be completed before the status date, so it is updated to 100%
Task 2 was scheduled to start, and it is updated to 60%, right up to the status date.
Task 3 is scheduled after the status data, and so it is not updated.
Notice the % Complete and the Actual Work and the Actual Cost are calculated.
Using the tip above on showing progress on the summary level, display progress for summary tasks.
Save the project.

Figure 15. Using the Mark on Track command to update task as currently scheduled “as of” the status date.
Simulation Results
This 13 - 2 Update Calculations.mpp file should have the following as shown in the following figure:
Updating tab shown below. If you are working with a coach or wish to earn a certificate of completion, take a screen capture of this Updating tab and paste in the Project Summary Task notes field.
The data should be the same in the yellow highlighted areas.
Progress on the summary taskbars.
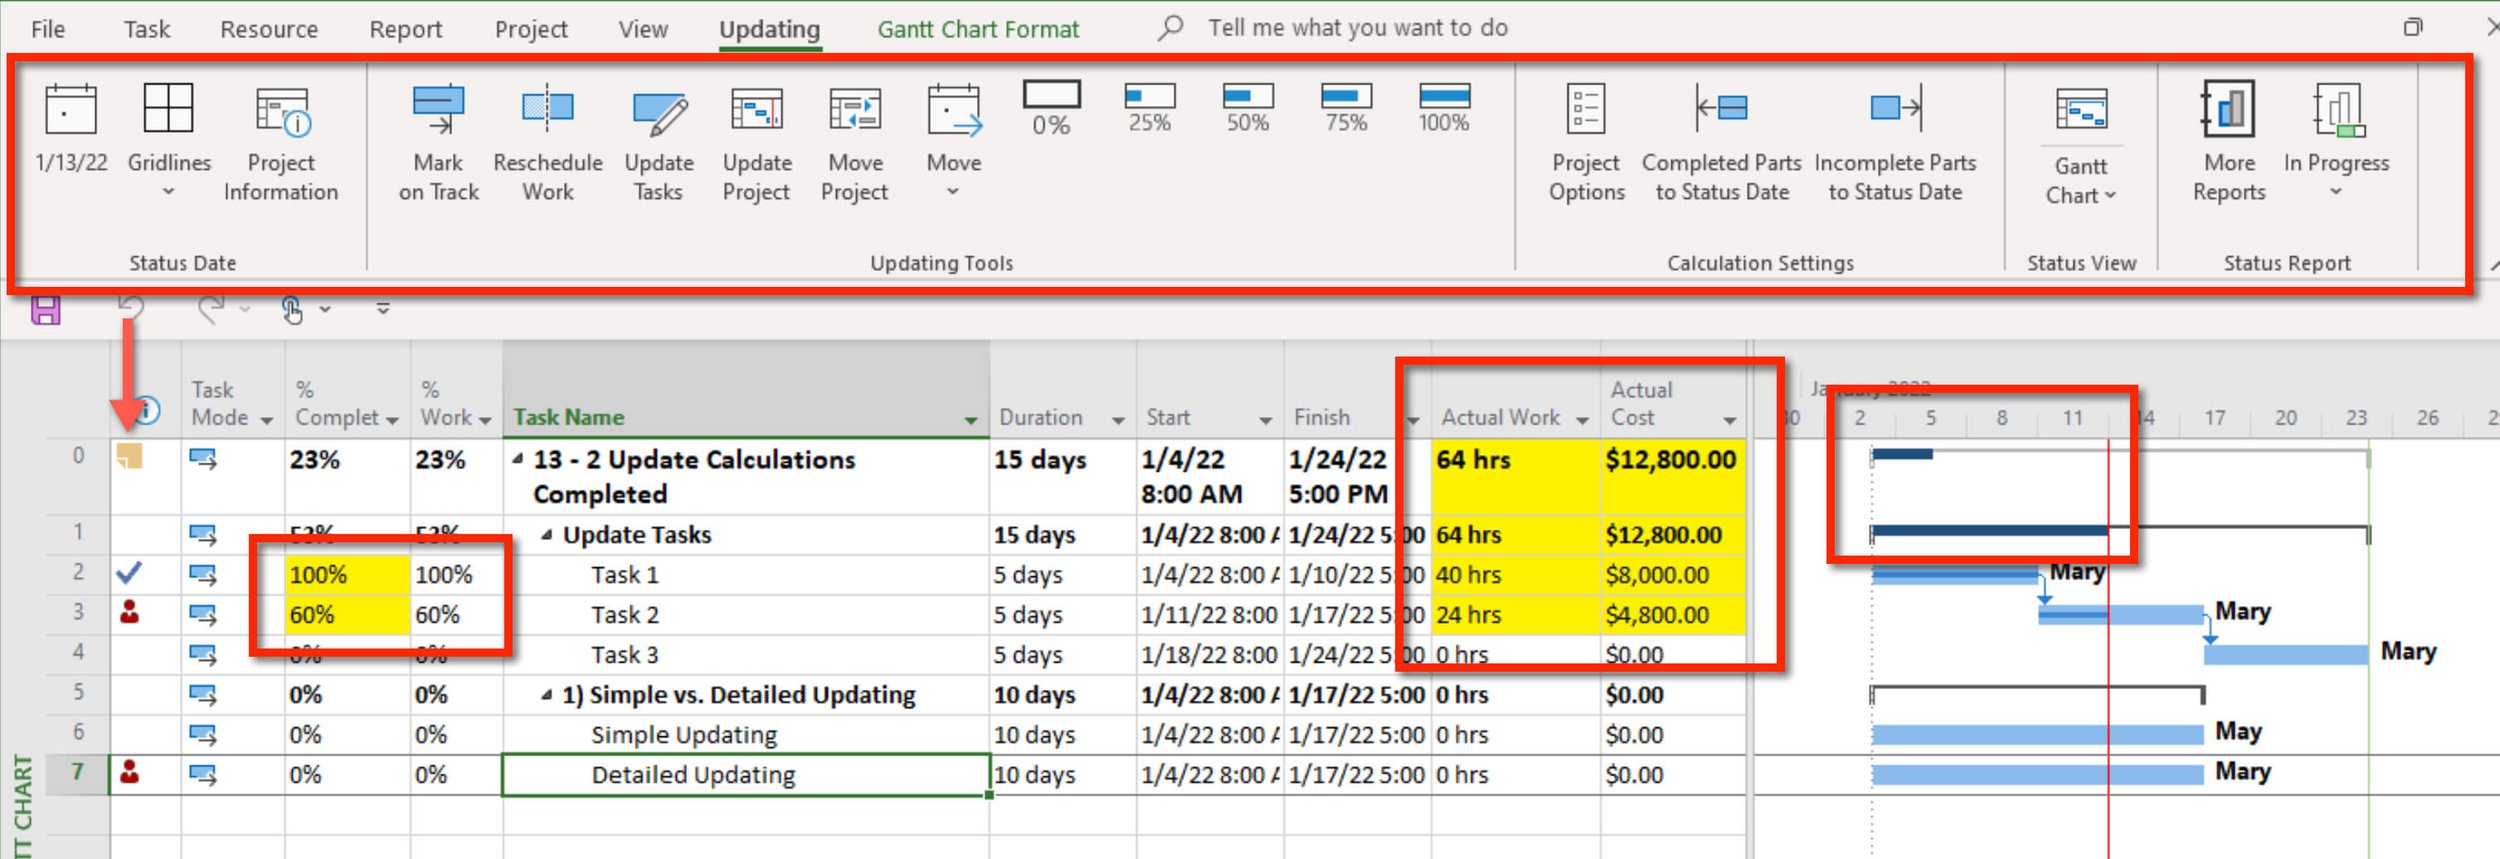
Figure 16. Updating tab, updated tasks and progress on summary taskbars.

Journal
Do you have a reporting cycle for the project you are working on? Imagine a world in which everyone in the organization knew the reporting cycle, or at least your group. A reporting cycle needs to be a group norm, a way of doing business that everyone understands. What is a Reporting Cycle?
What is the Status Date in Microsoft Project?
What are the characteristics of the Status Date?
How do you set a Status Date?
How do you format a Status Date?

If you are working with a coach, save and email them this file (13 - 2 Update Calculations.mpp should look like figure 16). If you are not working with a coach and you are planning to apply to either MS Master Class certificate, archive this completed simulation file so that you can submit it for review.

Return to the Master Class Book and review the next section.

Select Update Calculations
The updated calculation settings in Project Options, at the bottom of the Schedule page, will be simulated..
Updating Task status updates resource status (simple vs. detailed updating).
Actual costs are always calculated by Project (costs calculated by Project or entered by the user)
Edits to actual cost will be spread to the status date (not covered in this section)

Figure 17. Schedule calculation selection in Project Options.
The following sections will simulate the calculation selections on the Advanced page at the bottom.
Move end of completed parts after status date back to status date (If there is any portion of a completed task after the status date, that portion of the task will be moved in front of the status date).
And move start of remaining parts back to status date (If there is any portion of a task not completed well past the status date, that portion will be moved back directly to the right after the status date).
Move start of remaining parts before status date forward to status date (If there is an uncompleted portion of a task before the status date, that portion will be moved right after the status date)
And move end of completed parts forward to status date (The uncompleted portion of a task has been moved after the status date, and with the selection, the completed portion, which could be much earlier, is moved right before the status date).
Edits to total task % will be spread to the status date (not covered in this section)
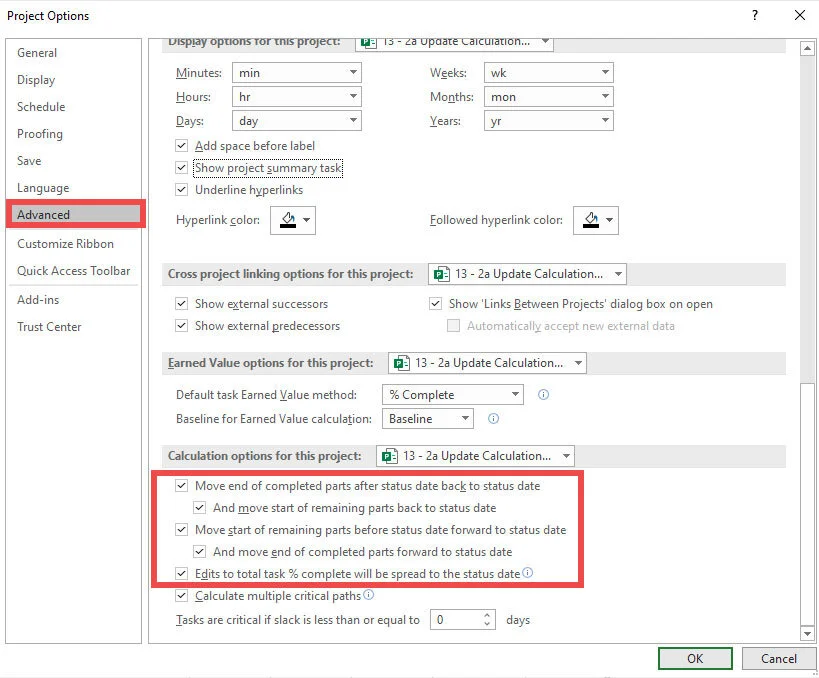
Figure 18. Advanced calculation selections in Project Options.

Note: As mentioned in the MS Project Master Book, making any of these calculation selections in Project Options does not recalculate the project. Rather, the next time a task is updated, the rule applies for that task and any following updates to other tasks.
In addition, it is common for a user to switch between a few of these selections depending on what tasks are being updated. This switching between choices is particularly the case for those selections on the Schedule page reviewed earlier. The choices on the Advanced page tend to be more static. If you happen to be one of those users who like to regularly pop into Project Options to make selections, this can become rather tiresome with all of the clicks. For instance, to go to the Advanced page and then down to the update calculation settings requires that you:
Move your cursor up to File
Click File
Move down to Options
Click Options
Move down to the Advanced page
Click Advanced
Scroll down once or twice, depending on your display.
You can shorten this up by clicking on the Options command that we added to the Updating tab.
The project file you just opened also includes two macros that will shortcut these clicks, taking you right to the calculation choices on the Schedule page and those on the Advanced page.

Customize Ribbon Simulation Part II (30 minutes)

Download *.mpp file
To start this simulation, download the Update Calculations in Advanced Options.mpp file by using the icon above and opening it in Microsoft Project. Rename the file to 13 - 3 Update Calculations in Advanced Options.mpp. Make sure your global settings in Project Options are correct and that you are using Microsoft Project 2019, 2021, or Microsoft 365 updated, for best results.
When you open the file, enable macros if asked.
This project file has macros, and we will add these two macros to the Updating tab on the ribbon so that they can be easily run during updating. These macros will remove the need to constantly navigate to the calculation settings in Options. Over and over again.
To do this simple customization:
Add these two modules (macros) to the Global.mpt file using the Organizer. Moving the macros to the Global.mpt file ensures that the macros can be run for any project without this file being open.
AdvancedPage
SchedulePage
Delete the two modules from the project file so that we can avoid confusion.
If you don’t move these macros to the Global.MPT file, they will not run when placed on the ribbon unless the file is open. Placing them into the Global ensures they will always run with any open project.
Rename the Calculation Setting Group to Update Calculations. Then add each of these macros to the Update Calculations group under the Updating tab on the ribbon shown in the figure below.
Customize the ribbon.
Select Macros in the Choose command from the dropdown menu.
Add each macro to the Updating Calculation Settings group under the Updating tab.
Rename each macro to Schedule Calculation and Advanced Calculation and select the first symbol on the second row for each macro, as shown below.

Figure 19. Copying modules (macros) to the Global.mpt file in the Organizer.
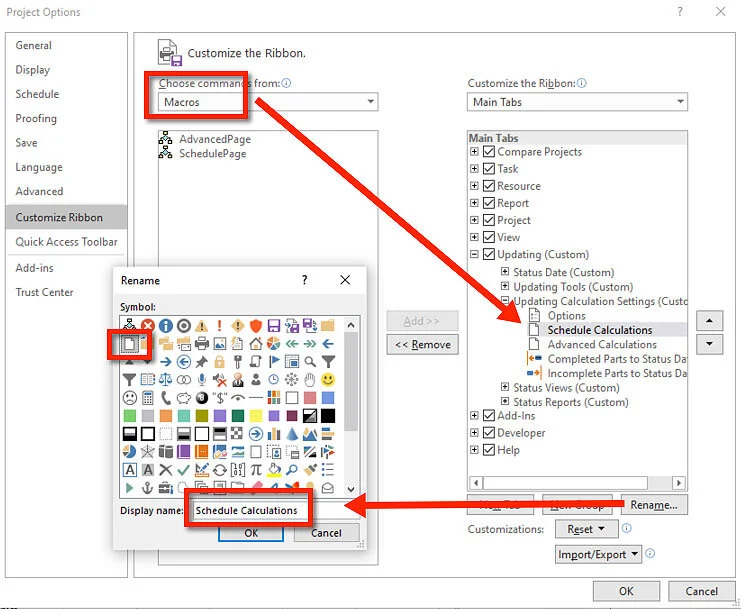
Figure 20. Customizing ribbon with macros.
When finished, test each macro command on the ribbon. The Schedule Calculations command should take you to the Schedule page and that area of Project Options, and the Advance Calculations command you take you to the Advanced page and that area of Project Options.

Figure 21. Macro commands on the ribbon.

Note: If macros do not work, select “Disable all macros with notification” in Project Options / Trust Center / Trust Center Settings, close the project and then open, enable macros if asked, and try each one again.

Figure 22. Schedule and Advanced pages in Project Options.
The macros placed on the ribbon are “send keys” or keystrokes and can be viewed by pressing Alt+F11 to open the Visual Basic for Application Editor. The command to open the VBA Editor can also be found at the end of the View tab and on the Developer tab. With the editor open, look for the modules under the Global.mpt file and double-click on them.
You could use the same keystrokes the macros use by typing in the keys to reaching the same location in the Advanced Page as one of the macos does. Try it out by typing:
Alt (or the option key if using a Mac keyboard), f, t, a, tab, c, c
Alt is an excellent keystroke to remember if your mouse battery dies just before heading out the door and you want to save your project.
Save the project.

Update Calculation Selections Simulation (35 minutes)
To start this simulation, open the 13 - 3 Update Calculations in Advanced Options.mpp file used in the previous simulation.
Simple vs. Detailed Updating
Simple Updating vs. Detailed Updating is an updating preference. “Simple” simply means that updating one aspect of a task updates another. There is no best practice; the decision is based on how you want to do updating.
Select the Schedule Calculation command on the ribbon and then:
Check Updating Task status updates resource status for simple updating and then click OK.
In the % Complete field for #6 Simple Updating task, enter 80%. Note the % Work Complete field is updated along with the Actual work on the task.
Uncheck the Updating Task status updates resource status for detailed updating.
Enter 80% in the % Complete field for the #7 Detailed Updating task.
Notice these updates:
Both tasks are updated to the status date in the taskbar pane of the Gantt Chart.
The Simple Updating task is 80% of its duration completed and 80% of the work, or 64 hours of Actual Work.
The Detailed Updating task has completed 80% of its duration and 0% of the work. That work information must be entered separately when using Detailed Updating.
Both tasks have Actual Start dates.

Figure 23. Illustration of simple vs. detailed updating.
Actual costs are always calculated by Project vs. entering Actual Costs manually
Another choice in the Schedule page related to updating is related to calculating costs when progress is updated on a task by entering % complete or % work complete. The choice is to have Project calculate Actual cost, or to do it yourself.
Select the Schedule Calculation command, then:
Check the Updating Task status updates resource status for simple updating.
Check Actual costs are always calculated by Project.
Enter 80% Complete for #9 Project Calculates and Actual Cost are calculated.
Next
Uncheck the Actual costs are always calculated by Project and make sure Edits to total actual cost will be spread to the status date is not checked.
Enter 80% in the % Complete field for the #10 Actual Costs Entered task.
Notice that Actual Cost are calculated for #9 because Project is calculating total costs, but that Actual Costs will have to be entered manually for #10. Those costs have to be entered vs. calculated.

Figure 24. Actual costs are always calculated by Project vs. entering Actual Costs manually.

“A task with a history”
Update Calculation Selections in the Advanced Page of Project Options
Warning: These calculation settings may not always work as advertised. With the update calculations in the Schedule page, and the many other calculations in Microsoft Project, it is possible to abruptly switch the way things are calculated and then switch back and forth with no apparent adverse consequences. The update calculations selections in the Advanced page are not as trouble-free.
The purpose of these selections is to help position taskbars as perfectly as possible to the status date. However, changing the calculation selections back and forth to get the desired result, or when learning this feature and making a lot of changes, can result in some calculations not working at all. If you find tasks not calculating, the only remedy is updating the taskbar manually or deleting the task and starting over. If you delete a task and start over, remember to reset the baseline for that task.
My only explanation for this frustrating behavior is that Microsoft Project records and stores information or history about a task. In this context, after some time, or several changes, the task cannot respond to new data from these update calculations. At times, much like an unforgiving friend or partner in life, there doesn’t seem to be a way to start over fresh with a task in Project. The task has a history, and one or more calculation selections will no longer work.
A task with history is an important lesson to learn about Microsoft Project. Unlike spreadsheet data that responds only to a calculation, there is a lot of information that Project remembers about tasks that the user can not easily observe, see, or clear.
For instance, as illustrated below, if you have two tasks, A and B, that are at the same level and A is 5 days in duration and B is 20 days, and you indent B under A, A becomes a summary task and A’s duration changes to 20 days as it should. Outdent B and A changes back to a detail task with 5 days duration. How does Project know to change task duration back to 5 days? That 5 day duration had been saved someplace inaccessible to the user, and there is no way to clear this memory of the recent duration history. The same is the case for resource assignments on tasks that are unknown to most users and hardly detectable; the first time resources are assigned, a calculation is applied. Then, a slightly different calculation is used from that point forward. Once a resource has been assigned to a task, that task changes forever. Even if all resource assignments have been removed from the task, there is no way to bring that task back to its original clear state.
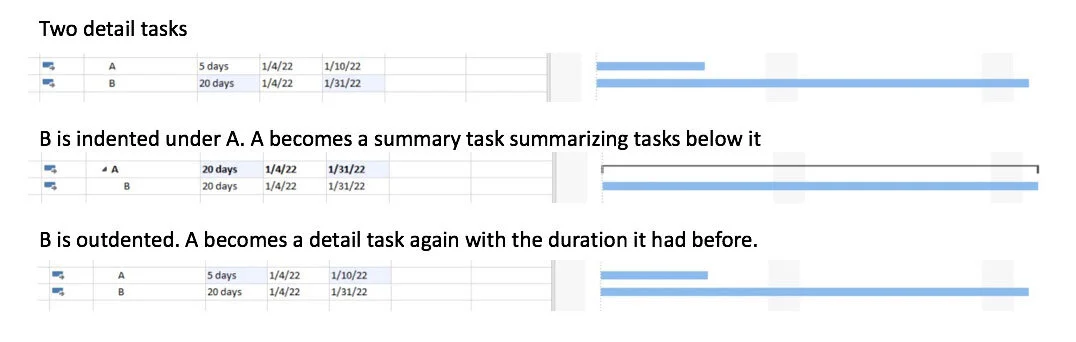
Figure 25. Example of information about tasks that Project remembers.

Best Practice
Always check your update calculation selections in Project Options before updating.
Regard the update calculation selections in the Project Options Advanced page as more static than those on the Schedule page. Make selections before updating a task, and then stick with those selections. If the task is not calculating correctly based on a selection, update the task manually, such as clicking and dragging a taskbar. One unattractive option is to delete the task and start over. This solution to a poorly behaving task is used more than most of us want to admit.
Selection: Move end of completed parts after status date back to status date
What do you do if you update a task and the taskbar for that task shows progress past the status date? The work was completed in the past and should be before the status date. Anything after the status date is technically in the future.

Click the Schedule Calculations command, check simple updating, have Project calculate costs, and leave Simple Updating selected.
Then:
Click the Advanced Calculations command on the ribbon and make sure that none of the selections are checked as shown to the left, and then click Ok.
Make Task 4, 75% complete by clicking on the 75% command and notice that the progress bar extends past the status date.
Click the Advanced Calculations command and check Move end of completed parts after status date back to status date.
Make Task 5, 75% Complete by clicking on the 75% command and notice that the task has been split and progress has been moved back to the status date as shown in the figure below.
Save the project.
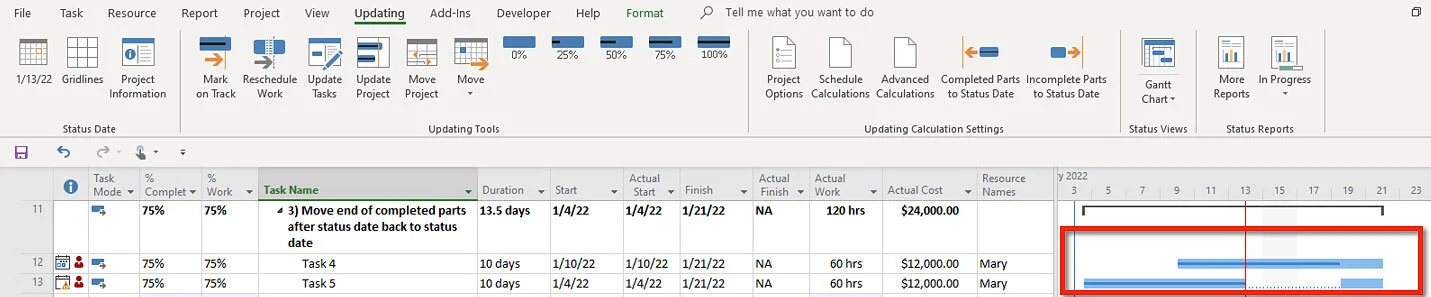
Figure 26. Move end of completed parts after status date back to status date.
Selections: Move end of completed parts after status date back to status date, And move start of remaining parts back to status date
Next, let’s say you want to remove the split and have the remaining portion or parts of the task past the status brought back to the status date. Do the following:
Select Task 6 and mark the task 75% complete by clicking on the 75% command and notice that the progress bar extends past the status date just like it did with Task 5.
Click the Advanced Calculations command and check Move end of completed parts after status date back to status date and check And move start of remaining parts back to status date.
Make Task 7 75% complete by clicking on the 75% command and notice that there is no split, progress has been moved back to the status date, and the remaining part has been moved back to the status date. See the figure below.
Save the project.
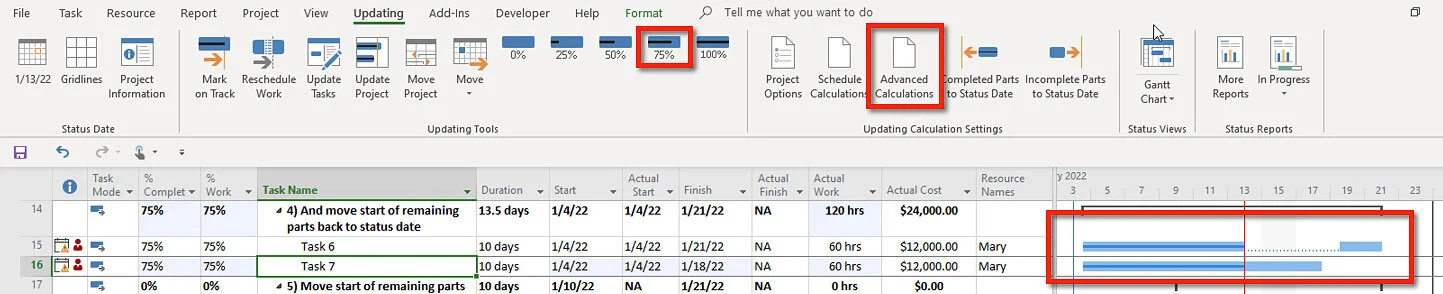
Figure 27. And move start of remaining parts back to the status date.
Selection: Move start of remaining parts before status date forward to status date
Next, let’s say there is a task that is not on schedule, and there are unfinished parts of the task before the status date, and you want to move those parts to the status date. Do the following:
Select Task 8 and make the task 25% complete by clicking on the 25% command. Notice that the progress bar is well before the status date.
Click the Advanced Calculations command and check Move start of remaining parts before status date forward to status date.
Make Task 9, 25% Complete by clicking on the 25% command. Notice the task is split, and the remaining parts have been moved to the status date.
Save the project.
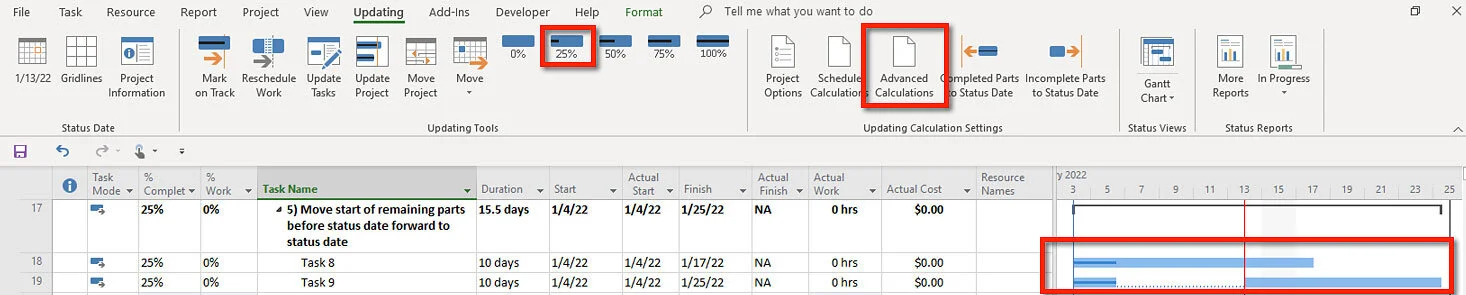
Figure 28. Move start of remaining parts before status date forward to status date calculation setting.
Selections: Move start of remaining parts before status date forward to status date, And move end of completed parts forward to status date
Next, let’s say there is a task that is not on schedule, and there are unfinished parts of the task before the status date, and you want to move those parts to the status date, and you do not want the task to be split, but instead, you want the completed portions of the task to move forward to the status date. To accomplish this, complete the following steps:
Select Task 10 (ID 21) and make the task 25% complete by clicking on the 25% command and notice that the progress bar is well before the status date and just like with Task 9, the remaining parts have been moved forward to the status date.
Click the Advanced Calculations command and check Move start of remaining parts before status date forward to status date and check And move end of completed parts forward to status date.
Make Task 11, 25% complete by clicking on the 25% command and notice that the task does not split, the remaining parts of the task have been moved to the status date, and the completed portion of the task has been forward to the status date as seen in the next figure.
Save the project.

Figure 29. Move start of remaining parts before status date forward to status date, And move end of completed parts forward to status date
In Microsoft Project, two additional commands that perform two of these calculations we have just reviewed can be used at any time, even after updating. These commands force parts of a task to be moved to the status date. Shown in the figure below, those commands are:
Completed Parts to Status Date
Incomplete Parts to Status Date
To illustrate, make these selections:
Task 12 is 75% complete, and progress on the task extends beyond the status date. Select the task and click on the Completed Parts to Status Date command, and the completed parts are moved. Project did not do this perfectly on my device and changed the task to 56% complete. I just changed it back to 75% complete. Not a big deal that it didn’t work perfectly as long as there is an easy fix. I quickly got the effect I wanted.
Task 13 is 25% complete, and there is a remaining portion of the task that is before the status date. Select the task and click on the Incomplete Parts to Status Date command, and the remaining parts are moved to the status date. Again, Project did not perform this task perfectly on my device and changed the task to 16% complete. I changed it back to 25% complete.
Save the project.
Simulation results
With 13 - 3 Update Calculations in Advanced Options.mpp open, take a screen capture of the Updating tab, and paste in the notes for row zero. All of the taskbars should be the same as those displayed in Figures 23 - 24, 26 - 30.
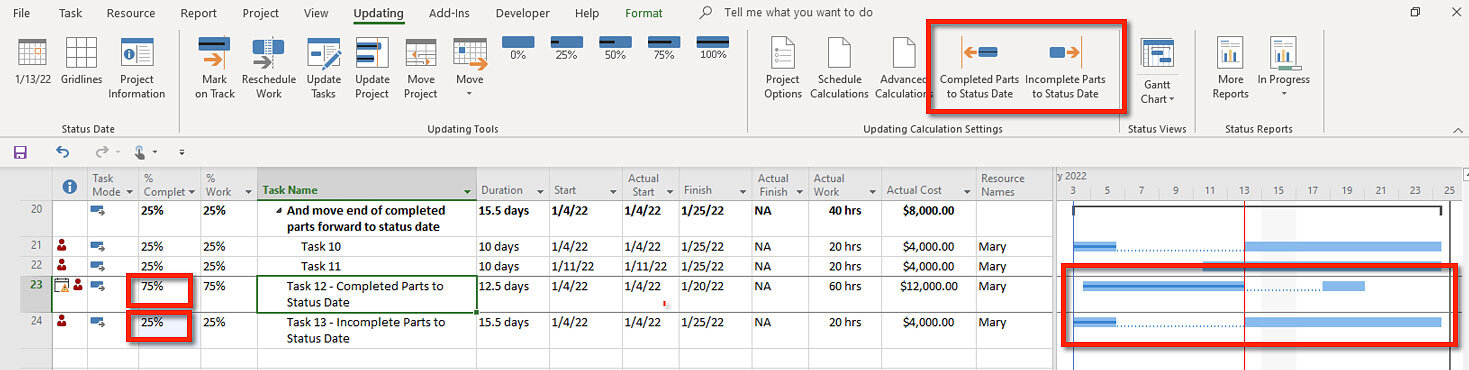
Figure 20. Complete Parts to Status Date and Incomplete Parts to Status Date commands.

Journal
Often when I am searching for something related to Microsoft Project in my browser, I see Google Ads that often read “Tired of Microsoft Project? Switch to….”
Do you think it is essential to draw the taskbars correctly? Is that important to you and your sponsor or customer? Is it worth the learning?
I am happy with Smartsheet. I use Smartsheet with a customer who scores low in project management maturity. There is no way in 100 years I could get this customer to the point of using Microsoft Project; in fact, I think it might be detrimental. But I am not sure I would argue that Smartsheet is much of a project management tool. There is no estimating model, limited resource management, and little flexibility or analysis. It seems that it is more of a task management collaborative system, and it does that well. I guess it is apples vs. oranges. Indeed, Smartsheet and many other web-based tools on the market are easy to learn. Often, when it is easy, the features are basic.
Seven updating calculation settings are reviewed in this section.
Can you describe Simple vs. Detailed Updating?
Can you describe the difference between Actual Costs Calculated vs. Manual Entry of Actual Costs?
If the completed portion of a task extends out beyond the status date, what calculation can you select to correct this?
f the calculation splits the task and you want to bring the uncompleted portion of the task back to the status date, what calculation can you select to correct this?
If a portion of a task is uncompleted and before the status date and you want to move the uncompleted part after the status date, what calculation can you select to correct this?
If this calculation splits the task and brings the completed portion of the task to the status date, what calculation can you select to correct this?
If you want the % Complete of a task to be spread to the status date on the summary level in a Usage type of view, what calculation can you select to do this?

If you are working with a coach, save and email them this file (13 - 3 Update Calculations in Advanced Options.mpp, all of the taskbars should be the same as those displayed in Figures 23 - 24, 26 - 30). If you are not working with a coach and you are planning to apply to either MS Master Class certificate, archive this completed simulation file so that you can submit it for review

Return to the Master Class Book and review the next section.

Update and Analyze Status
Review
Review the Content Links above on Updating Commands and Tips and Earned Value Management [jump to]
Experience in Microsoft Project
In this update section we are going to be entering actuals and then reviewing the results. The reports and and views that provide the analysis have already been created and are in the file you just downloaded. We are going to automate the use of these views and reports by adding them to the Update tab on the ribbon.
But, before we do this, let’s review some of the updating commands in Microsoft Project.

Updating Commands Simulation (20 minutes)

Download *.mpp file
To start this simulation, download the Update Commands.mpp file by using the icon above and opening it in Microsoft Project. Rename the file to 13 - 4 Update Commands.mpp. Make sure your global settings in Project Options are correct and that you are using Microsoft Project 2019, 2021, or Microsoft 365 updated, for best results.
Enable macros if asked.
Notice that the status date is 1/27/22.
These updating commands have already been reviewed or used:
0% Complete
25% Complete
50% Complete
75% Complete
100% Complete
Mark on Track
Update Tasks command
The figure below shows that the Update Tasks command opens a dialog box for entering basic information updating a selected task. The Notes button provides quick access to view or enter notes on the task. In this simulation file, baseline bars are in yellow on row 2 in the taskbar part of the Gantt Chart view. In the figure below, Task 1 is 100% Complete. The actual duration was 4 days, one day shorter than the baseline duration.
Use this command to update Task 1 as shown below by entering an Actual Duration of 4d. Make sure, Remaining Duration is zero.
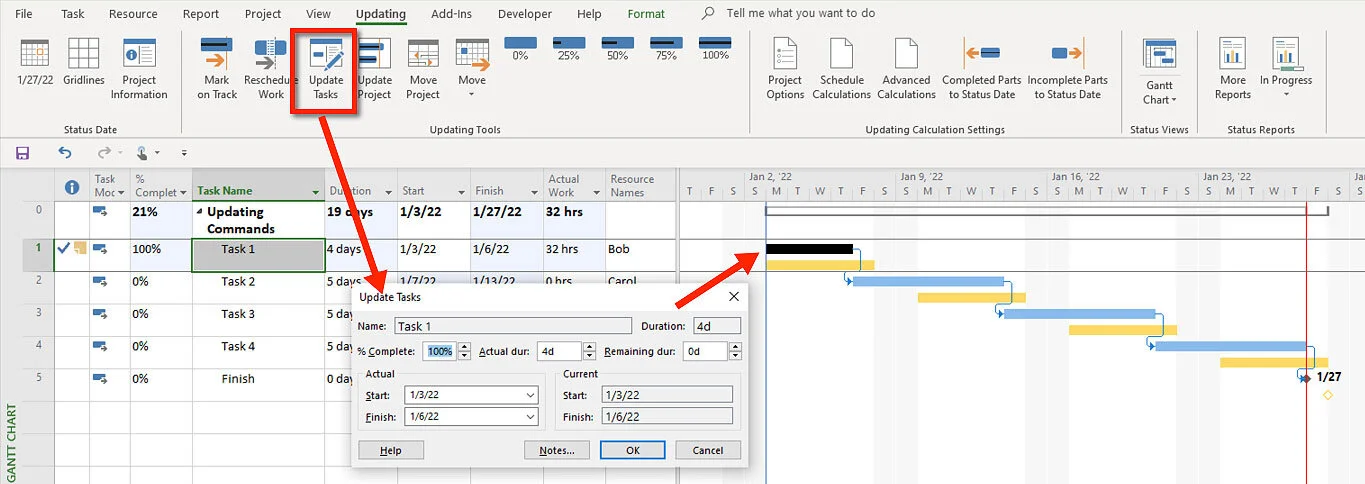
Figure 18. Update Tasks command.
Update Project command
Select Task 2 and Task 3 and click the Update Project command.
Select the Selected tasks radio button to update just those two tasks.
Update through the status date, 1/27/22. Updating through another date selected in this dialog box does not change the status date.
Select the Set 0% - 100% complete radio button that will update the selected tasks as scheduled. For example, if the duration of the task is half before and half after the status date the % complete will be 50%. If the other option (either 0% or 100%) is selected the task would be marked as 0% complete because it isn’t finished. The idea of finished or not finished updating is common when payment for completed tasks is contractually based on them being 100% complete. There is also a law in project management that goes something like this: “most tasks rapidly progress to 97% complete and then remain that way forever.” Some organizations require 0% or 100% updating. This updating idea is common for many government projects. Many federal goverment reporting agencies are only interested if a task is finished or not finished.
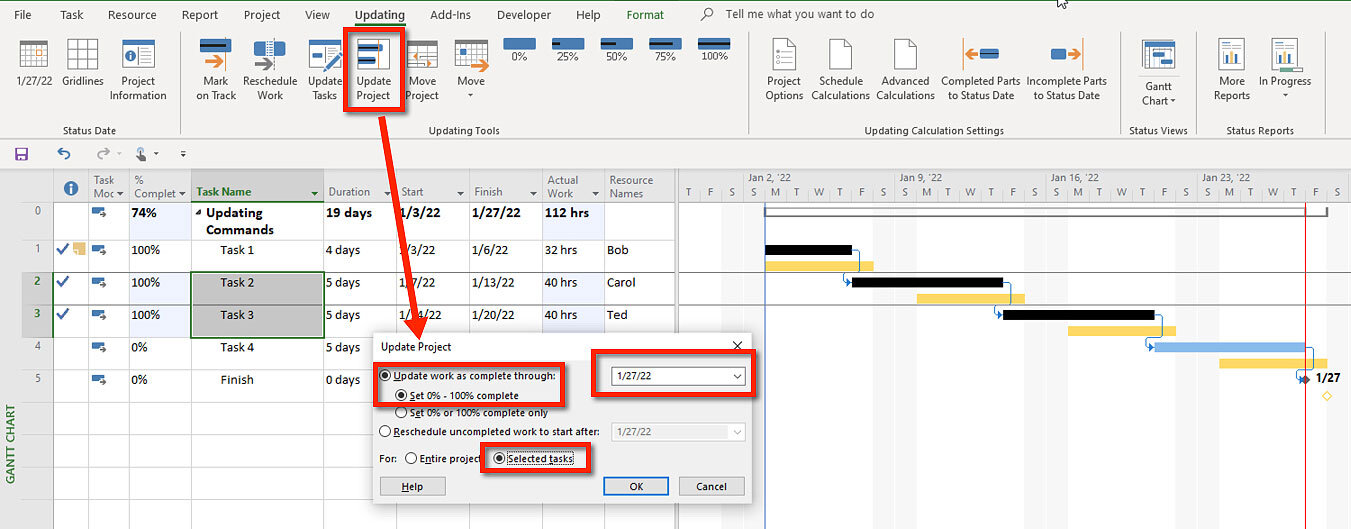
Figure 19. Update Project command.
Move Project command
This is a rarely used command because it is infrequently required. But if needed, it is invaluable. Occasionally a project will start, progress for a while and for a variety of reasons, the project is put on hold. Perhaps those involved realized they were not really ready to start project. Or there was a major disruption in the organization. Congress changed their mind. There was An Act of God.
Project Example
As a company, we were working on several local Project Server deployments. Locally, we had four near-miss hurricanes one season in Florida.
A common practice for businesses in high-rise buildings when the various models indicate that a hurricane is heading their way is to move everything along the windows to the center of the floor. This activity isn’t as consuming as an office move, but it is a lot more work than expected and a significant disruption to the business. These companies spent almost the entire summer moving, and the deployments we were working on started and stopped four times. Four times we moved the projects in Microsoft Project and reset the baselines.
Click on the Move Project command and move the project one month ahead. Set the move date to 2/3/22. Expect the following message to appear. Select Yes.

Then, unexpectedly, another dialog box opens asking you if you want to select the Project Start date. Select 2/3/22.

Figure 20. Move Project command.
New Baseline and Status Date
The project has been moved so it is necessary to save a new baseline. Reset the baseline (save a new baseline)
Change the Status Date to 2/24/22.
Reschedule Work command
Mark Task 4 as 50% complete. Notice the task is not completed to the status date.
Click the Reschedule Work command to reschedule the uncompleted part of the task to the status date.
Save the project.
Simulation Results
The file 13 - 4 Update Commands.mpp, should look like the screen in the next figure. The project starts on 3/1/22 and Task 4 is split around the status date.

Figure 21. Reschedule Work command.

Customize Ribbon Simulation Part III (30 minutes)

Download *mpp file
To start this simulation, download the Actuals and Status.mpp file by using the icon above and opening it in Microsoft Project. Rename the file to 13 - 5 Actuals and Status.mpp. Make sure your global settings in Project Options are correct and that you are using Microsoft Project 2019, 2021, or Microsoft 365 updated, for best results.
Before entering actuals in this last section and analyzing status, we will finish the custom Updating tab on the ribbon and include a command that will open a view for updating we will call Updating Actuals. In addition, we will add commands to open nine other custom status views and reports, as shown in the figure below.
The file you just opened has all of these custom elements already created; we need to place them on the Updating tab.

Figure 22. Custom Updating tab on the ribbon.
First, customize the ribbon by customizing existing groups and adding the custom groups, shown in the figure below, to the Updating tab.

Figure 23. Adding custom groups in Customize Ribbon.
Second, we need to economize space, so let’s clear commands we are not likely to use frequently. For now, clear (remove) the Move Project command from the Updating Tools group and empty (remove) any commands that are in these three groups:
Task Status
Resource Status
Status Reports
Third, use the Organizer to move these custom elements to the Global.mpt file. All of the custom elements, except the one Module (Macro file) are labeled with the word Bridge so that you know they are custom and from us. Move these 17 elements:
(Note, if you have been using Process Bridge, there is no reason to replace the ones you already have.)
Views
Bridge Resource Sheet
Bridge Task Details Form
Bridge Update Actuals
Bridge Updating Gantt Chart
Task Tables
Bridge Earned Value
Bridge Earn Value (Cost)
Bridge Earned Value (Schedule)
Bridge Project Cost Variance
Bridge Project Timing Variance
Bridge Project Variance
Bridge Project Work Variance
Bridge Updating
Resource Tables
Bridge Resource Cost Status
Bridge Resource Earned Value
Bridge Resource Work Status
Modules - Status Macros (Delete the Status Macros from the file after you copy it to the Global.mpt) Remember: If you don’t move these macros to the Global.MPT file, they will not run when placed on the ribbon unless the file is open. Placing them into the Global ensures they will always run with any open project.
Reports
Bridge Cost Overview
Bridge Project Overview
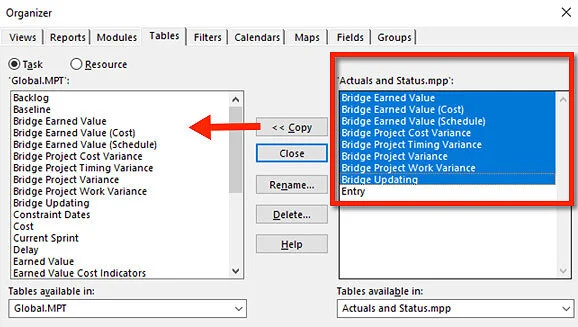
Figure 24. Using the Organizer to Copy custom Task Table to the Global.mpt file.

Note: Remember, Microsoft Project saves changes to the Global.mpt file when you exit Microsoft Project. However, you can save changes to the Global.mpt file by opening the Visual Basic Editor. To do that, press Alt+F11 or by clicking on the View tab / Macros / Visual Basic command. To save changes to the Global.mpt, make sure the Project Explorer is open, View / Project Explorer, and then select the file and click the save button.
While we are in the VBA Editor, let’s look at the StatusMacros module. Double click on the module and it opens the module to see the code. Notice that it contains 11 very simple macros that we are going to place on the Updating tab to open our updating and status views and reports.

Figure 25. VBA Editor show a custom module.
Fourth, add each of the macros in the figure above to the Updating tab on the ribbon. Do this by:
Customizing the ribbon.
Select Macros in the Choose commands from the drop-down menu.
Add these macros to the Status Reports group.
Report_CostOverview (Rename to Cost Overview and use whatever symbol you want to represent the command).
Report_ProjectOverview (Rename to Project Overview and use whatever symbol you want to represent the command).

Note: One of the limitations in customizing the ribbon is not being able to edit symbols or add new ones.
Add these macros to the Task Status Views group and arrange them in this order.
View_ProjectActuals (Rename to Updating Actuals and use whatever symbol you want to represent the command).
View_ProjectVariance (Rename to Project Variance and use whatever symbol you want to represent the command).
View_ProjectTimingVariance (Rename to Timing Variance and use whatever symbol you want to represent the command).
View_ProjectWorkVariance (Rename to Work Variance and use whatever symbol you want to represent the command).
View_ProjectCostVariance (Rename to Cost Variance and use whatever symbol you want to represent the command).
View_ProjectEarnedValue (Rename to Earned Value and use whatever symbol you want to represent the command).
Add these macros to the Resource Status View group and arrange them in this order.
View_ResourceWorKVariance (Rename to Work Variance and use whatever symbol you want to represent the command).
View_ResourceCostVariance (Rename to Cost Variance and use whatever symbol you want to represent the command).
View_ResourceEVA (Rename to Earned Value and use whatever symbol you want to represent the command).
When you are finished, all of these macros should be listed in the group like those in the following figure.
Click Ok and save the project.
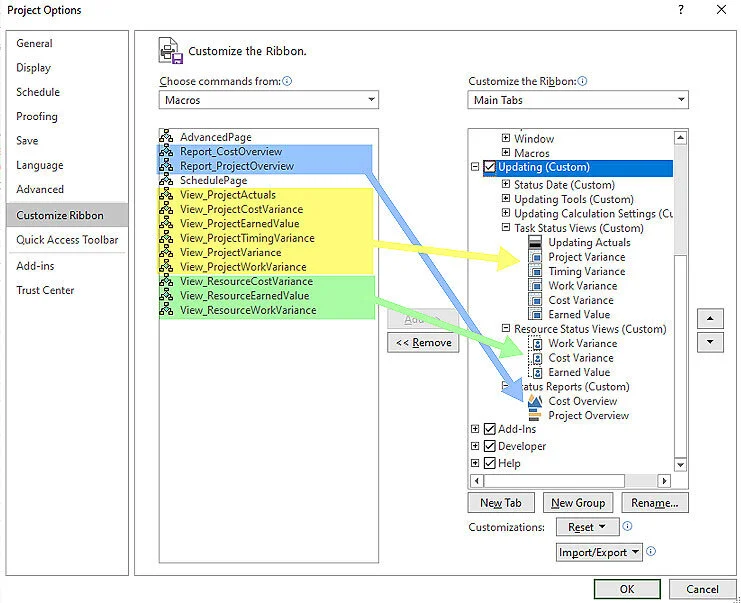
Figure 26. Adding macros to custom groups on the ribbon.
The last step is to test each of the commands. The best way to do that is to close project, open a different project and test each of these commands in these three groups on the ribbon:
Task Status Views group.
Resource Status Views group.
Status Reports group.
Export the ribbon to save a backup of the custom ribbon. Name the file Updating.exportedUI. To export the ribbon, select the Import/Export button in the Customize Ribbon dialog box, and then select Export all customization. See Figure 38 if needed.
Simulation Results
The custom Updating tab looks like the one in the next figure. All commands work.

Figure 27. Custom tab on the ribbon with custom groups and commands.

Enter Actuals and Analyze Status (40 minutes)

Download *.mpp file
After finishing the last simulation, open the 13 - 5 Actuals and Status.mpp file if you are starting up again. Ensure your global settings in Project Options are correct and that you are using Microsoft Project 2019, 2021, or Microsoft 365 updated for best results.
We are going to update this project. As we do, remember the story, there is always a story behind a status report. When you are telling the story in a status meeting or with stakeholders, Microsoft Project is a great tool to use as the visual aid technology for your story. That is one of the reasons we added the status views and reports to the ribbon; we need quick access and ease of use during a presentation.
Do people really believe the PowerPoint presentation of project status? Doubtful. But what is powerful is to present status with the actual project. People in the audience ask questions, and you answer the questions by quickly getting to the real data.
Project Example

At Johnson & Johnson, in new product development for one device maker, they built project team rooms and had deployed rules related to planning and reporting on projects. One rule related to reporting was that teams had to report and answer questions with live data to management in a team room using Microsoft Project. They also have to answer questions by using the project's current or live data.
To help the project managers do this quickly and effectively, without doing a lot of hunting and pecking, we created toolbars filled with commands, much like the Updating tab on the ribbon that you just finished. This allowed the project managers to navigate Microsoft Project more efficiently and quickly during a live status presentation. For a project manager that could stand in front of management and the team and answer questions quickly from the real data, perceptions of their credibility skyrocketed.
In this simulation make sure Simple Updating is selected and that MS Project calculates actual costs.
To start entering actuals or what happened to the project up to the status date, click the Updating Actuals command. Updating on the ribbon / Task Status Views group / Updating Actuals command.
This command opens a split window with a view on the top and bottom. In the Gantt Chart view on the top, the main “actual” fields are visible.
In the bottom view, the Work theme has been applied to the form view, where Actual Work and Remaining Work can be entered. The Current, Baseline, and Actual Start and Finish dates are also visible in the form view.
The taskbars are the standard Microsoft Project format with a few adjustments. The taskbars are taller, and the taskbars roll up on the summary level using the Layout command under the Gantt Chart Format tab. The text has been removed from conditional formatting, and the baseline is formatted in a yellow-orange color.
The status date is 2/4/22.
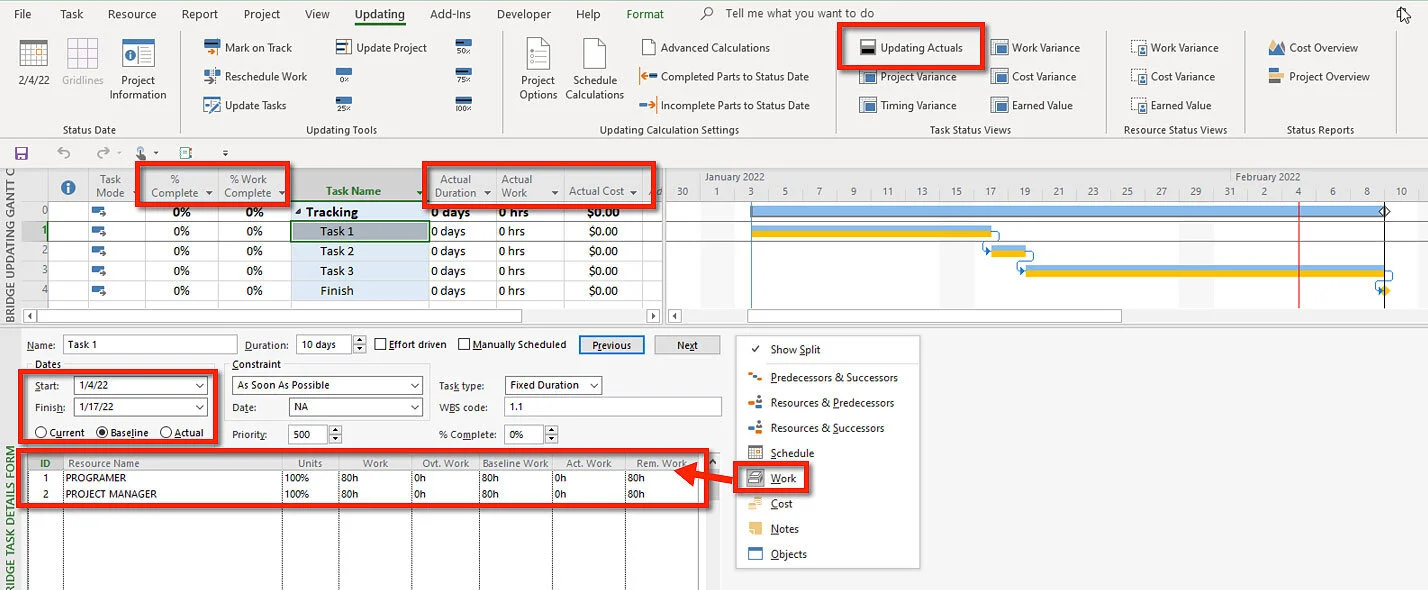
Figure 28. Updating view in Microsoft Project. A split window with a Gantt Chart on top and a Task Details Form below.
Update Task 1. Let’s say the task started on time, but it took a day longer. There were some serious technical issues. The team, mainly the Programmer, really kicked it in, working through the weekend to complete the task in a reasonable time frame. Enter these actuals:
In the top view, enter 11 days in the Actual Duration field. Note these changes:
The task is marked as finished with a checkmark in the indicators field.
The task is 100% complete and 100% work complete.
The Actual Work hours and Actual Cost have been added.
The taskbars show progress, and that progress is rolled up to the summary.
The project has slipped by one day.
In the bottom view, the duration has changed to 11 days. Remember, current and actual are always the same when a task is completed.
There are now actual start and finish dates.
The two resources worked 16 hours more than planned because they were assigned at 100%, and the task took one day longer.
The resources have no remaining work because the task is completed.

Figure 29. Updating in Microsoft Project.
Let's say, though, the Programmer reported that they worked 120 hours and the Project Manager worked 95 hours. In the Actual Work field in the bottom view, enter that information and click OK in the form when finished to calculate.
If you have the latest update of Microsoft Project, Project won't let you without changing the task's duration. It breaks the rules and changes the duration of a Fixed Duration, not Effort Driven task, and a task with an actual duration and an actual finish date! This type of behavior is common in Microsoft Project, so you have to learn how to update in a way that is acceptable to Project.
Do this update this way:
Mark the task as 0% complete and change the duration back to 10 days to start over.
Change the duration in the bottom view to 11 days.
In the Actual Work fields in the bottom view, enter 120 hours for the Programmer and 95 hours for the Project Manager.
Click OK, and the task has been updated and completed, and we got the result we wanted.
Save the project.

Tip: There are multiple ways and places to enter actuals. For example, you could enter Actual Work, update the Work field, and then mark the task completed, and the Actual Work field will be populated. Or, if you are using Simple Updating, you could enter Actual Work and Remaining Work for a resource assigned to a task, which would update Actual Work and % Complete on the task. Find the ways and places that work for you.
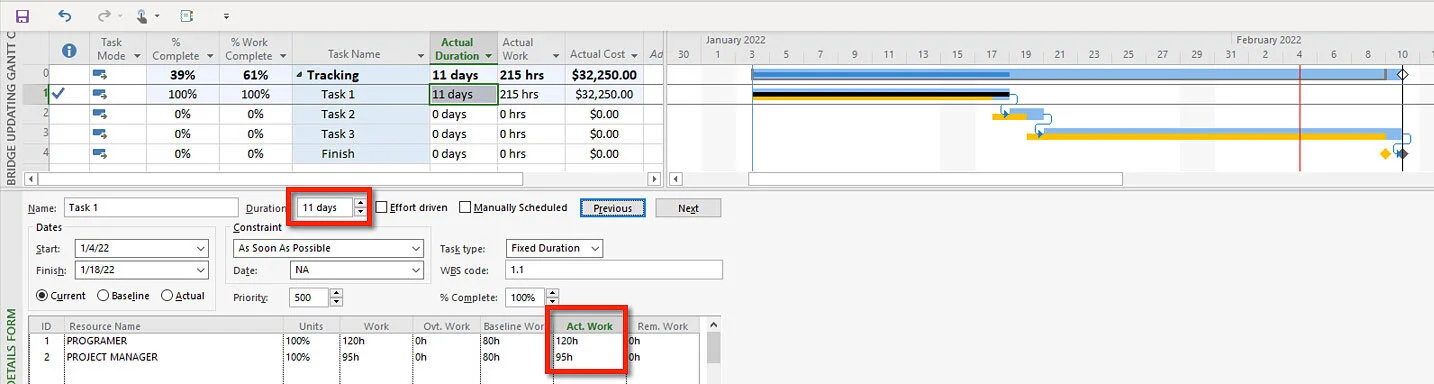
Figure 30. Updating in an Microsoft Project acceptable way.
Next, update and enter the actuals for Task 2. Note that the task is Fixed Duration and not Effort Driven, but perhaps that is just how we want Project to calculate the task. Let's say in real life, the task is effort driven. If we assign another resource, it will shorten the task's duration. We decided if we assigned another person to the task, we might increase cost, but we could get back on schedule. In addition, the logic between Task 1 and Task 2 is soft, so we will start Task 2 before Task 1 is scheduled to finish. Enter the following changes and actuals for Task 2:
You did two things to get back on schedule, you assigned another resource to shorten the duration, and you started the task earlier.
Go to the Resource Sheet view and define a new resource named Contractor. This Contractor has excellent skills, but they are also a little expensive, enter their cost rate of $287.50.
Assign this new resource at 100%.
Put a one-day lead between Task 1 and Task 2, so the task's Start date is 1/18/22. The Programmer had finished all of their work on Task 1 over the weekend and back at their desk on Tuesday.
As a result of assigning this resource, the task's duration became one day.
Mark the task as 100% complete.
The schedule is now one day ahead of schedule. The Contractor does not have baseline information, but the task still took just 16 hours to complete as planned.
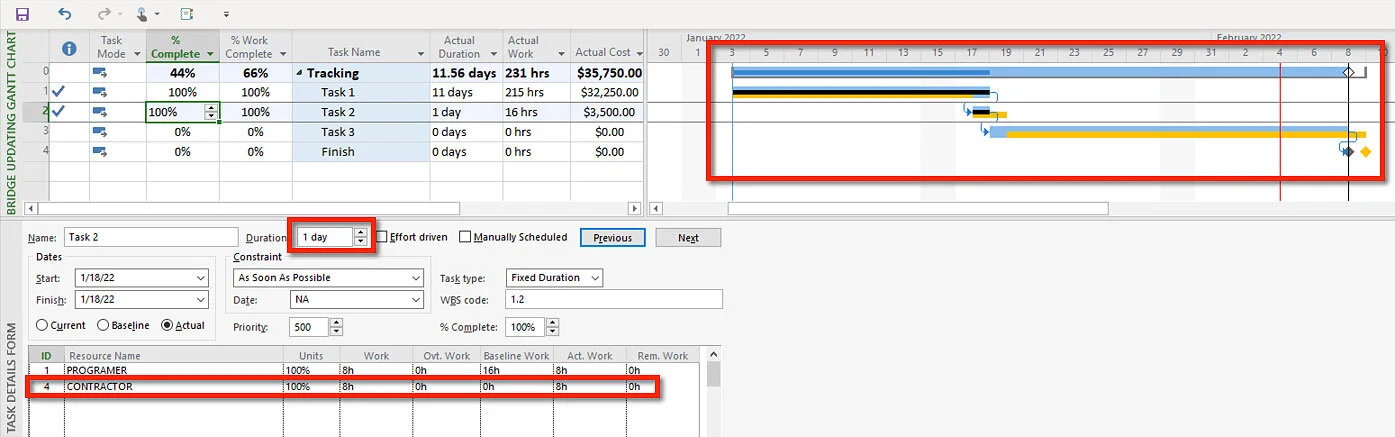
Figure 31. Updating a task, modifying and entering actuals.
The final update is Task 3; click on the Mark on Track command in the Updating Tools group. Note the following status:
Every task has been updated to the status date. There are no uncompleted parts before the status date and no completed parts after the status date.
There are 16 hours of work remaining on the project.
There is an actual start date for Task 3, but no actual finish date.
You are finished updating the project. Save the project.
Simulation Results
This project, 13 - 5 Actuals and Status.mpp, should look like the following figure.
Figure 32. Everything updated to the Status Date.
Suppose you just finished the update and you rushed off to a status meeting with your client, and you show them this picture, and they respond, “I can’t read Gantt Charts; how are we doing on the project?”
What would you say?
Remove the split window and click on the Project Overview command in the Status Reports group.
The good news, you might say, is, “We have 95% of the actual work done, and we are going to finish the project a day early.” The bad news you would continue to explain is, “We are $9,350 over budgets. We had planned to spend around $38,400, and we will be close to $48,000. We had to spend 55 more hours than we initially estimated.”

Figure 33. Project Variance report.
If the client asks, “Why are we so far off on cost and hours?” You might click on the Cost Overview report command, and explain, “We ran into the a technical snag on the first task which put us off schedule and cost us and extra 55 hours of work as already mentioned, at a cost of $8,250 on this task. We took immediate corrective action, assigned another resource which cost an additional $1,100, but that was well worth the cost from our perspective because they helped to bring the schedule back in and we are scheduled to finish early.”
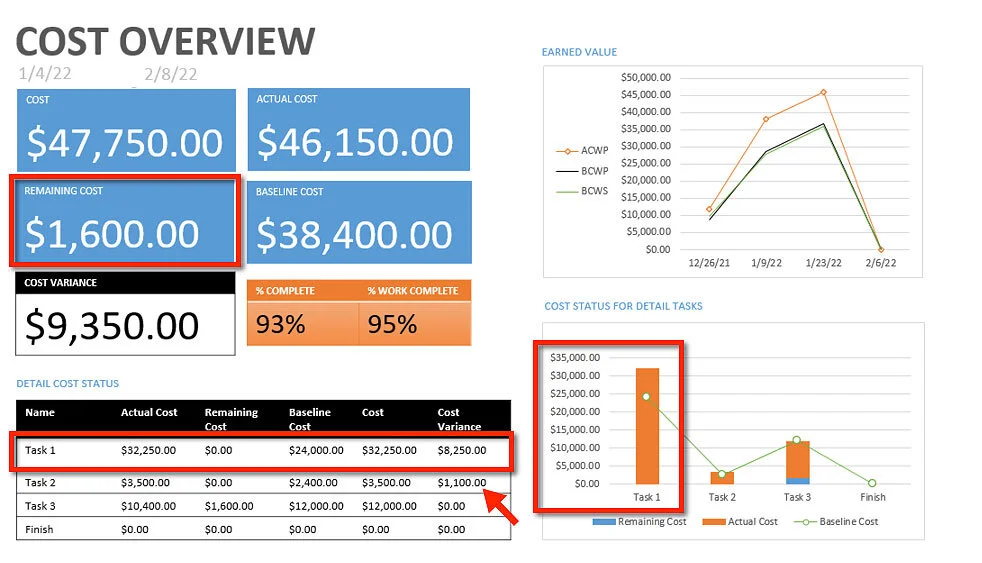
Figure 34. Cost Overview report.
To end this section on updating, let’s run through the custom views.
Click on the Project Variance command. This view shows the details of where we went off on cost, work and schedule, and where we started improving to get ahead on schedule.
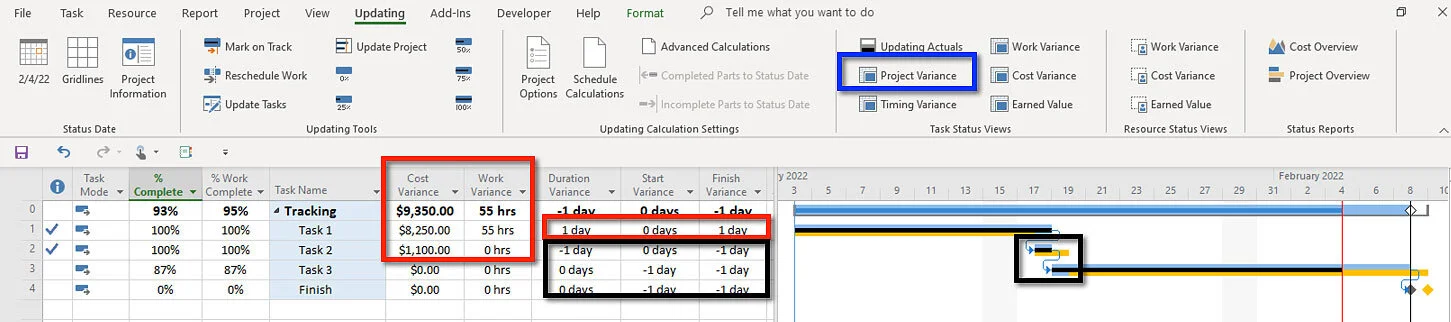
Figure 35. Project Variance custom view.
Click through the other task variance views and then select the Earned Value command. Open up the pane divider to see all of the fields. You might have to increase the height of the header to see all of the text. I included text that included the full names and formulas.
In Earned Value terms, we are ahead of schedule, SPI = 1.02 and over budget, CPI = .8. A CPI of .8 is not considered good by any standard. With these metrics, the number 1 is on target, over 1 is ahead and under 1 is behind. As you remember, Task 1 was late and Task 2 was ahead of schedule but SPI is 1 for both tasks. This is a controversial calculation. Microsoft Project’s perspective is, “Well, they were scheduled to be completed before the status date, and they are.”
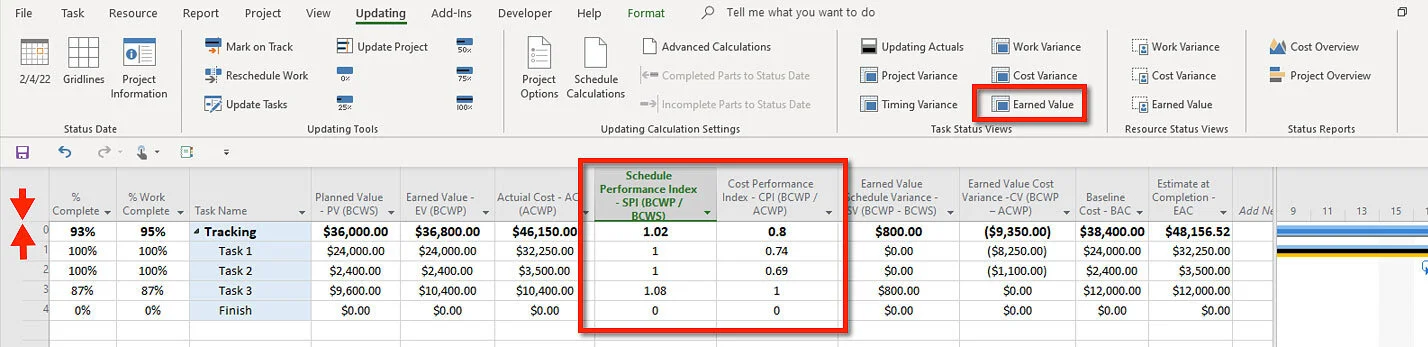
Figure 36. Project Earned Value.
There are custom cost and work variance views for resources you can look at. Click on the Earned Value command in the Resource Status Views group to apply a view with resource Earned Value fields.
Every resource has completed their work except the Administrator. As you likely noticed in the work variance resource view, they have 16 hours remaining. The other three resources are over in CV, Earned Value Cost Variance. The Contractor is over because they did not have a baseline, so there was no Planned Value or Earned Value. In Earned Value thinking, the last task the Admin is assigned, as of the status date, the plan was to spend $9,600, but the task was scheduled early, so they accomplished and spent $10,400, with a CV of $800. That should even out when the task is completed.
You have already saved the project with the correct view for a coach or reviewer. You do not need to save the project.

Figure 37. Resource Earned Value
Tip: If you manage a group of project managers, providing them with a detailed process for creating and managing projects in Microsoft Project goes a long way in getting everyone on the same page and consistently reporting across projects. A part of that process might be a custom ribbon. Custom ribbons can be shared with other users by exporting a custom ribbon. Each user imports the custom ribbon.
Exporting a custom ribbon is also the way to save a backup of your customization.
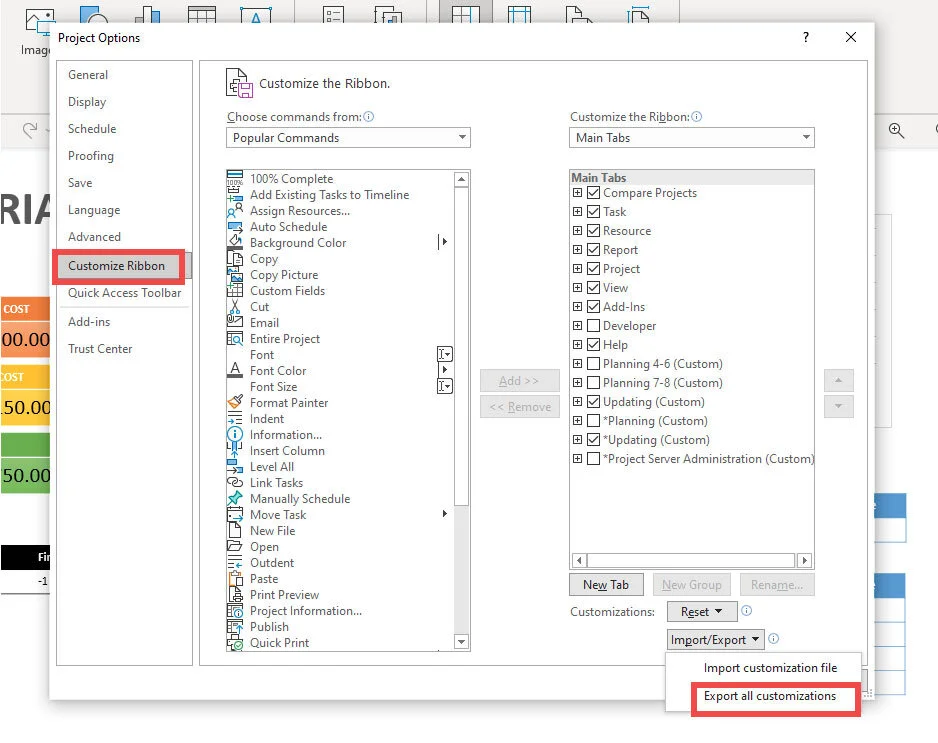
Figure 38. Exporting a custom ribbon.
Final Application
Throughout this MS Project Master Class, you have been creating a plan for this class in the MS Project Master Class Plan.mpp file and you have been tracking your work on all detail tasks.
Above you finished updating the project, now enter your final updates and then:
Baseline the project.
Update the project.
Ensure that each activity is scheduled correctly.
You have kept timesheet information, how much time you actually spent, on each activity throughout this Master Class, enter that information in the Actual Work field.
% Work Complete and % Complete should be 100% on all of the Activities completed to date.
Take a look at the Project and Resource Work Variance views and in the Notes field on the Project Summary task write a status statement on project and resource work variances.
Save your project and if you are working with a coach, save and email them this file to review. If are planning to apply for either of the Master Class Certificates or the “MS Project Certificate of Mastery” (MSPCOM), archive this completed simulation file so that you can submit them for review.

Journal
There is a lot to the updating process. It is one of the hardest things to learn and do well in Microsoft Project. Why, do you think?
If someone were designing a workshop on Microsoft Project and knew the software well but had not used it much, they might spend a lot of the class time on CPM or resource management. If they had used the software, updating would take up at least equal time.
What are the two parts to updating?
What are the common updating commands, and what is the basic functionality of each command?
Chart 17: Updating process in Microsoft Project offers steps to follow for updating. Are these steps consistent with how you would approach updating? If not, what would you do differently?
Where do you select the baseline used for comparing current and actual timing, work, and cost?
Where do you find the project Statistics command?

If you are working with a coach, save and email them these files (13 - 4 Update Commands.mpp should look like Figure 21, and 13 - 5 Actuals and Status.mpp, should look like Figure 32). If you are not working with a coach and you are planning to apply to either MS Master Class certificate, archive this completed simulation file so that you can submit it for review.
In addition, archive or send the Updating.exportedUI. ribbon file. This ribbon file should look like figure 27, and all commands should function. Be sure to test with a different project file than the ones used when the custom tab and commands were created.)

Return to the MS Project Master Class Book and review the next section.

Review of Best Practices
Reporting Cycle
A formal reporting cycle, as an organizational business practice, will go a long way in helping project managers work more successfully with their teams.
Updating Process
Establish an Updating Process. Having a process or series of steps will both increase your efficiency, better updating accuracy, and satisfaction with using Microsoft Project.
Status Date
ALWAYS enter a Status Date before updating a project.
Updating
Create an Updating tab on the ribbon with all of the updating commands, the updating views typically used for updating, status views for analysis, and reporting.
Update Calculation Selections
Always check your update calculation selections in Project Options before updating.
Regard the update calculation selections in the Project Options Advanced page as more static than those on the Schedule page. Make selections before updating a task, and then stick with those selections. If the task is not calculating correctly based on a selection, update the task manually, such as clicking and dragging a taskbar. One unattractive option is to delete the task and start over. This solution to a poorly behaving task is used more than most of us want to admit.

Activity 13 Exam
Complete this Activity by taking this exam. Take the exam here.

Figure 39. Activity 13: Update Project exam.

Please help us make this Master Class better. Click on the icon above to send us suggestions and corrections.
Simulation Files
Throughout this MS Project Master Class, you have been creating a plan for this class in the MS Project Master Class Plan.mpp file and you have been tracking your work on all detail tasks.
Above you finished updating the project, now enter your final updates and then:
Baseline the project.
Update the project.
Ensure that each activity is scheduled correctly.
You have kept timesheet information, how much time you actually spent, on each activity throughout this Master Class, enter that information in the Actual Work field.
% Work Complete and % Complete should be 100% on all of the Activities completed to date.
Take a look at the Project and Resource Work Variance views and in the Notes field on the Project Summary task write a status statement on project and resource work variances.
13 - 1 Update Workflow.mpp (This file should look like Figure 7)
13 - 2 Update Calculations.mpp (This file should look like Figure 16).
13 - 3 Update Calculations in Advanced Options.mpp, (In this file, all of the taskbars should be the same as those displayed in Figures 23 - 24, 26 - 30.).
13 - 4 Update Commands.mpp (This file should look like Figure 21)
Updating.exportedUI. (This ribbon file should look like Figure 27, and all commands should function. Be sure to test with a different project file than the ones used when the custom tab and commands were created.)
13 - 5 Actuals and Status.mpp, (This file should look like Figure 32)

Using Process Bridge? It’s easy to follow the workflow…

Figure 40. Update* tab on the ribbon and the Activity 13: Update Project bar.
Activity 13: Update Project
The Update tab on the ribbon for Activity 13: Update Project is similar to the Updating tab created in the simulations above. However, the macros are a bit more robust and there are a few additional commands. In addition to the Updates tab on the ribbon, Process Bridge also comes with the Activity 13: Update Project floating command bar. Using this floating command bar means that you can leave it open as you use other portions of the ribbon and open dialog boxes during the updating process.
A - The Update Project floating toolbar is under the Executing tab on the ribbon.
B - Step 13: Update Project floating toolbar. Walk down these commands to update a project.
C - Update Tab
Status Date
Update Project Workflow
Status Date (Use to enter Status Date)
Gridlines (Use to format gridlines like the status date or current date)
Format Gridlines (Start, Current, Finish and Status Date formatted)
Updating Calculations and Updating View
Schedule Calc. (Opens Options, Schedule page, calculation selections)
Advanced Calc. (Opens Options, Advanced page, calculation selections)
Updating Actuals View (View for entering actuals)
Updating Tools
Mark on Track (As of the Status Date)
Reschedule Work (As of Status Date)
Update Tasks (Opens dialog box for updating task)
Update Project (Opens dialog box for updating project)
Complete Back to Status (Moves completed portion of a taskbar after the Status Date, back in front of Status Date)
Incomplete Up to Status (Moves incompleted portion of a taskbar before the Status Date, after the Status Date)
0% Complete
25% Complete
59% Complete
75% Complete
100% Complete
Task Status Views
Project Variance
Project Cost
Project Timing
Project Work
Project EVM
Project Indicators
Resource Status Views
Resource Work Variance
Resource Cost Variance
Resource EVM
Status Reports
Project Overview
Cost Overview
Work Overview
Update Project Workflow

Figure 41: Update Project Workflow command.
Status Date Group
Commands:
Status Date command, for entering the status date before entering actuals.
Gridlines command, for formatting gridlines.
Format Gridlines command, formats the Start Date in blue, the Current Date in green, the Status Date in red and the Finish Date in black.

Figure 42: Status Date Group.
Updating Calculation & Updating View Group
Commands:
Scheduled Calc. command opens Project Options and to where you make calculation selections like simple or detailed updating and whether Microsoft Project calculates actual cost.
Advanced Calc. command opens Project Options to where you make calculation selections related to how an updated task bar is positioned in relationship to the status date.
Updating Actuals View command applies a split window with two views for entering actuals.

Figure 43. Updating Calculations and Updating View group.
Updating Tools Group
Commands:
Mark on Track command for updating a task to the Status Date as currently planned.
Reschedule Work command for moving the remaining work, or the uncompleted portion of a task to the status date.
Update Tasks command opens a dialog box for updating selected tasks.
Update Project command opens a dialog box for updating the project or selected tasks.
Complete to Status commands moves completed portions of a task past the status date back to the status date.
Incomplete to Status command moves uncompleted portions of a task before the status date to the status date.
% Complete commands for marking a task complete in quartiles.

Figure 44. Updating Tools group.
Task Status Views Group
Commands:
Project Variance command applies a view for general variances.
Project Cost command applies a view for cost status.
Project Timing command applies a view for timing status.
Project Work command applies a view for work status.
Project EPM command applies a view for earned value. As shown below, the earned value formulas are in the headers.
Project Indicators command applies a view with indicator examples for status calculation.

Figure 45. Task Status Views group.
Resource Status Views Group
Commands:
Work Variance command applies a view showing Work status.
Cost Variance command applies a view showing Cost status.
Earned Value command applies a view showing Earned Value with the formulas in the header for each field as shown in the figure below.

Figure 46. Resource Status Views group.
Status Reports Group
Commands:
Project Overview command applies the Project Overview report.
Cost Overview command applies the Cost Overview report.
Work Overview command applies the Work Overview report shown in the figure below.

Figure 47. Status Reports group.