
Last Updated: April 6, 2023
Activity 9: Evaluate Risk
Page Outline
Application 3 - Finalize Evaluate Risk - 17 minutes (jump to)
Review Best Practices - 5 minutes (jump to)
Review Microsoft Project Features - 5 minutes (jump to)
Update Expert Project (jump to)
Take Exam (Activity 9 - Evaluate Risk) - 7 minutes (jump to)
List of Competed Simulations Files (jump to)
Send Suggestions and Corrections (jump to)
Review Process Bridge (jump to)
Application 1 - Learn the Evaluate Risk Workflow - 20 minutes
Review Workflow - 10 minutes
Journal - 10 minutes (jump to)
Application 2 - Evaluate Risk - 65 minutes (jump to)
Qualitative Risk Evaluation Simulation - 30 minutes (jump to)
Inserting Risk Questions Simulation - 20 minutes (jump to)
Journal - 15 minutes (jump to)

This page should take 1 hour and 37 minutes to complete.
Application 1
Learn the Evaluate Risk Workflow - 10 minutes
A workflow is a set of sequential or parallel processes or steps performed to complete a specific Activity in a project lifecycle. It typically involves a series of interdependent tasks that must be completed in a particular sequence, often with specific criteria or conditions that must be met before moving on to the next step.
The outline for each Activity (chapter) in this Master Class is the workflow for applying the project management tools and techniques reviewed.
A specific Microsoft Project risk management workflow is unavailable. Nor are there any risk management-related features in the software. However, the software provides plenty of options to store risk evaluation data generated in other software tools like Word or Excel. There are also powerful Microsoft Project add-ons that specifically address risk management.
Review
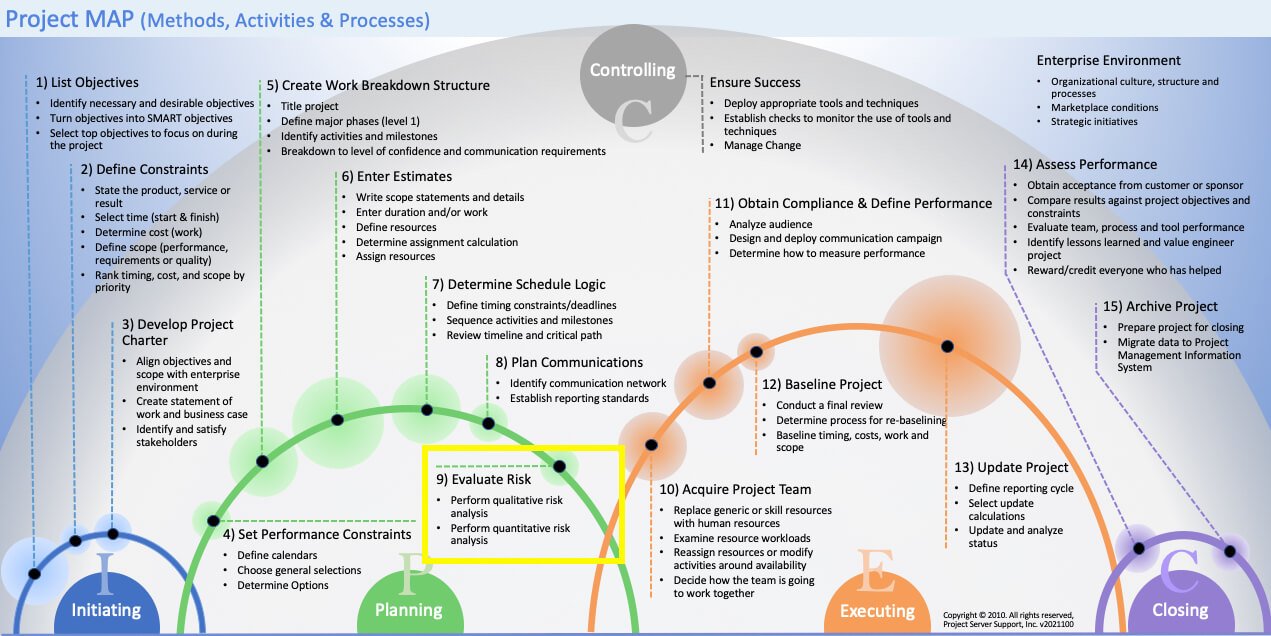
Review and learn Activity 9: Evaluate Risk workflow below.
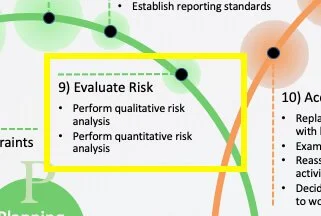
Figure 1 Activity 9 in Project MAP.

Note: This is Activity 9: Evaluate Risk in the Project MAP project lifecycle.
We all have experience with risk evaluation and management in various formal and informal ways. Most people remember risk-related slogans throughout their lives that they learned in childhood, such as:
Duck and cover
Only you can prevent forest fires
Speed kills
Line up from the shortest to the tallest
An ounce of prevention is worth a pound of cure
Safety starts with S but begins with you
Yield to pedestrians — it’s the law
Stop, drop & roll
Better safe than sorry
You'll put an eye out!
Say something
Run. Hide. Fight.
In project management, there are two types of risk evaluation. One is qualitative, or a type of problem analysis. This is the most common type of risk evaluation; this is the approach we take for the risk of fire in a structure or when evaluating various insurance policies.
A risk evaluation Excel workbook for qualitative risk evaluation can be downloaded from the file download page.
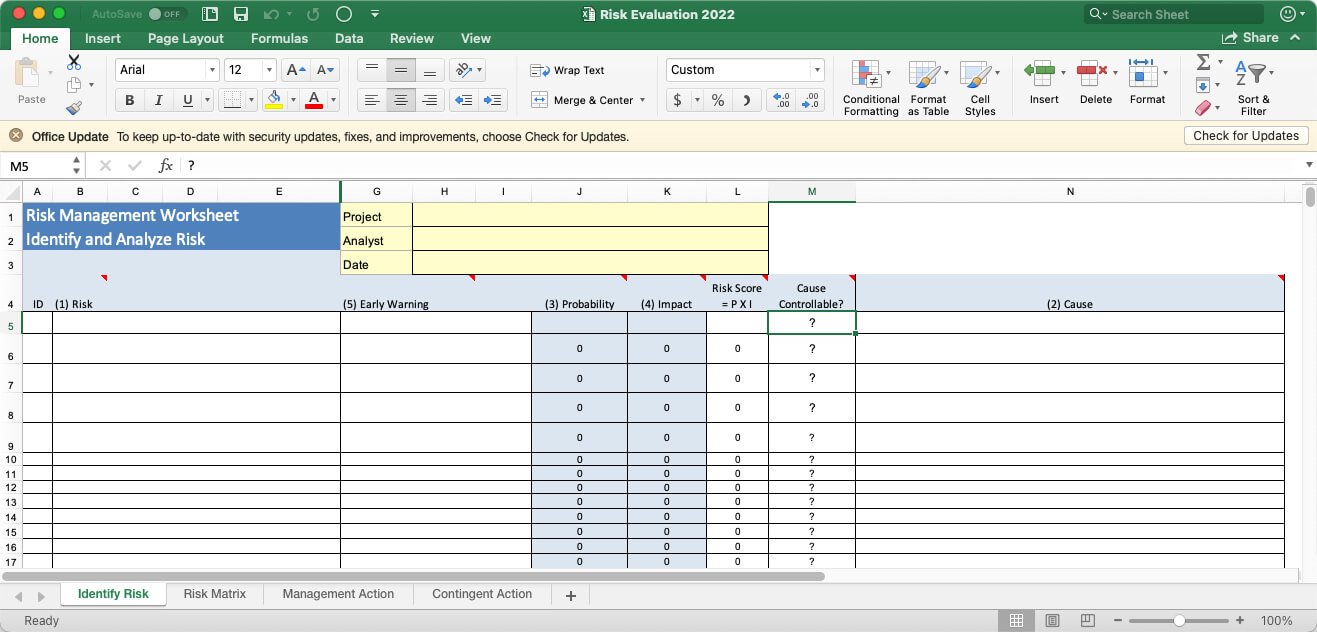
Figure 2 Risk Evaluation workbook.

Click on the download icon above to open the Risk Evaluation workbook (Risk Evaluation Workbook.xlsx).
Another type of qualitative risk evaluation on the project level is SWOT (Strengths, Weaknesses, Opportunities, and Threats). SWOT analysis is a valuable technique for project managers to evaluate the strengths, weaknesses, opportunities, and threats associated with a project and to develop strategies to maximize project success. Using SWOT analysis in project management, project managers can identify potential problems and opportunities early on and make informed decisions about project direction and resource allocation.
Figure 3 SWOT Analysis Action Plan Worksheet.

Click on the download icon above to open the SWOT Analysis Action Plan workbook (SWOT Analysis Action Plan.xlsx).
The second type of risk evaluation is more quantitative. The most common quantitative approach used with Microsoft Project, which fits in a Probability Distribution Method category, is called Monte Carlo Method. The Monte Carlo software used to illustrate this method in the Master Class Book is Barbecana's Full Monte SRA (Schedule Risk Analysis) software for Microsoft Project. See Full Monte SRA.

Best Practice
Qualitative Risk Evaluation on the project level is a best practice.

Figure 4 Evaluate Risk Workflow chart.

Click on the download icon above to open the Activity 9 - Evaluate Risk Workflow (Activity 9 - Evaluate Risk Workflow.pdf).

Journal - 10 minutes
Qualitative risk evaluation can be performed at the meta-level on project objectives and overall project timing, scope, and cost constraints. Or this analysis can also be performed on the task level. Quantitative risk evaluation is performed at the detail task level and rolled up to the summary and project levels.
Summarize your current risk evaluation and management approach and what you want to improve, include, or change.

Return to the Master Class Book and review the next section for this Activity.
Application 2
Evaluate Risk
Qualitative risk management typically involves a qualitative risk assessment, identifying and analyzing risks based on subjective judgments and qualitative data. This can include techniques such as brainstorming, expert opinion, and risk rating scales. The assessment results can then be used to develop risk mitigation strategies and prioritize risk management efforts.
This application will review where you might apply qualitative risk evaluation in Microsoft Project. We will also review Object Linking and Embedding (OLE), recording a Macro (module), and making that module available to any opened project by moving it to the Global.mpt file and then adding the macro to a command on the ribbon.

Qualitative Risk Evaluation Simulation (30 minutes)
This simulation uses the Risk Evaluation Workbook tool to perform a qualitative risk evaluation for your expert project. We will use the OLE feature in Microsoft Project to use this risk evaluation tool.
First, open your Expert Project.mpp file.
Next, use the OLE feature to embed the Risk Evaluation workbook (Risk Evaluation Workbook.xlsx) downloaded above in the project summary task. Edit the inserted object and evaluate three risks to the project’s objectives and constraints.
To embed the Risk Evaluation Workbook.xlsx at the summary level:
Open the Notes field for the project summary task.
Click the Insert Object button.
Select the Create from File radio button.
Don’t select the Link button when you want to embed the object.
Check the Display As Icon checkbox.
Click OK.

Figure 5 Embedding an object in the project summary notes field.
Figure 6 Changing the icon label for an OLE attachment.
When displaying an OLE attachment, click the Change Icon button to enter a custom label.
Once the object has been embedded, double-click on the icon to review or edit. In this case, the object is opened in Excel.
In this opened embedded object, add three realistic risks to the project’s objectives or constraints. As appropriate, address each of the questions in the workbook for each risk. When finished, save the workbook, close Task Notes, and save the project.
Note: Objects (files) can be added to any of the task, resource, and assignments Notes fields.
When an object is embedded in a .mpp file, that object is associated with the project. The object can not be opened without first opening Microsoft Project. The .mpp file, for instance, could be sent to someone, and if they open the .mpp file, that object will be available to open. However, the .mpp file will increase in size based on the size of each embedded object.
Linking to objects vs. embedding is preferable if those objects stay in the exact location. If you send a .mpp file to someone outside of your network or without access to the folder the object resides in, they will not be able to open the objects.
Simulation Results
In your Expert Project.mpp. file, the embedded object in the project summary task Notes field should contain three risks to the project’s objectives or constraints. Each risk, if appropriate, has identified both Management and Contingent Actions. If you are considering conducting a SWOT Analysis with your project team, also embed the SWOT Analysis Action Plan workbook (SWOT Analysis Action Plan.xlsx) file at the project summary level.
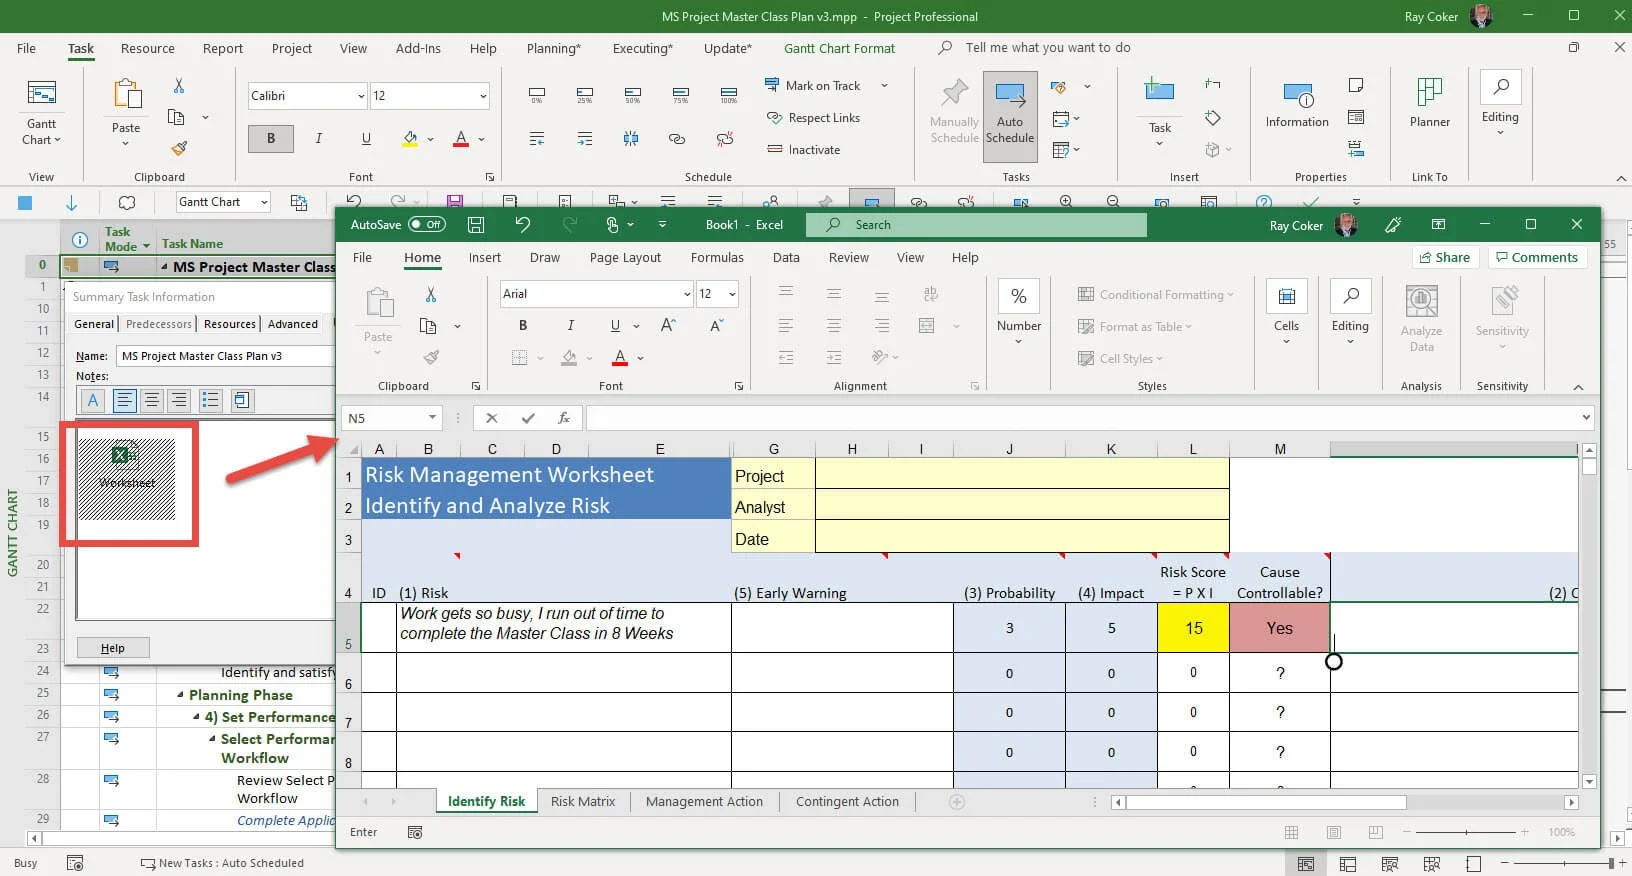
Figure 7 Editing an embedded object.
Inserting Risk Questions Simulation (20 minutes)
This simulation uses the widely used qualitative risk questions at the project level and for detailed tasks. Microsoft Project will use Visual Basic for Applications to automate these questions in your expert project, and then the Organizer and Ribbon feature in Microsoft Project will be used to make the automation available to all projects you might open and to make it easier to apply.
Using this same Expert Project.mpp file, you could add (copy and paste) these qualitative questions to the task Notes field for the project summary task.
1. For this activity, what is a risk?
2. What is the cause for this risk? Is the cause controllable?
3. How likely is this risk to occur?
5 = Very High, 4 = High, 3 = Moderate, 2 = Low, 1 = Very Low
4. What is the impact of this risk on this activity?
5 = Very High, 4 = High, 3 = Moderate, 2 = Low, 1 = Very Low
5. What is the early warning for the contingency action?
6. What is the management action to mitigate the risk?
7. What contingent action will be taken if the risk were to occur?
Best Practice
These qualitative risk questions are considered a best practice in project management:
For this project or activity, what is a risk?
What is the cause for this risk? Is the cause controllable?
How likely is this risk to occur?
What is the impact of this risk on this activity?
What is the early warning for the contingency action?
What is the management action to mitigate the risk?
What contingent action will be taken if the risk were to occur?
If they do anything at all, most people perform this type of risk evaluation on the project level.
However, suppose you have a project with 1,200 tasks, and you have identified 75 critical tasks that you would like to address from a qualitative risk perspective because there is a substantial variance between the expected and pessimistic durations, suggesting risk (uncertainty) can be mitigated to shorten the duration of the project. You could type in these questions for each task to get started, but that would be like typing in 75 paragraphs, so at minimum, you would copy and then paste each set of questions into each of the 75 tasks.
Note: The easiest way to copy and paste from one task Notes to another task Notes field is to split the window in a Gantt Chart view, apply the Task Form in the bottom view. Then in the Task Form, apply the Notes detail or theme. In the example above, you could flag each of these 75 tasks, filter on that flag, and then walk down the tasks in the Gantt view and copy and paste the questions into each Notes field in the bottom view.
If you wanted to use these questions with other projects, you could automate this activity more by:
Recording a macro
Copying the macro to the Global.MPT file
Attaching the macro as a command to the Quick Access Toolbar or the Ribbon.
Recording a Macro
Using this same Expert Project.mpp file, select any task, select View on the ribbon, then Macros, and Record Macros. We will not type in all of these risk questions, but we will start the process.
Figure 8 Record Macro command.
Figure 9 Record Macro dialog box.
Store the macro in This Project. As I have mentioned before, I typically like to move custom elements like views, tables, and macros to the Global.MPT when they are finished, so in Options, I do not allow these elements to be automatically saved to the Global.mpt.
Don't worry about the Macro name at this point but remember the name listed. It may not be Macro 1 as shown in the screen above.
Then Click OK.
You are now recording keystrokes.
Next, we will record adding some text to Task Notes. Select Task on the ribbon and then the Task Notes command. In the Notes field, type in The journey of a thousand miles begins with one step. When finished, click OK.
Figure 10 Typing in the text for a macro.
Stop recording the maco by selecting View on the ribbon, the Macros command, then Stop Recording.
Figure 11 Stop Recording macro command.
Next, make sure the macro works correctly. Select any other task. Click on the Macros command again to view the macro. You may have multiple macros. First, find your project and then the macro. It may not be named Macro1, and then click the Run button.
Figure 12 Run a macro.
If your macro is working correctly, the text is automatically added to task Notes,
Once your macro works correctly, click on the Macros command again to view the maco, then click the Edit button.
The Edit command opens the macro, or module, in the Visual Basic for Applications (VBA) Editor. In the Project window find the project you recorded the macro and expand the Modules folder.
You could easily change the text by editing the module, saving the project, or clicking the save button in the VBA Editor.
Figure 13 Viewing and editing a macro in the VBA Editor.
If you open VBA and do not see your project, click View on the VBA menu and select the Project Explorer and then Code to open those two windows.
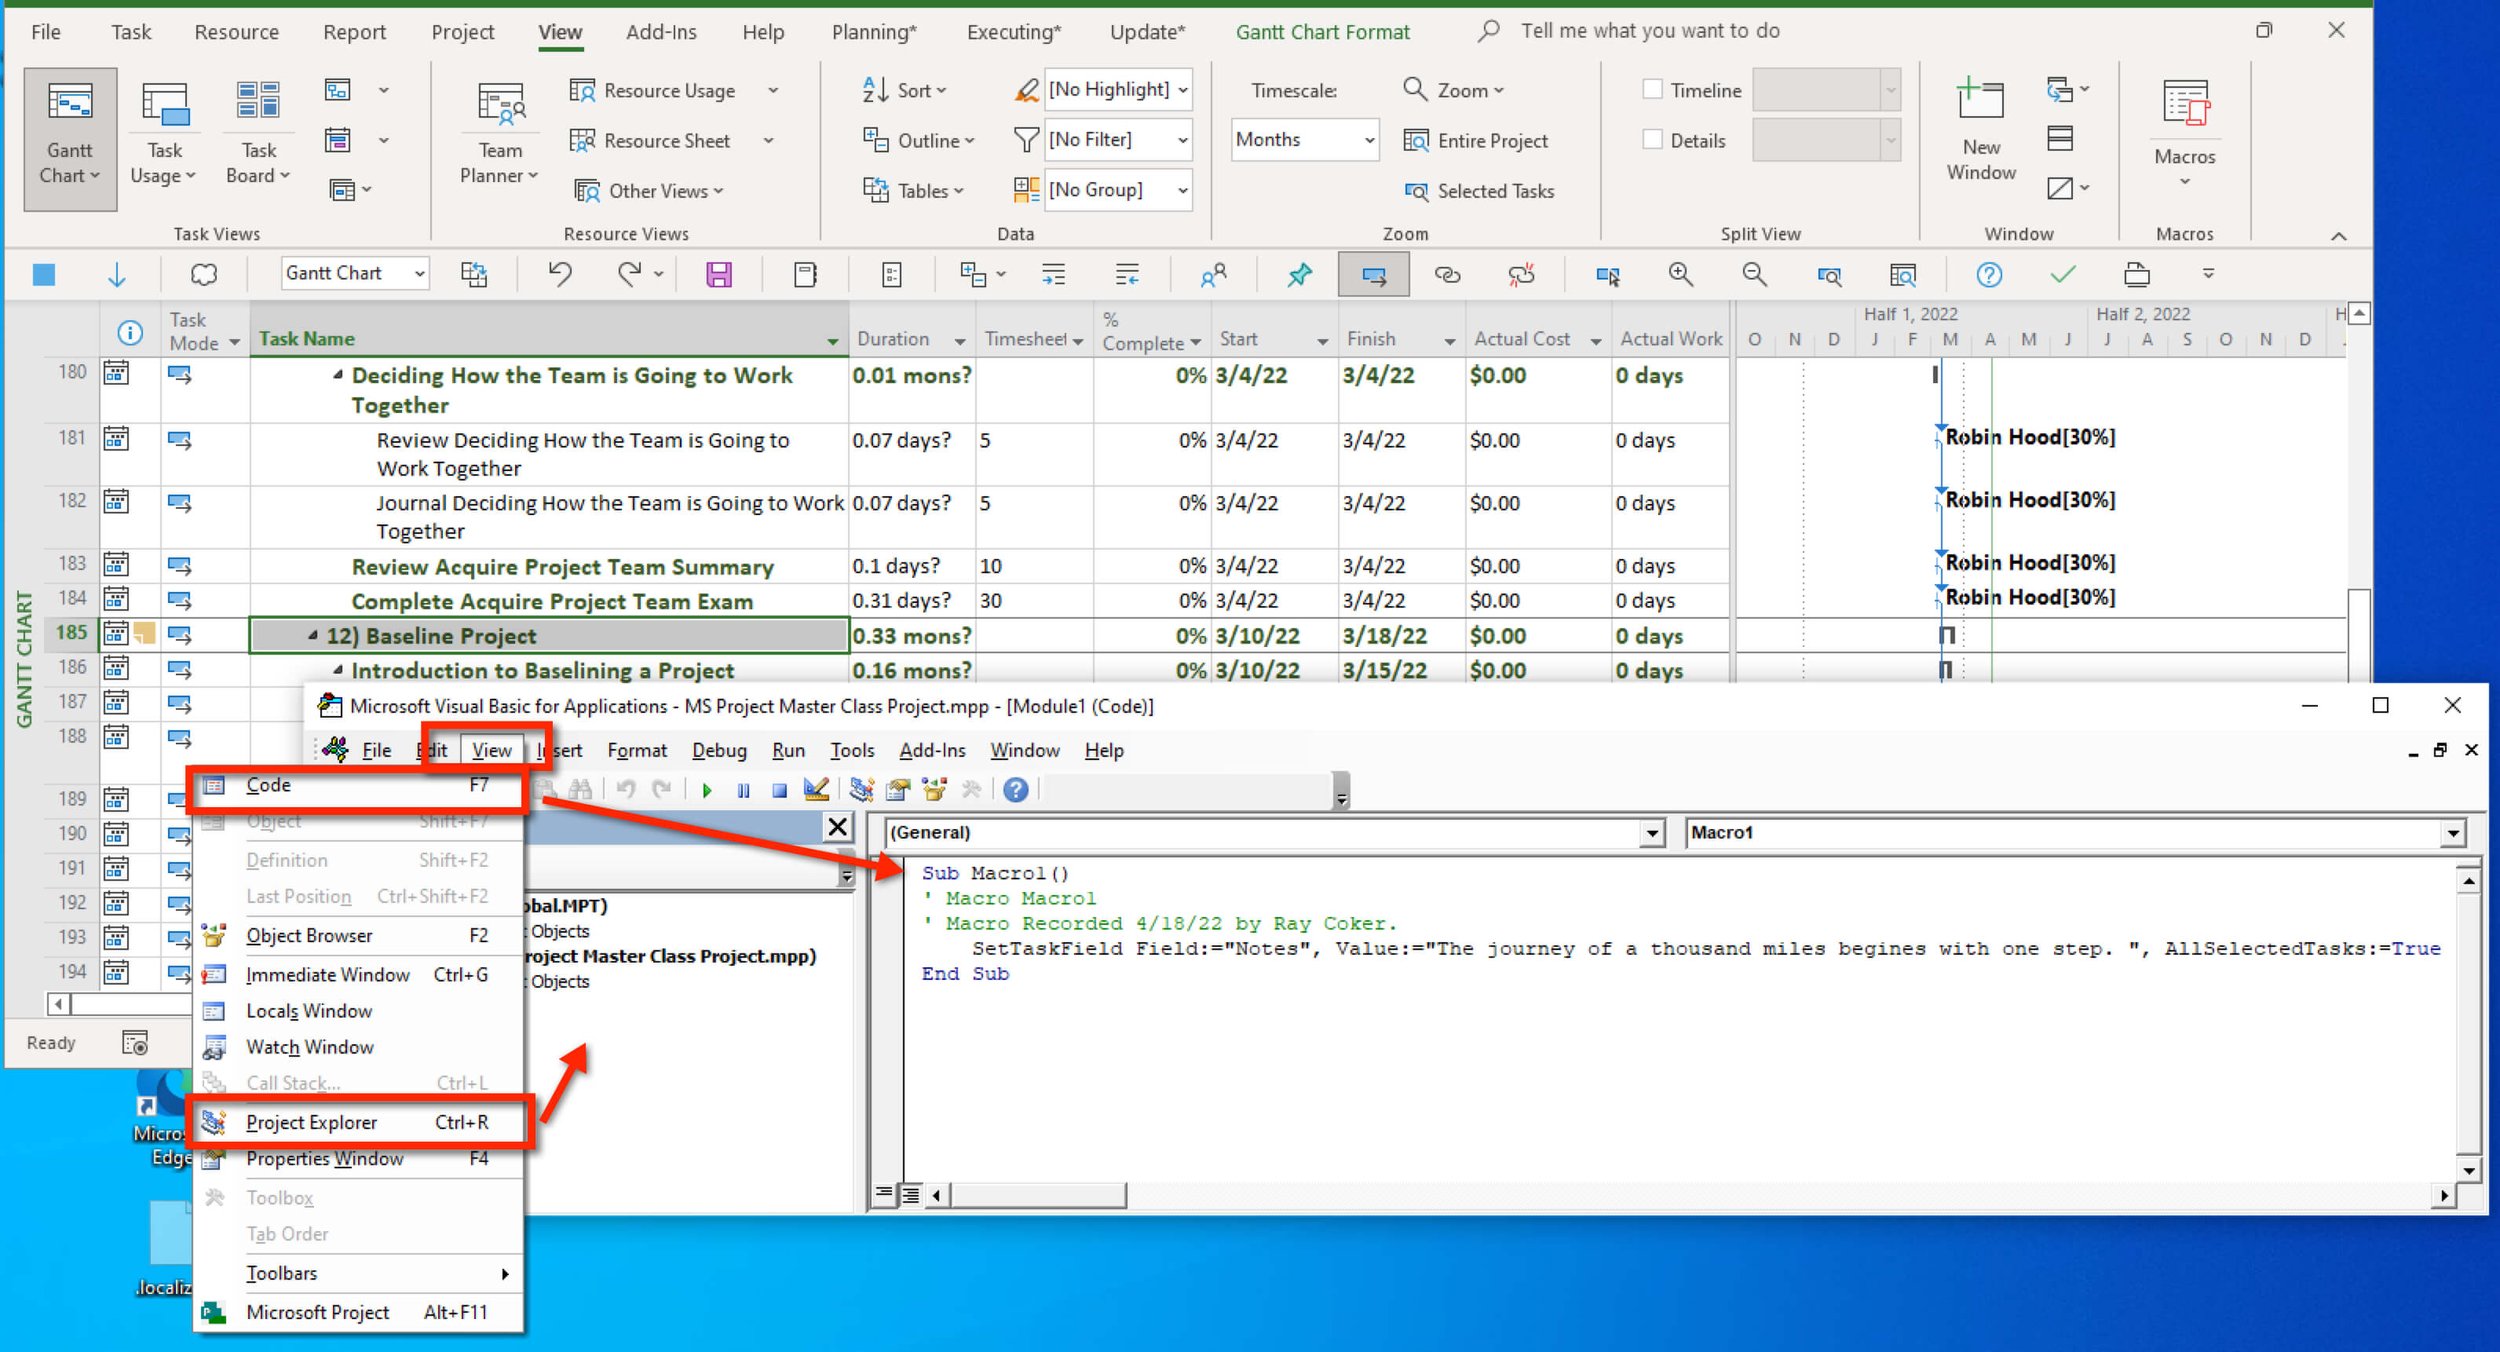
Figure 14 Code and Project Explorer windows in VBA.
Next, we will edit the code for this macro and add all of the risk questions. I have a shortcut, so you don't have to take the time to type in this information correctly.
Click on the download icon and open Sub-InsertRiskQuestions.docx.
First, open the Sub InsertRiskQuestion document, copy all of the text, and then paste it into your macro, replacing all of the text. The actual text that is inserted by the macro is highlighted in yellow so that you can easily edit any of the text if desired.
The macro is now called InsertRiskQuestion. In VBA, macro or module names can not have spaces.
Figure 15 Insert Risk Questions macro.
Close the VBA Editor and then select a task in Microsoft Project and run the macro.
When you know the macro is running correctly, save the project, which will save the macro since it is currently associated with the project.
Figure 16 Run Macro from VBA.
If this is a macro you want to keep and use frequently with your other projects, you can do these three things:
Give the macro a unique name
Copy the macro to the Global.MPT
Attach the micro to a command on the ribbon.
We are going to walk through these steps, so open the Organizer and click the Rename button give the macro the name InsertRiskQuestions and then copy the macro to the Global.MPT.
We have used the Organizer several times, so you should be able to do that without detailed instructions.

Figure 17 Using the Organizer to manage macros.
To attach the macro that was just copied to the Global.MPT to the Ribbon, do the following:
Open Project Options.
Select Customize Ribbon.
C - Select Macros.
D - Say we want to attach this macro to the Project tab; expand the Project tab.
E - Add a new group at the end of the Project tab by clicking on the New Group button. Name the group Risk.
F - Select the InsertRiskQuestions macro from the Global.MPT, not the project file.
G - Add the macro to the Risk group on the Project tab
H - Rename the macro by selecting the macro and clicking the Rename button
I - Select the symbol shown in the figure below
J - Rename the macro as it appears on the Ribbon. Give the macro any name you want.
Figure 18 Add macro to the Ribbon.
Finally, test the macro by selecting a task and clicking on the command.
Figure 19 Using the command on the ribbon to add risk questions to a task.
When finished, save the project.
Simulation Results
For your Expert Project.mpp file, and for any project you have opened in memory, that macro you just created and attached to a ribbon command should be available.
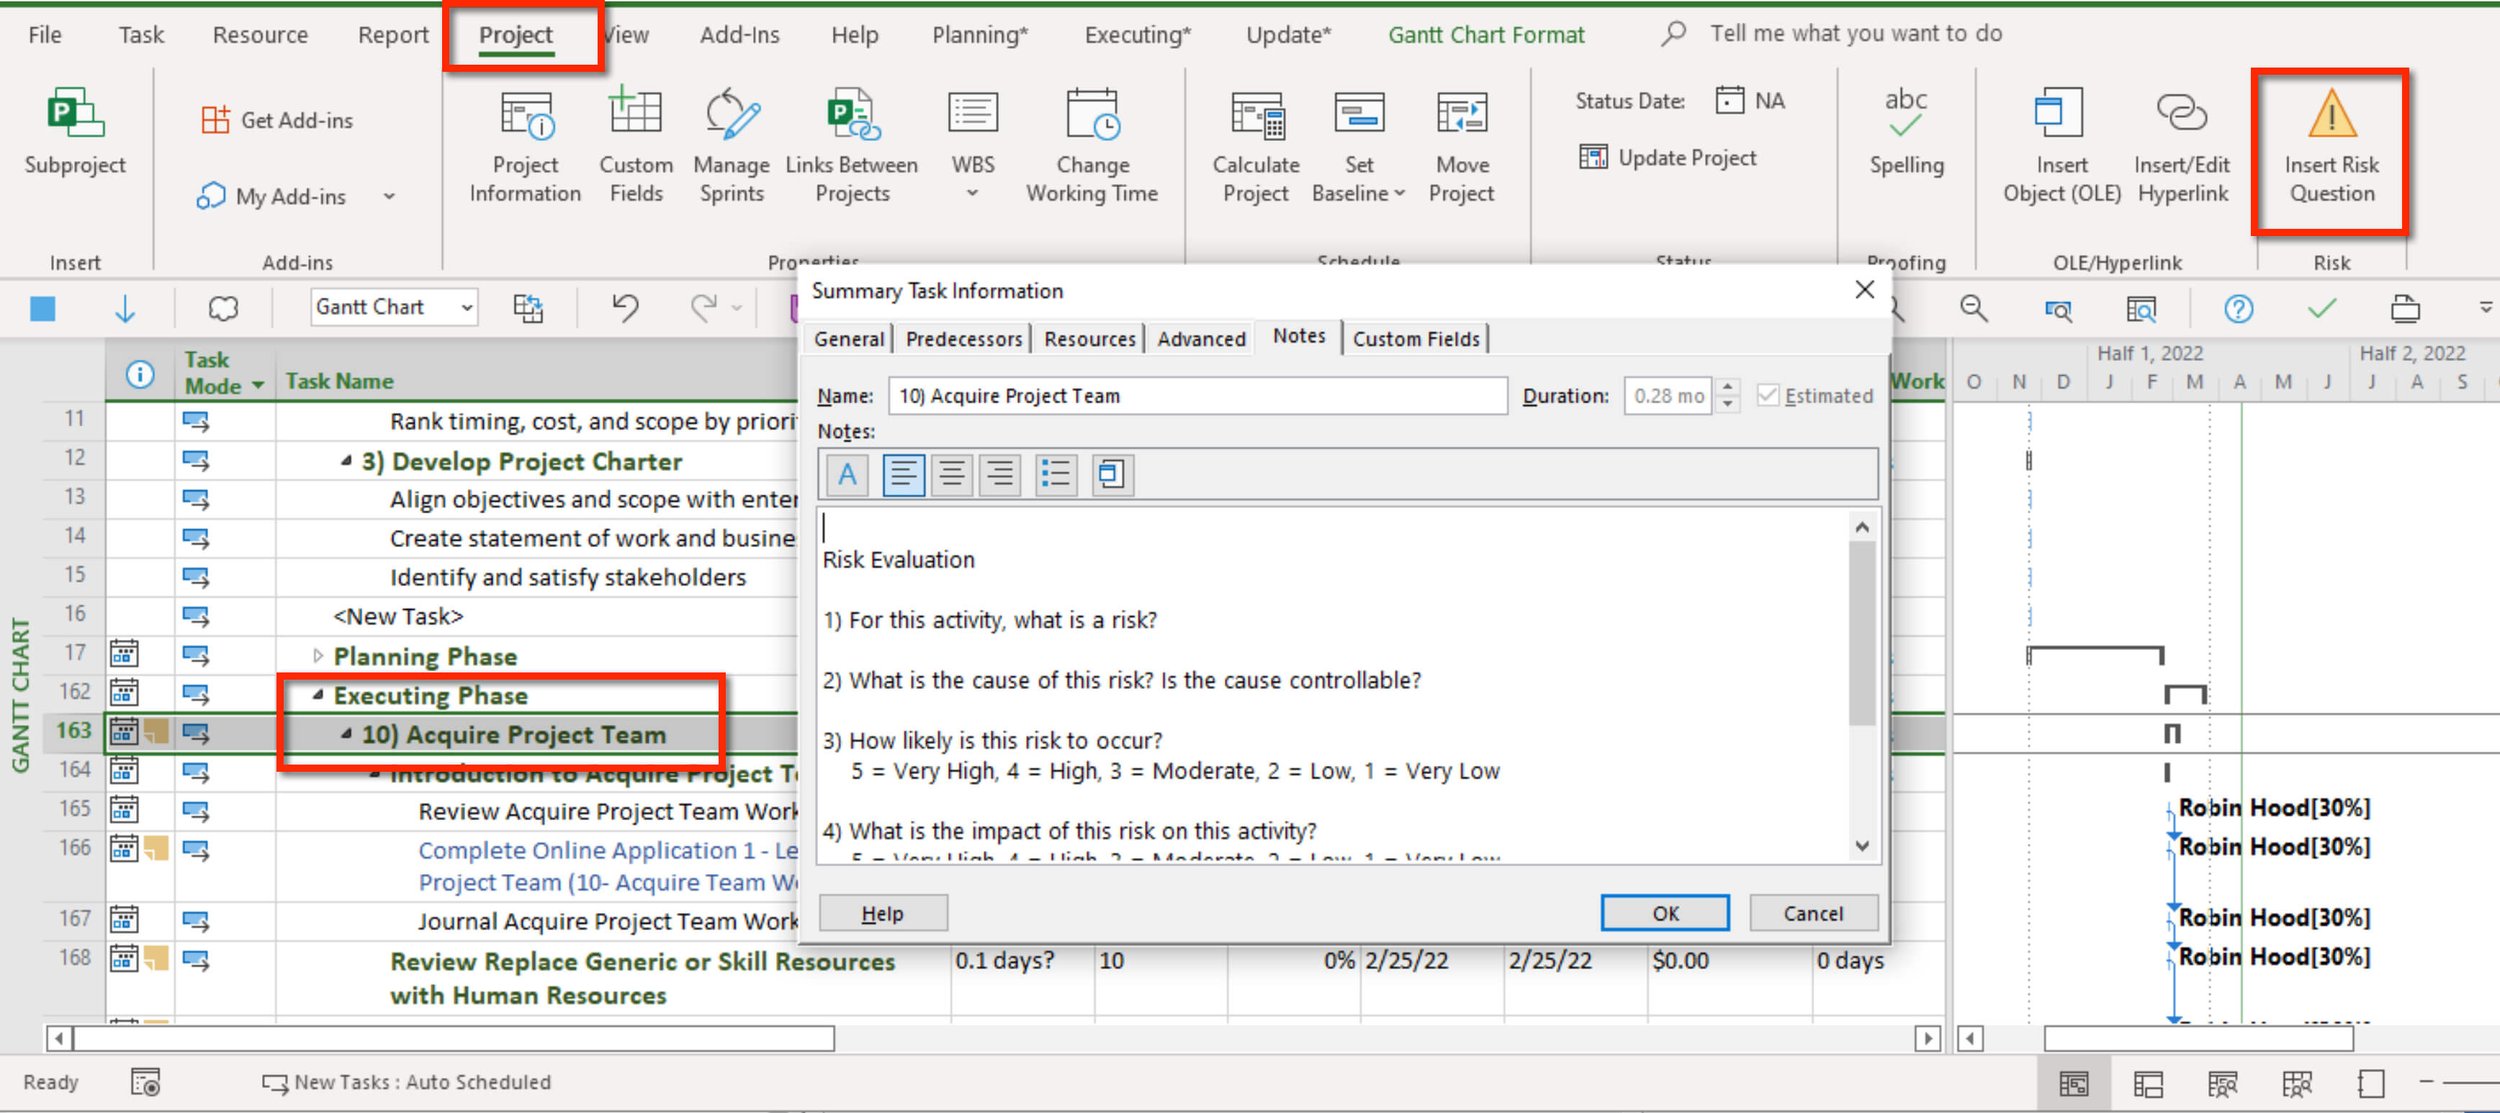
Figure 20 Risk command used to add risk questions to a task.

Journal - 15 minutes
We have all heard of people being self-insured. Self-insure is a risk management technique in which a company or individual saves money to remedy an unexpected loss. Theoretically, one can self-insure against damage (like flood, fire, injury, or earthquake). However, most people purchase insurance against potentially significant, infrequent losses.
The thinking behind self-insure is that since insurance companies aim to profit by charging premiums over expected losses, a self-insured person should be able to save money by simply setting aside the money that would have been paid as insurance premiums. But it is critical to amass and put aside enough funds to cover you, your family, and your possessions if an accident or natural catastrophe occurs.
There are some faulty assumptions behind self-insuring, but we all self-insure to some extent. For instance, if we have an older vehicle, we might buy liability insurance but not collision insurance. But one thing seems inevitable: most self-insured people are likely more concerned with preventing a risk from occurring than paying should the risk occur.
Project Example

I once visited the most famous James Madison home, Montpelier, in Orange County, Virginia. Montpelier was initially built in 1764 by Madison's father, James Madison Sr., but it was significantly expanded and renovated by Madison himself throughout his lifetime.
James Madison, the fourth President of the United States, was an early proponent of insurance to protect property and mitigate risk. Madison recognized the importance of insurance in promoting economic growth and stability and played an active role in developing the insurance industry in the United States.
In 1794, Madison helped to found the Mutual Assurance Society of Virginia, one of the first insurance companies in the United States. The society provided fire insurance to homeowners and businesses in Virginia, and it quickly became a model for other mutual insurance companies throughout the country.
Madison believed that insurance was essential for promoting economic growth and stability. He saw it as a way to protect property owners from financial losses due to disasters like fires and floods. He also recognized that insurance could help reduce the burden on the government in the aftermath of disasters, as insured property owners would recover more quickly and would be less likely to require government assistance.
Madison's advocacy for insurance helped pave the way for the modern insurance industry in the United States, which is now one of the world's largest and most complex industries. Today, insurance protects individuals and businesses against a wide range of risks, from property damage to liability claims, and it plays a critical role in promoting economic growth and stability.
According to my tour guide, one of Madison's most interesting architectural innovations was moving the cook house from its original location into the main house at his estate, Montpelier, and converting it into a kitchen.
The cook house at Montpelier was a small building located a short distance from the main house. It contained the kitchen, living quarters for enslaved people who worked in the kitchen, and other domestic positions at the estate.
After purchasing home insurance, a contingent management plan in the case of fire and other disasters, Madison moved the cook house into the main house, creating a more centralized and convenient location for food preparation. This was a significant undertaking, as it required the construction of a new kitchen and installing complex ventilation systems to ensure that smoke and fumes from the kitchen did not spread throughout the house.
Despite the challenges, Madison's decision to move the cook house into the main house was innovative and helped transform the way homes were designed and built. By bringing the kitchen closer to the main living areas, Madison created a more functional and efficient living space that was better suited to the needs of his family and guests.
Regardless of who might pay for the consequences of risk events that could cause damage to our vehicles, homes, and businesses, it is better to prevent risk events from happening or limit the impact of risks should they occur. This is undoubtedly the case when we are evaluating risk on the project level.
However, on the detail level, when there is a significant variance between estimates of work and cost suggests that we have not mitigated risk well. That realization leads to the 1) opportunity to protect a project, task by task, by taking steps to identify and mitigate risk, and 2) reducing the duration and cost of the project incrementally by mitigating the risk. The intent of this mitigation is to lower the calculated expected duration and cost estimates by lowering the pessimistic estimates.
In summary, on the project level, the intent is to prevent risk or mitigate the damage if the risk should occur. On the detail level, the intent might be to incrementally reduce the duration and cost of the project by moving each detailed task from the expected duration and cost estimates toward the optimistic estimates.
Do you anticipate doing qualitative risk evaluation for your projects? If yes, at what level of a project?
What are the steps or questions to ask in qualitative risk evaluation?
How do you determine which risks to address?
There are two ideas around risk mitigation; what are those two ideas? Provide some examples.
Can you see yourself leading a SWOT analysis with project team members? If yes, what do you see as the primary value of generating a SWOT action plan?
What is your biggest takeaway from this section on qualitative risk evaluation?

If you are working with a coach, rename your Expert Project.mpp file to Risk Evaluation.mpp. This file should include the embedded object, Evaluation Workbook.xlsx, in the project summary task Notes field. The workbook should contain at least three risks to the project’s objectives or constraints. Each risk, if appropriate, has identified both Management and Contingent Actions. If you are considering conducting a SWOT Analysis with your project team, embed the SWOT Analysis Action Plan workbook (SWOT Analysis Action Plan.xlsx) file at the project summary level. In addition, the Risk Evaluation.mpp file should contain the macro for adding the risk questions to a selected task.
If you are not working with a coach and planning to apply for either MS Project Master Class certificate, archive this project so you can submit it for review.

Return to the Master Class Book and review the next section for this Activity.
Application 3
Complete this Activity by reviewing best practices and the features used in Microsoft Project. Then update your Expert Project.mpp and take the exam.
Review of Best Practices
Qualitative Risk Evaluation on the project level is a best practice.
These qualitative risk questions are considered a best practice in project management:
For this project or activity, what is a risk?
What is the cause for this risk? Is the cause controllable?
How likely is this risk to occur?
What is the impact of this risk on this activity?
What is the early warning for the contingency action?
What is the management action to mitigate the risk?
What contingent action will be taken if the risk were to occur?

Review Microsoft Project Features - 10 minutes
OLE
OLE (Object Linking and Embedding) is a technology used by Microsoft Project to allow users to link or embed data from other applications, such as Microsoft Excel, Word, or PowerPoint, into their project files.
With OLE, users can insert charts, tables, or graphs created in Excel or Word into their project files and update them as necessary without leaving the project application. This gives users a more comprehensive view of their project data and simplifies sharing information across different software applications.
Linking involves linking the inserted object and the source file. The linked object remains a separate entity within the project file, and any changes made to the source file are automatically reflected in the linked object in the project file. This means that the user can update the information in the source file, and the linked object will also be updated in the project file.
Embedding, on the other hand, involves inserting the object directly into the project file. The embedded object becomes a part of the project file and is no longer linked to the source file. Any changes made to the source file will not be reflected in the embedded object in the project file. The user must manually update the object after opening the project and making the necessary changes. .
Overall, OLE in Microsoft Project allows for the seamless integration of data and information from different software applications, enabling users to create more dynamic and interactive project files.
Steps
To use OLE (Object Linking and Embedding) in Microsoft Project, follow these steps:
Select a task you want to embed or link an object like a Word document or Excel worksheet.
Do not click on the Project tab and click on the Insert Object (OLE) command. This command is for inserting an OLE into the Object field for a particular task or resource. This feature has yet to work well for several of the past versions of Microsoft Project. We recommend using the OLE feature the Notes field for a task or resource.
Double-click on the task you want to add a note to open the Task Information dialog box.
Click on the Notes tab in the Task Information dialog box.
Click on the Insert Object button in the Notes section of the dialog box.
Choose the type of object you want to insert, such as Excel Worksheet or Word Document, from the Object Type drop-down menu.
A new dialog box will appear, allowing you to create a new object or insert an existing one. Choose the appropriate option.
If you insert an existing object, navigate to the file you want to insert, select it, and click the Insert button.
If you create a new object, a window will appear with the application you chose (such as Excel or Word) open, allowing you to create or edit the object.
Once inserted or created the object, it will be displayed in the task notes.
To link the object to the source file, right-click on the object and select Linked Worksheet/Object, then choose the appropriate source file.
To embed the object, insert it into the task notes without linking it to a source file.
That's it! With OLE, you can easily integrate data and information from other applications into your task notes in Microsoft Project.
OLE vs. Hperlinks
In Microsoft Project, OLE (ObjecLinking and Embedding) and hyperlinks are two different ways to link information from one part of the project to another.
OLE is a method of embedding or linking objects, such as a chart or a spreadsheet, from one application into another. In Microsoft Project, you can use OLE to embed or link objects from other applications, such as Excel or Word, directly into a project file. This allows you to display the information from the other application within your project file, and any updates made to the linked object will be reflected in your project file.
Hyperlinking is another method of linking information within a project file. A hyperlink is a clickable link that takes you to a specific location within a project file or to a different file altogether. In Microsoft Project, you can use hyperlinks to link to other tasks within the same project, to external files, or to websites.
In summary, OLE is used to embed or link objects from other applications into a project file, while hyperlinks are used to link to other locations within the same project or to external files and websites.
Macros
Macros in Microsoft Project are a powerful tool that allows you to automate repetitive tasks, perform complex calculations, and customize how the software works. A macro is a set of instructions you can create and save in a specific project, or in Microsoft Project that automates a series of actions in the software.
Some common uses of macros in Microsoft Project include automating the creation of new projects, updating task durations and dependencies, generating custom reports, and exporting data to other software applications.
Macros can also be used to customize the user interface, add new functionality, and extend the capabilities of the software beyond what is available out of the box.
Steps
Open Microsoft Project and create a new project or open an existing project.
Click on the "View" tab in the ribbon and select the Macro command.
In the "Macro" dialog box, give your macro a name, such as "Insert Risk Questions," and click "Create."
This will open the Visual Basic Editor. In the editor, you can write the code for your macro. The code will consist of a series of commands that tell Project what to do.
Here's an example of VBA code you can use to insert risk evaluation questions into the Notes field for a selected task in Microsoft Project:Sub InsertRiskQuestionsForTask()
Sub InsertRiskQuestionsForSelectedTask()
Dim t As Task
Set t = ActiveSelection.Tasks(1) 'get the first selected Task
If Not t Is Nothing Then
t.Notes = t.Notes & vbCrLf & "What are the potential risks associated with this task?" & vbCrLf & "What can be done to mitigate those risks?"
End If
End Sub
In this example, the code uses the ActiveSelection object to get the currently selected tasks in the active view. It then selects the first Task in the selection using the Tasks(1) property. Finally, it checks to ensure the Task was found and, if so, appends the risk evaluation questions to the end of the Task's Notes field using the Notes property.
Again, you can customize the text of the risk evaluation questions to fit your specific needs. If you want to add these questions to a different field, such as a custom field, you can modify the code to reference that field instead.
You could modify the code to loop through all selected tasks if you wanted to add the risk evaluation questions. The code for a loop would be:
Sub InsertRiskQuestions()
Dim t As Task
For Each t In ActiveProject.Tasks
If Not t Is Nothing Then
t.Notes = t.Notes & vbCrLf & "What are the potential risks associated with this task?" & vbCrLf & "What can be done to mitigate those risks?"
End If
Next t
End Sub
To run a macro in Microsoft Project:
Click on the "Macros" dropdown menu and select "View Macros."
In the "Macro" dialog box, you will see a list of all the macros created for this project. Select the macro you want to run and click "Run."
Alternatively, you can run a macro by using a keyboard shortcut. Press Alt + F8 to open the "Macro" dialog box, select the macro you want to run, and click "Run."
The macro will execute and perform the actions you programmed it to do. Depending on the complexity of the macro and the size of your project file, it may take a few moments to complete.

Update Expert Project
Your expert project has been used as the simulation file in the two simulations, so no other work on this project is suggested.

Activity 9 - Evaluate Risk Exam
Complete this Activity by taking this exam. Take the exam here.
Figure 21 Activity 9 Exam.

List of Competed Simulation Files
For this Activity, these files should be archived if you plan to apply for either of the two completion certificates. If you are working with a coach, forward these files.
Risk Evaluation.mpp
Expert Project.mpp

Suggestions and Corrections
Please help us make this Master Class better. Click on the Help icon above or Report on the menu to send us suggestions and corrections.

Using Process Bridge? It’s easy to follow the workflow…
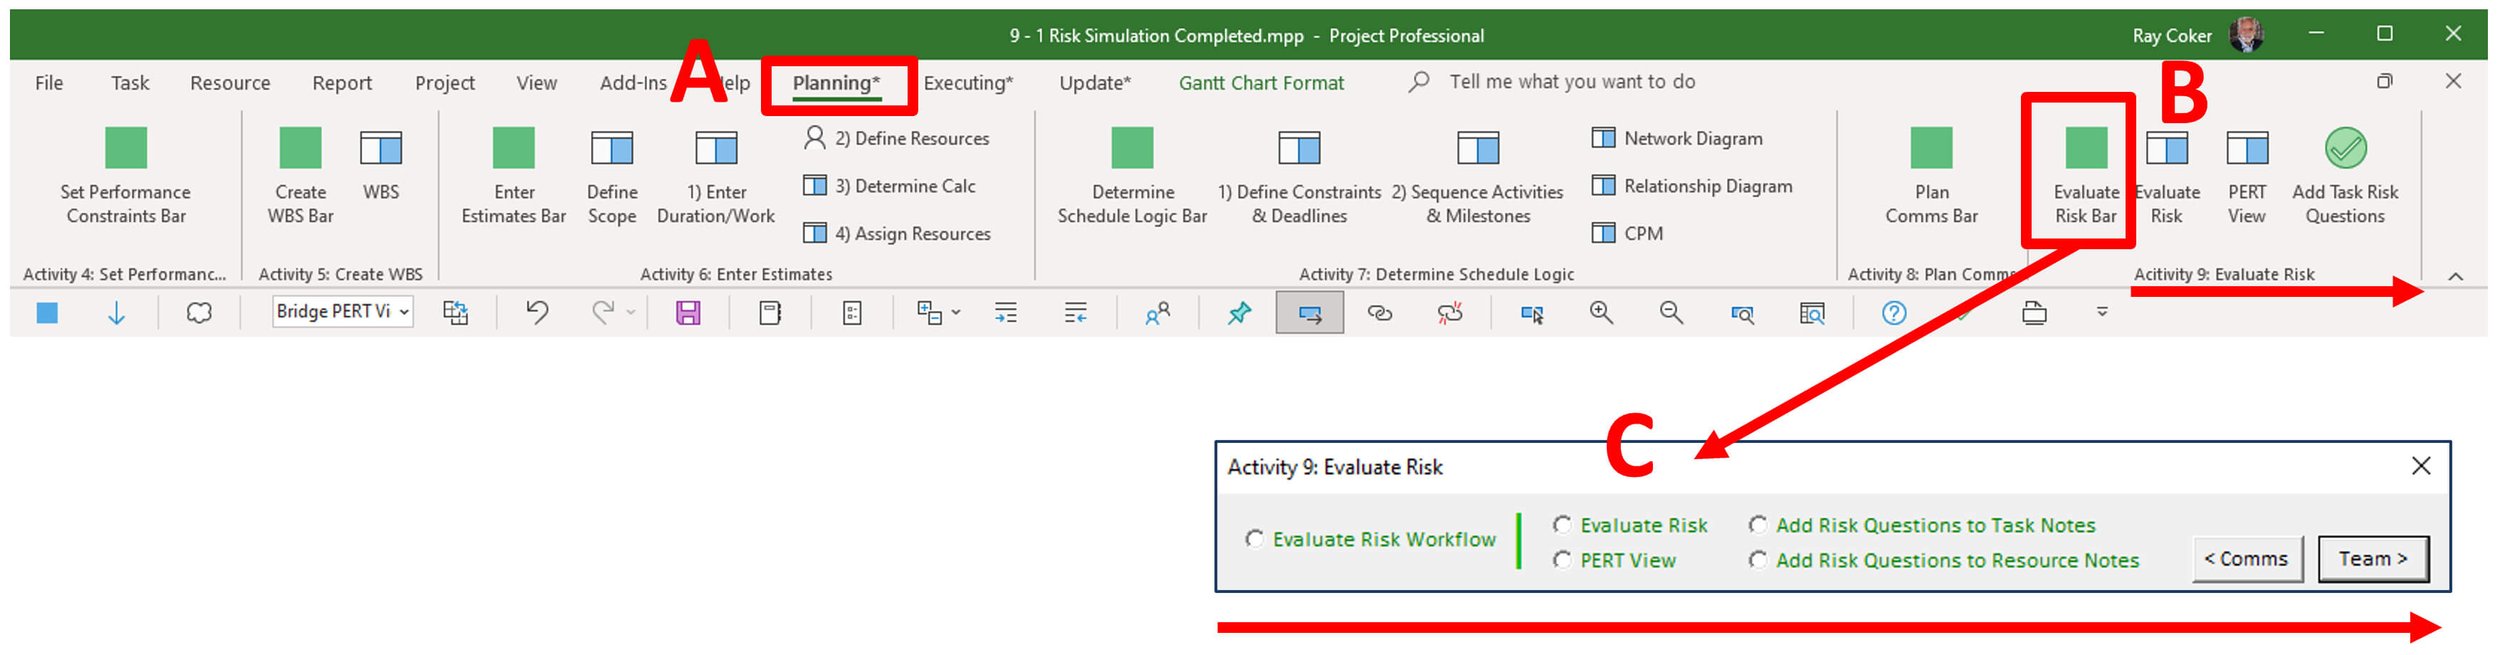
Figure 22 Process Bridge tab and Activity 9: Evaluate Risk floating toolbar.
A - Activity 9: Evaluate Risk is located under the Planning tab on the ribbon.
B - Risk Evaluation commands.
Evaluate Risk - Applies a split window that opens the task Notes field for entering information on risk.
PERT View - Applies a Gantt Chart view for entering and calculating PERT estimates.
Add Task Risk Questions - Insert the qualitative risk question to Notes for a selected task.
C - Activity 9: Evaluate Risk floating dialog box.
Evaluate Risk Workflow
Evaluate Risk - Applies a split window that opens the task Notes field for entering information on risk.
PERT View - Applies a Gantt Chart view for entering and calculating PERT estimates.
Add Task Risk Questions - Insert the qualitative risk question into Notes for a selected task.
Add Resource Risk Questions - Insert the qualitative risk question into Notes for a selected resource.
Click the Evaluate Risk Workflow command on the floating toolbar to view this workflow.
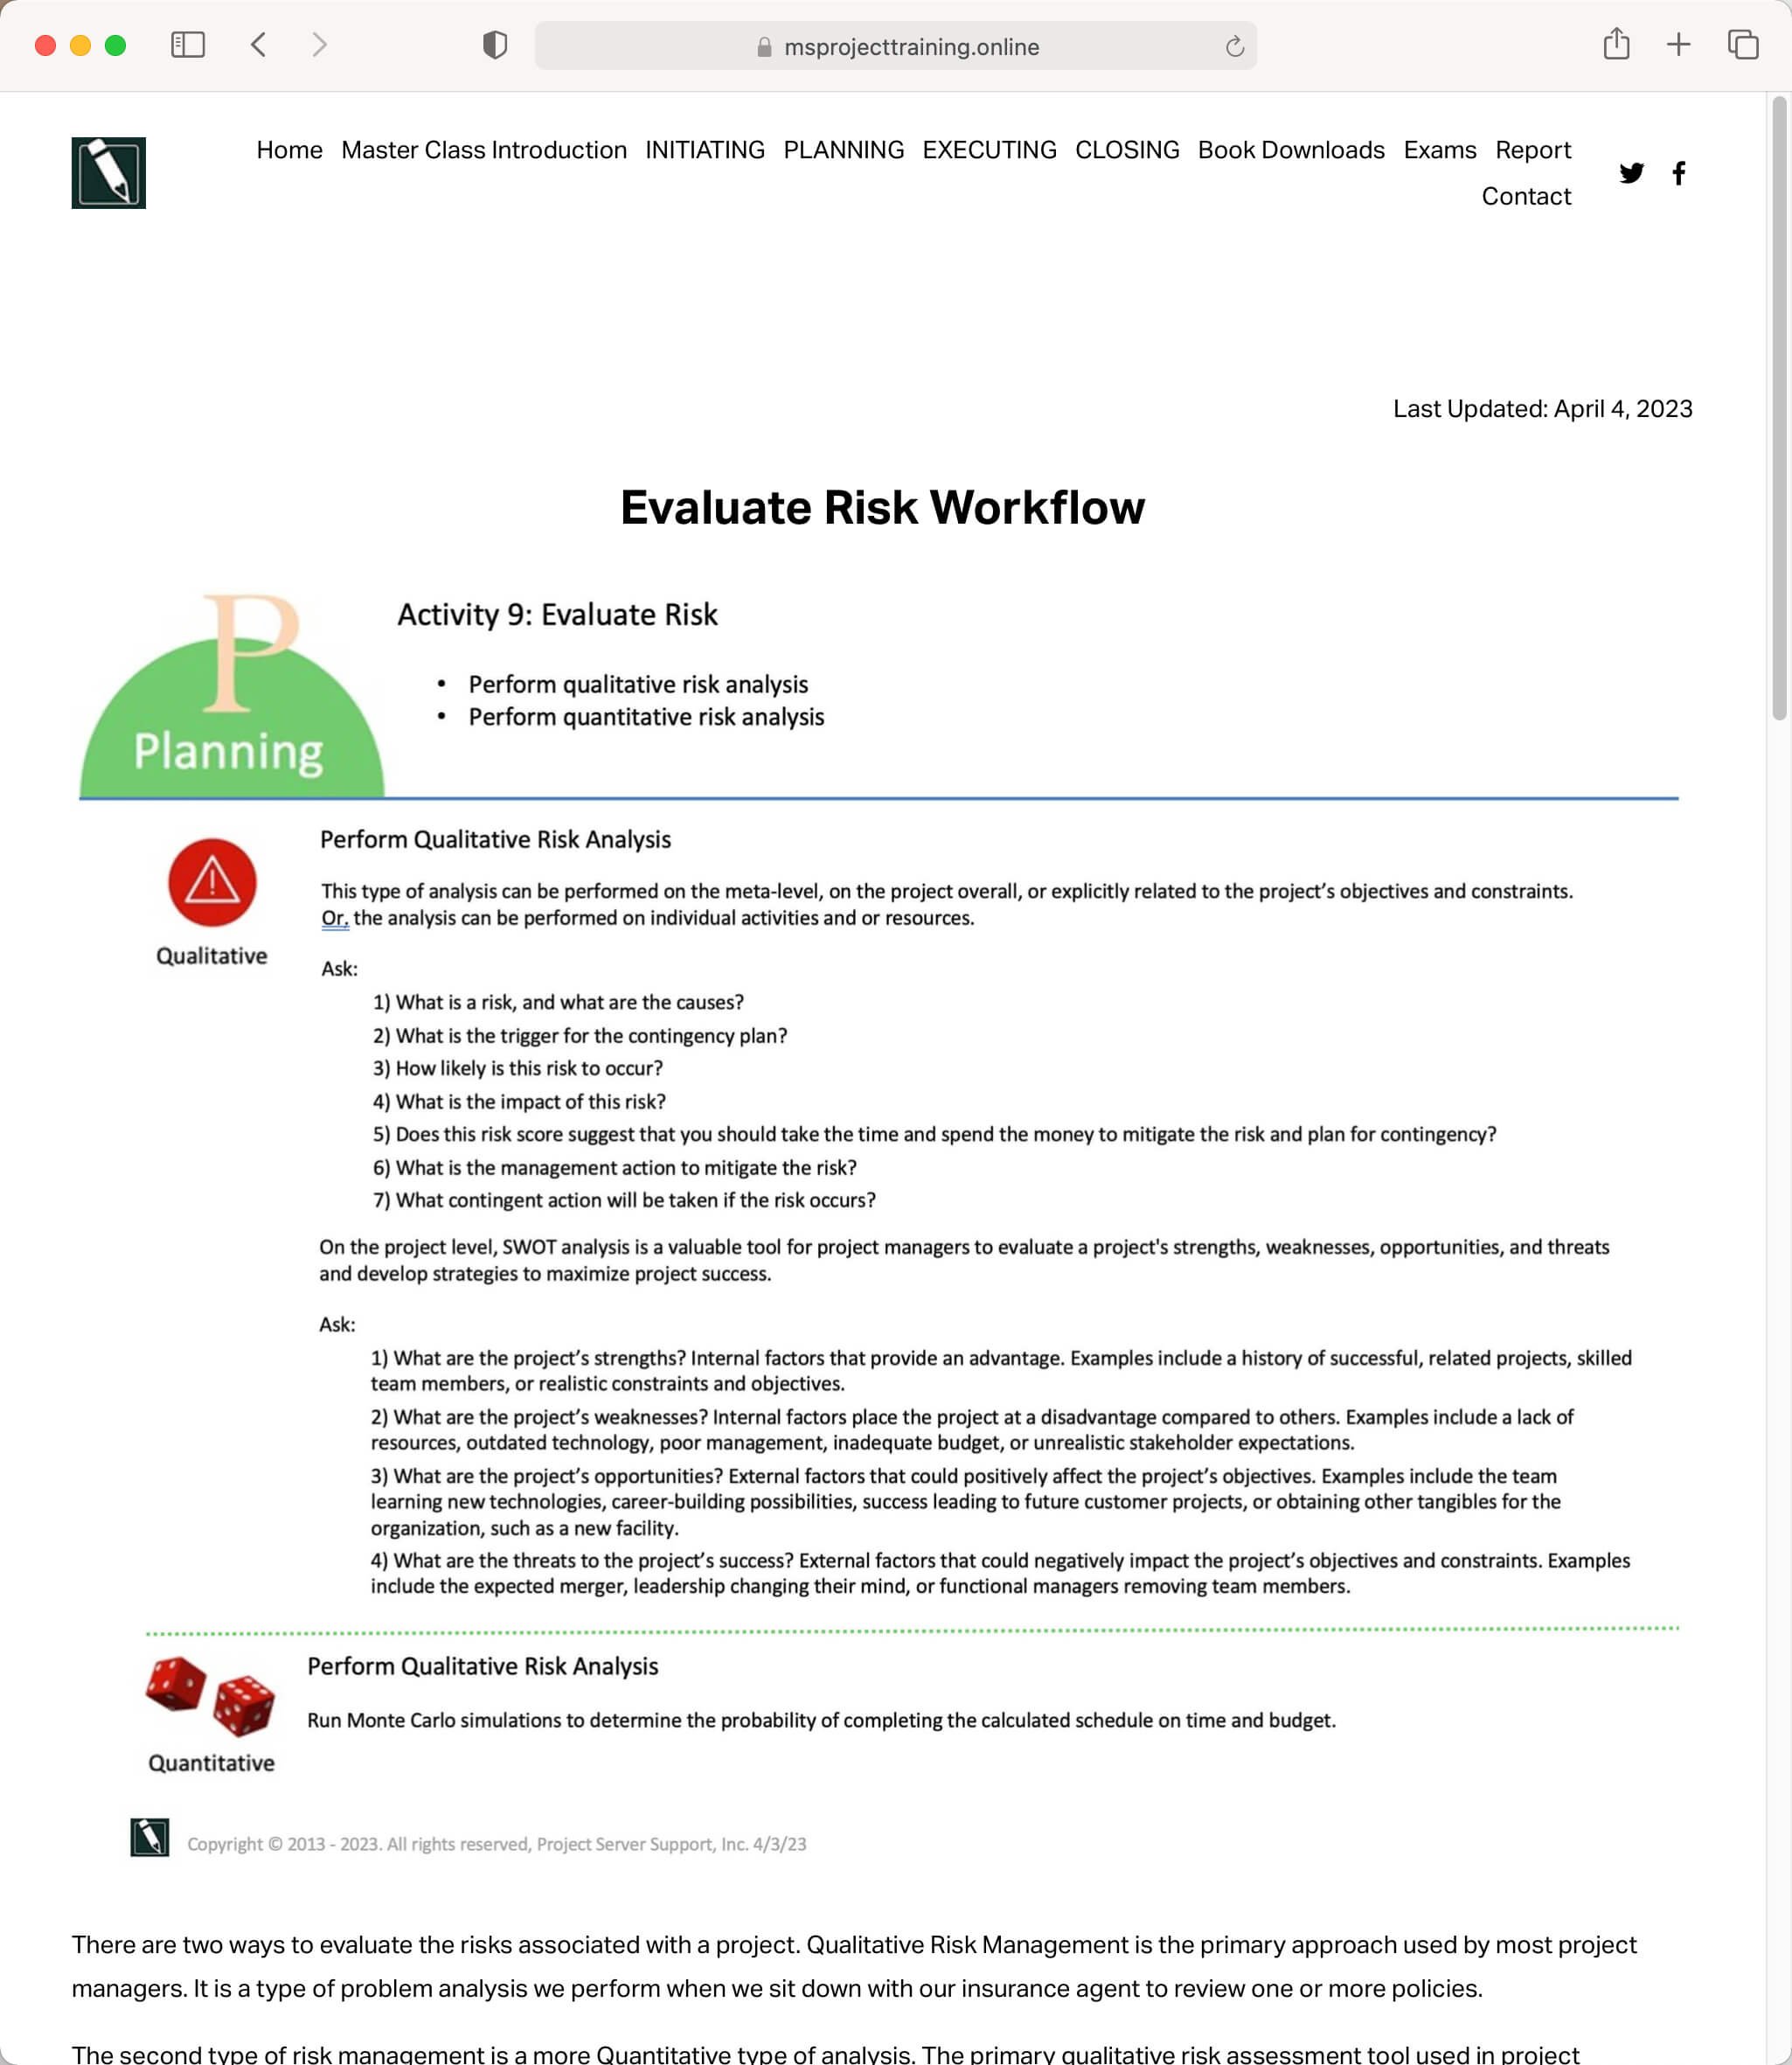
Figure 23 Evaluate Risk Workflow
Click on the Evaluate Risk command to apply a split window that opens the task Notes field for entering information on risk.
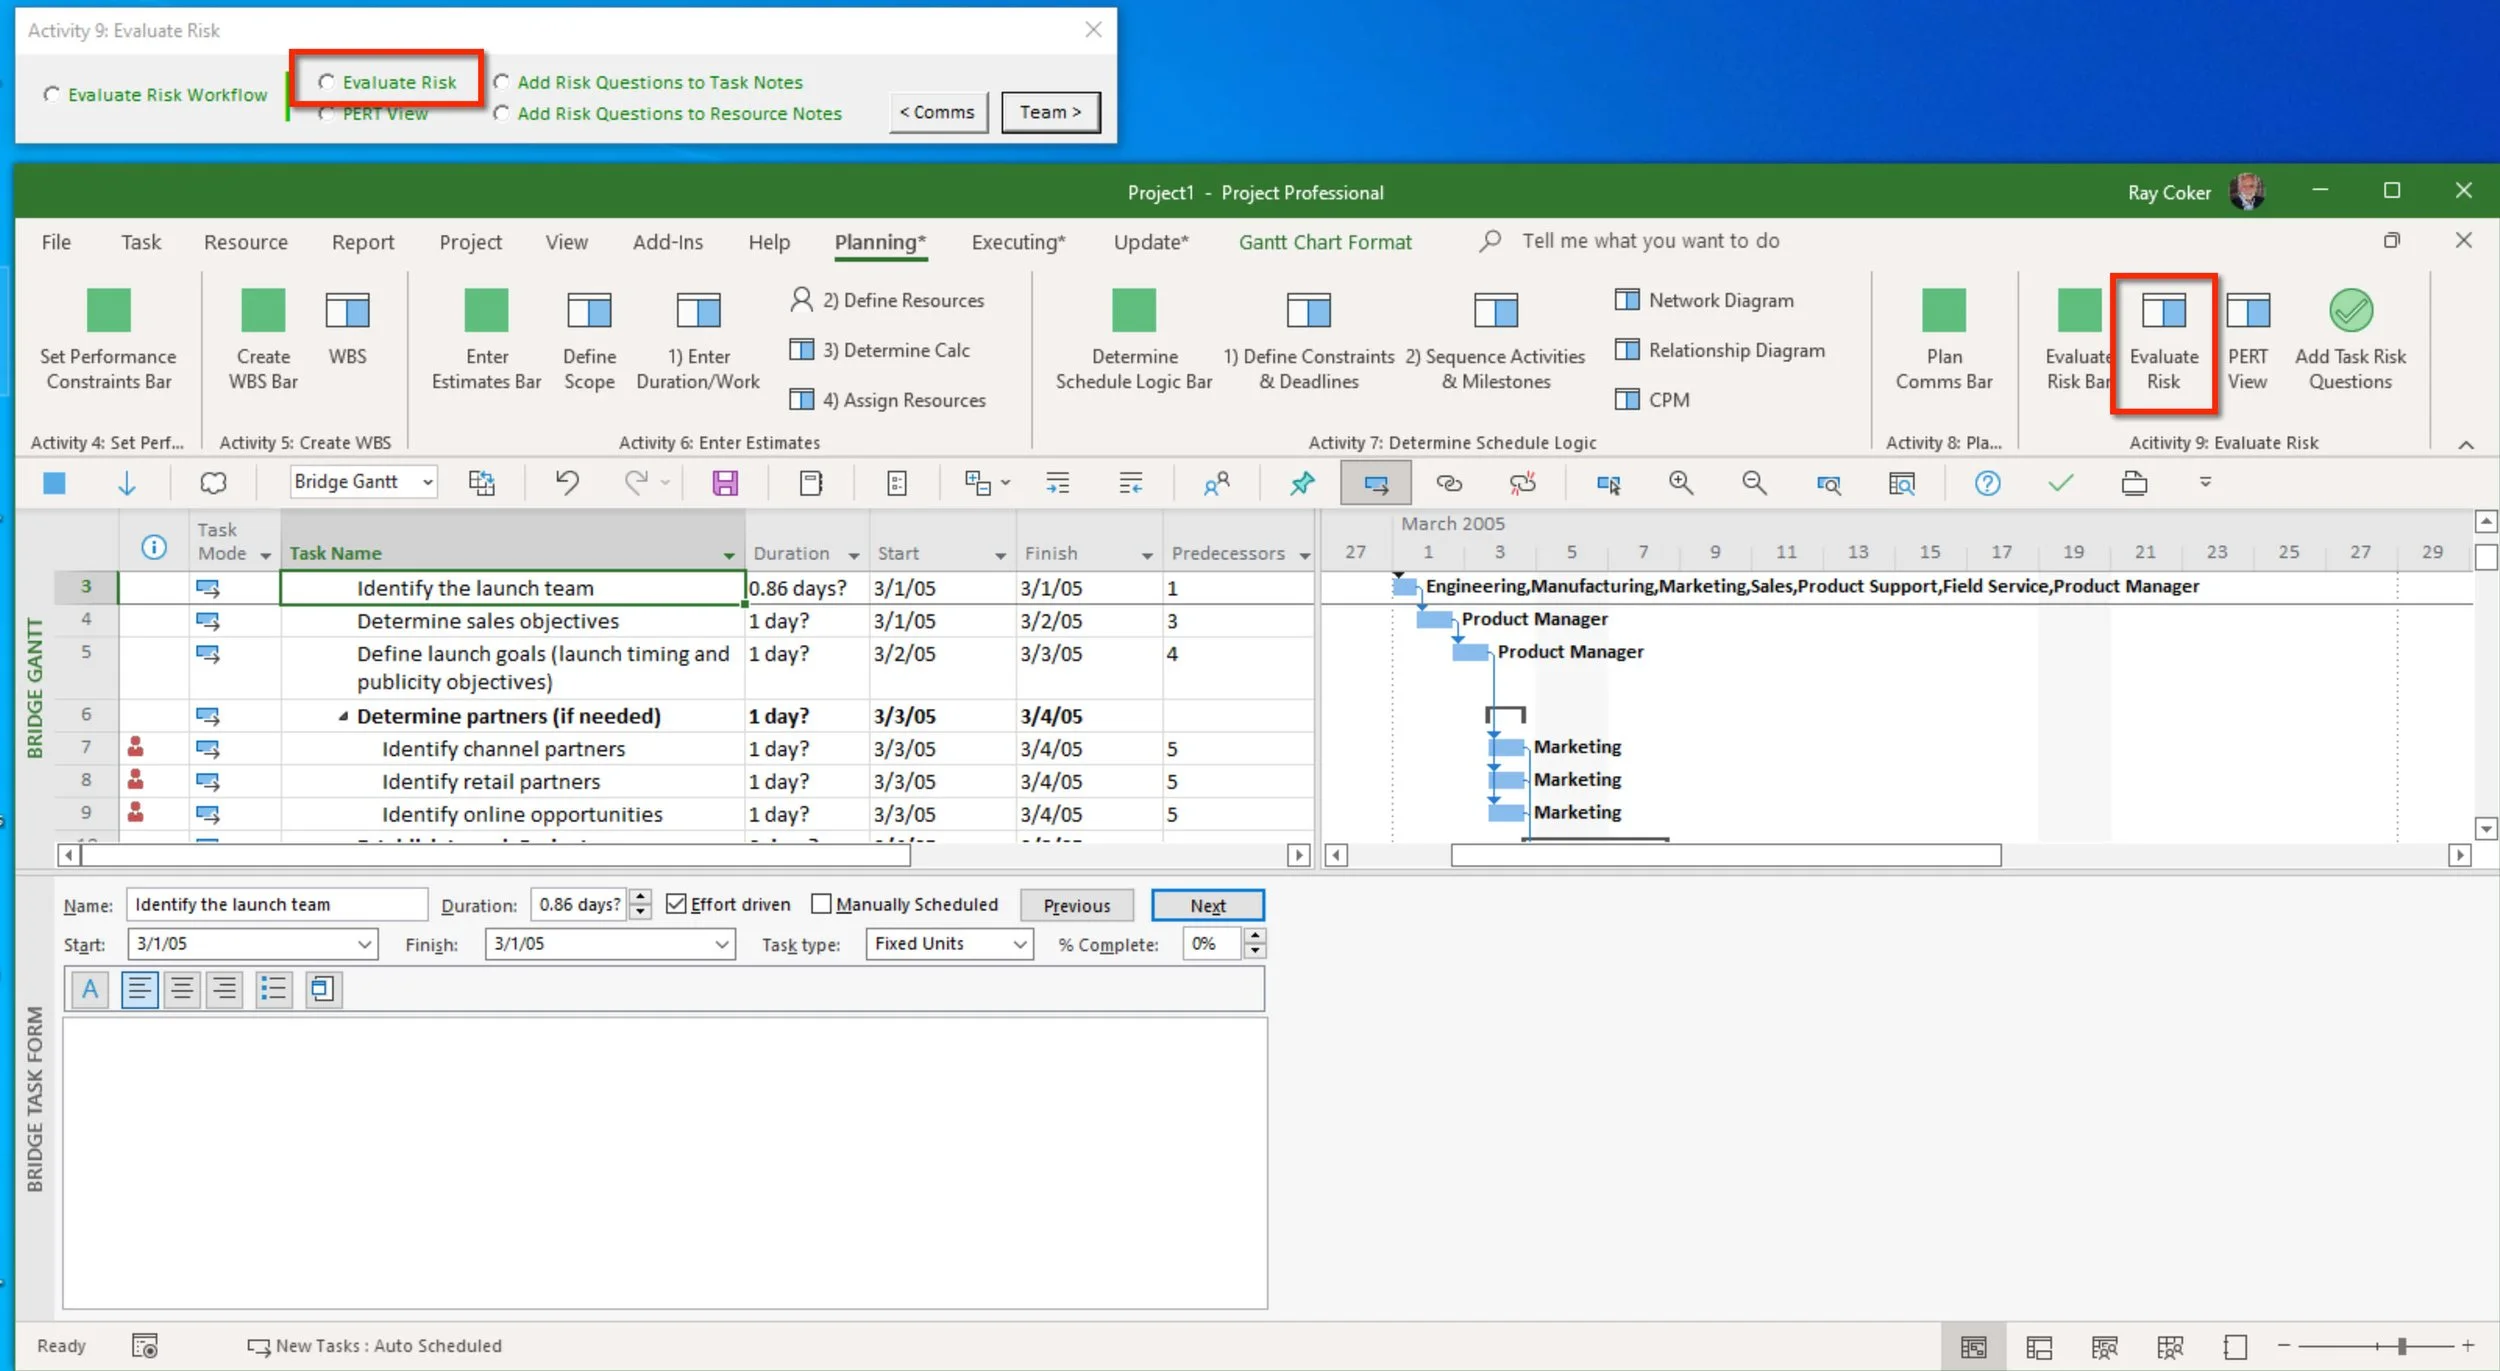
Figure 24 Evaluate Risk view.
Click on the PERT View command to apply a Gantt Chart view for entering and calculating PERT estimates.
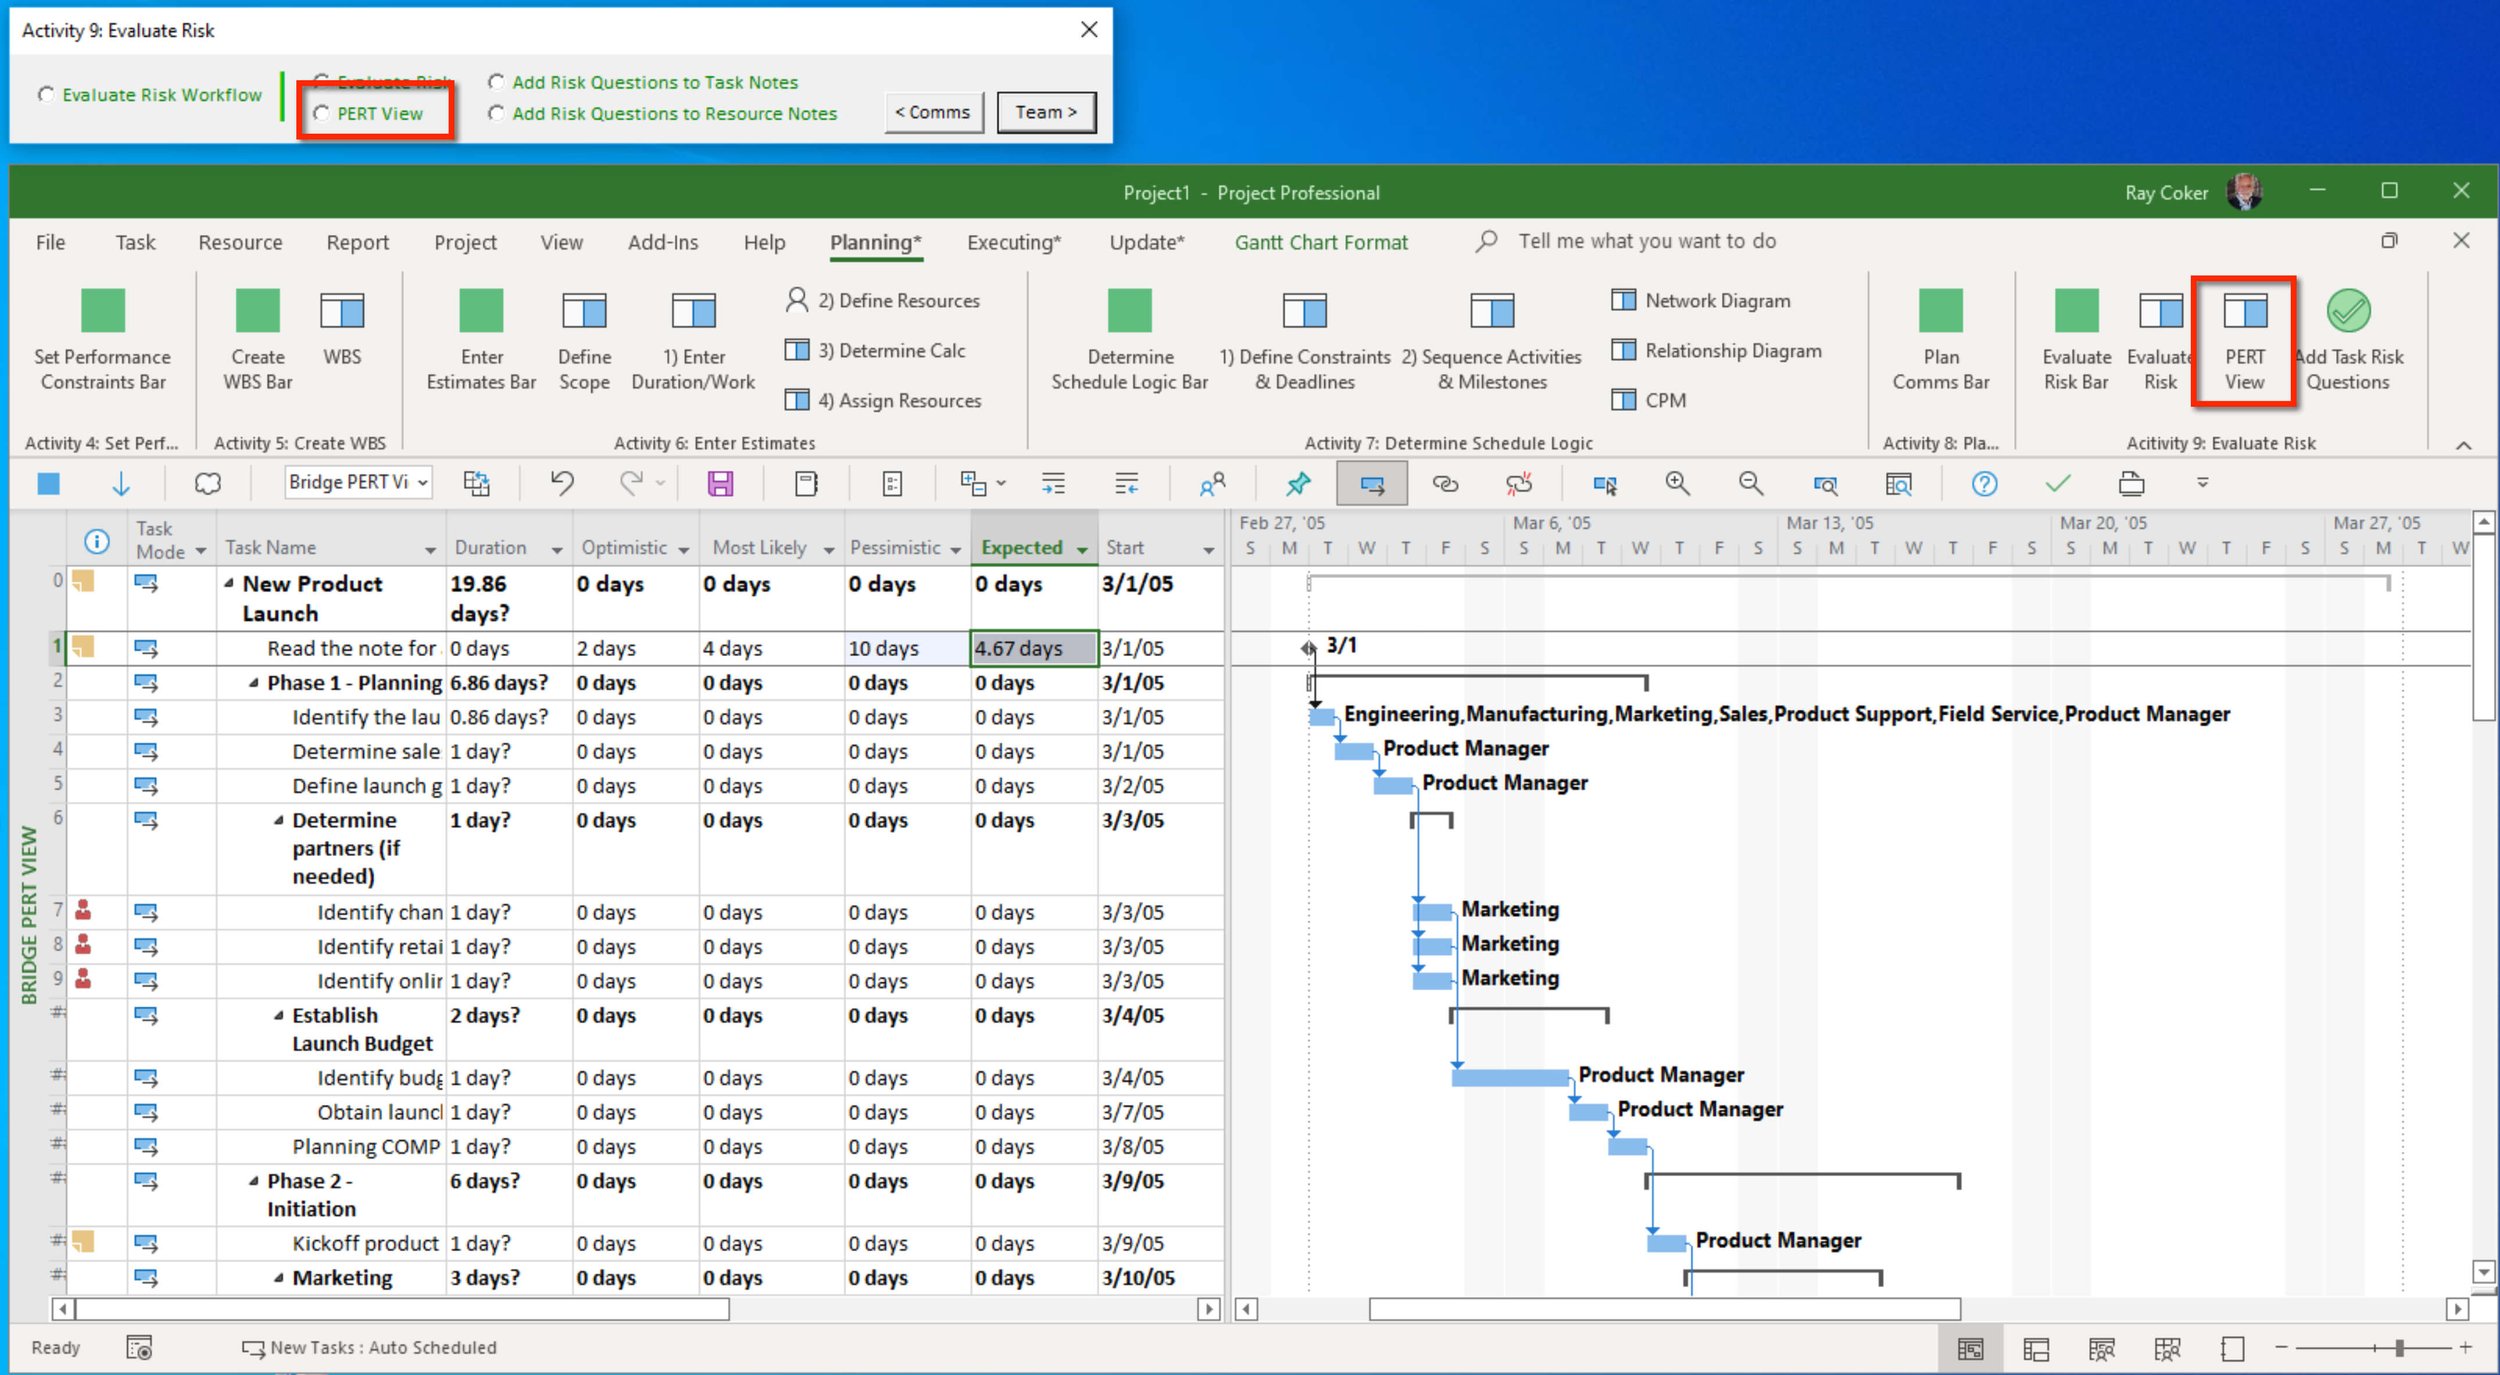
Figure 25 PERT View.
Click on the Add Task Risk Questions or Add Risk Question to Task Notes command to insert the qualitative risk question into Notes for a selected task.
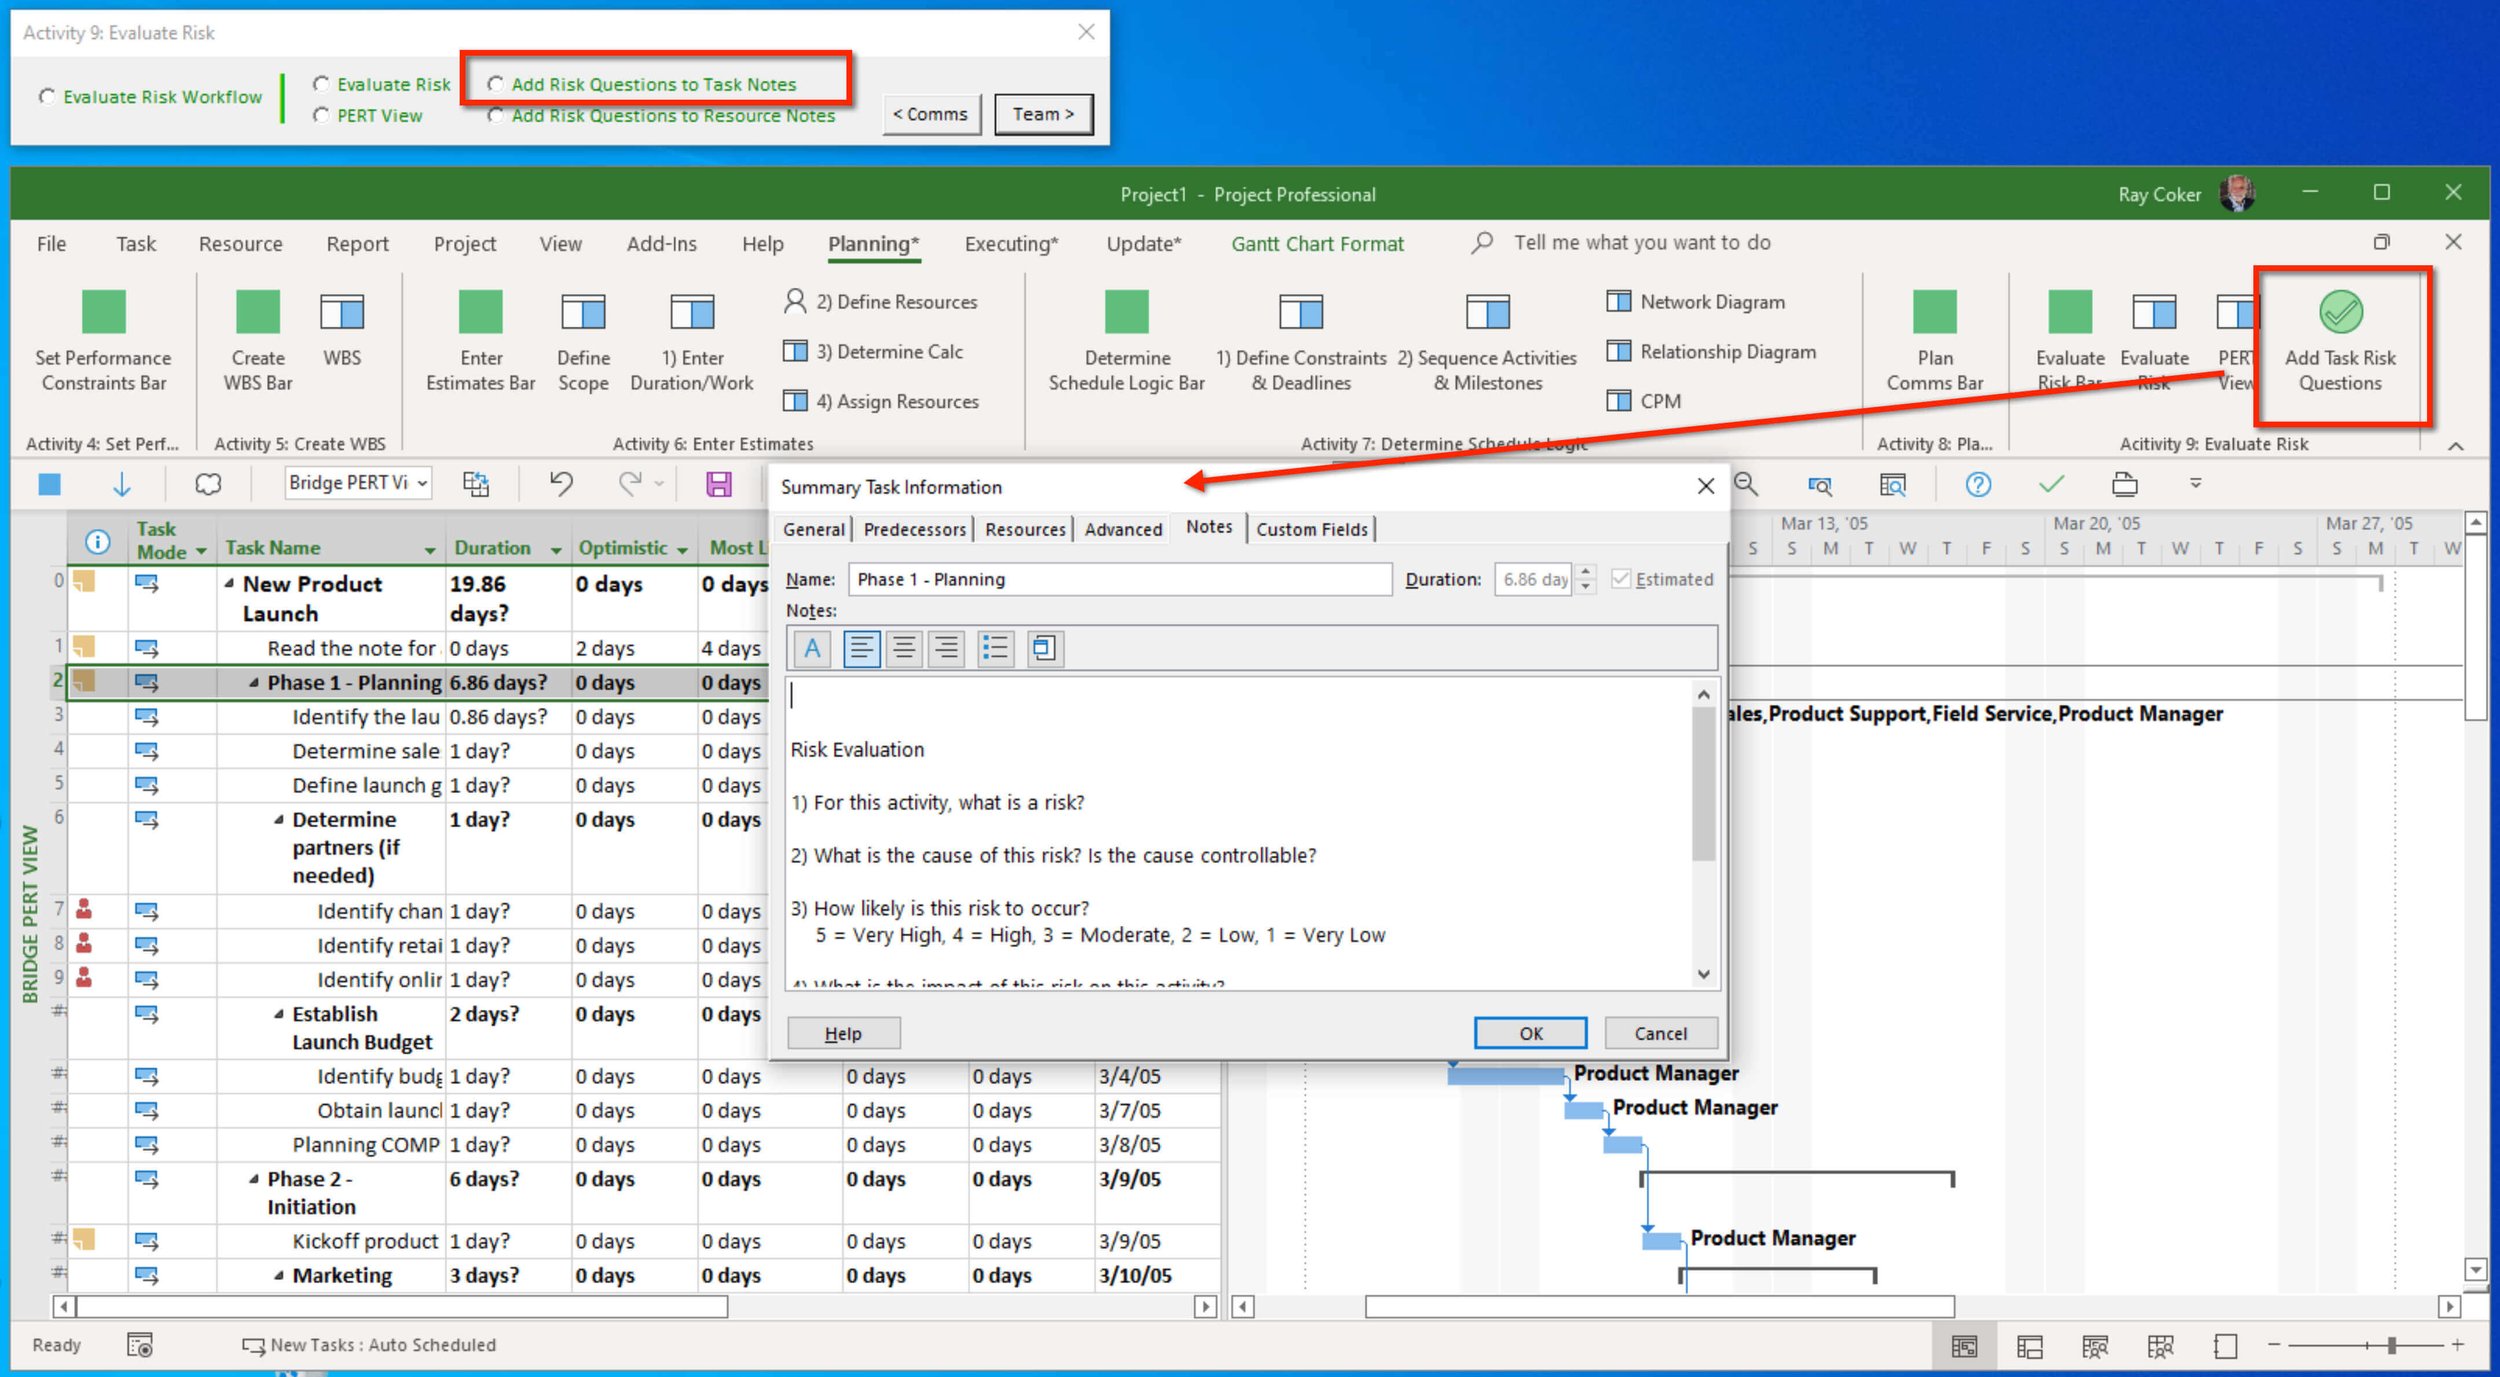
Figure 26 Adding risk questions to task Notes.
Click on the Add Risk Question to Resource Notes command to insert the qualitative risk question into Notes for a selected resource.

Figure 27 Adding risk question to resource Notes.