
Last Update: February 26, 2022

Activity 6: Enter Estimates in Microsoft Project
Page Outline
Application 1 - Learn Enter Estimates Workflow
Activity 6 Workflow Simulation - 45 minutes (jump to)
Enter Estimates Content Links (jump to)
Application 2 - Enter Scope Statements
Define Scope for Detail Tasks and Milestones Simulation - 20 minutes (jump to)
Application 3 - Enter Duration and/or Work
Estimating Approaches Simulation - 15 minutes (jump to)
Application 4 - Use Tables, Views, the Visual Basic Editor and Custom Fields to Perform PERT Calculations.
PERT Customization Simulation - 45 minutes (jump to)
Application 5 - Define Resources (jump to)
Define Resources Simulation - 30 minutes (jump to)
Application 6 - Make Assignment Calculation Selections (jump to)
Assignment Calculation Simulation - 15 minutes (jump to)
Application 7 - Assign Resources (jump to)
Assign Resources Simulation - 45 minutes (jump to)
Finalized Updates to the MS Project Master Class Plan.mpp (jump to)
Review of Best Practices (jump to)
Activity 6: Enter Estimates Exam (jump to)
Simulation Files (jump to)
Process Bridge (jump to)

Enter Estimates Workflow
Review
Review and learn the Activity 6: Enter Estimates workflow in Figure 8.
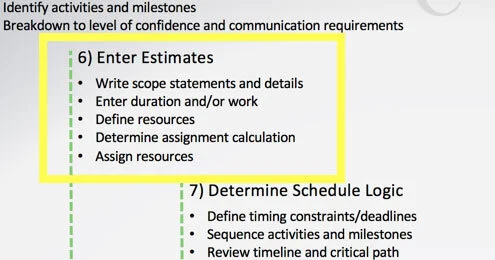
Figure 1. Activity 6 in Project MAP.

Note: This is Activity 6: Enter Estimates in the Project MAP project lifecycle.
Microsoft Project takes six proven project management concepts and techniques and bundles them together in one software tool for project managers. Activity 6 is the next logical step in project planning after creating a Work Breakdown Structure, suggesting that Microsoft Project has a built-in underlying process for planning and executing. Users might flip #2 and 3, but this is the process:
Enter Work Breakdown Structure.
Enter Estimates (Timing, Cost, and Work) at the Detail Task Level.
Schedule Activities Schedule Logic (Critical Path Method).
Level Resources.
Baseline project.
Update and modify the project.
Entering estimates in Microsoft Project is a function of three things:
Enter estimates of duration, work, or both.
Select how you want tasks to calculate when you assign resources.
Make resource assignments.
Typically, if you enter an estimate of Duration for a task, Microsoft Project will calculate the Work and Cost for the task when resources are assigned, thus completing the estimate for a task.
Typically, if you enter an estimate of Work for a task, Microsoft Project will calculate the Duration and Cost.
Undeniably, understanding the calculations and how to efficiently and effectively assign resources and then schedule those resources is the most difficult aspect of learning and using Microsoft Project.
However, our experience is that the effort involved in learning this feature set creates opportunities for the project manager. Almost every manager in every company and organization sees the need to better manage resources on projects.
Microsoft once reported that across all of the millions of Project users worldwide, less than 20% of users have taken the time to learn this feature set. Our estimate is that it takes a project manager about 20 hours to learn this functionality on their own. Approached systematically, we believe managers can learn it well in three or four hours.

Journal
The name of this Activity (chapter) is Enter Estimates. A better title might be Calculate Estimates because we are doing more than just using Microsoft Project as a repository. We want to use it as a tool that calculates our estimates. How does Project do that?
It does it when you follow this Enter Estimates Workflow.
What are the six techniques that combine to form the core functionality of Microsoft Project?
When you enter and calculate your estimates, can you think of a better workflow for Activity 6? If yes, what is that workflow?

Best Practice
The real skill in project management is juggling three balls at the same time when managing a project:
Scope (this includes WBS with well-defined performance for each detail task.
Time (schedule and the resource management related to that schedule).
Cost (this includes resource work and availability).

Activity 6 Workflow Simulation - 45 minutes
Open your MS Master Class Plan.mpp you worked on during the previous two Activities. As mentioned, we are going to work on this plan throughout the class.
First, using the Table of Contents in the Master Class Book and the Outline above, create the WBS for Activity 6: Enter Estimates.
As mentioned in the last Activity, Create Work Breakdown Structure, estimates and resource assignments are the Scope portion of the Project’s Triple Constraints. When the Scope is completed we have a schedule (Timing) and Costs.
Each summary task and detail task are little triangles of Project Scope, Timing, and Cost. The detail tasks all combine to provide the Triple Constraints for the entire project. As mentioned before, the idea is that if you build a project bottom-up, at the detail level, the triple constraints for the project will be more realistic and or accurate.
You manage the triple constraints for the project by managing the constraints for each detail task or activity.

Figure 2. Triple Constraints
In Microsoft Project, there is timing and cost (work) information on the detail level. For example, there is a calculated Start and Finish date for each detail task and milestone, and all of the Critical Path Method dates and durations. Costs are broken down by resources and there are a variety of cost data. However, there is nowhere in Microsoft Project to enter the Scope (other than the name of the task) for detail tasks and milestones.
We are going to recommend that you enter Scope in the Notes field for each detail task and milestone. The information for this scope definition or “scope statement’ is up to you. Some suggestions are in the Enter Estimates Workflow below.
In the MS Project Master Class Plan.mpp file you have open, move up to the first task under the Planning Phase. This phase is broken down to Level 4. The scope of #27 Select Performance Constraints Workflow at Level 3 in the figure below is the three detail tasks at Level 4 below it. The three tasks indented below #27 are terminal tasks, what Project calls detail tasks, those are the ones that require scope statements.
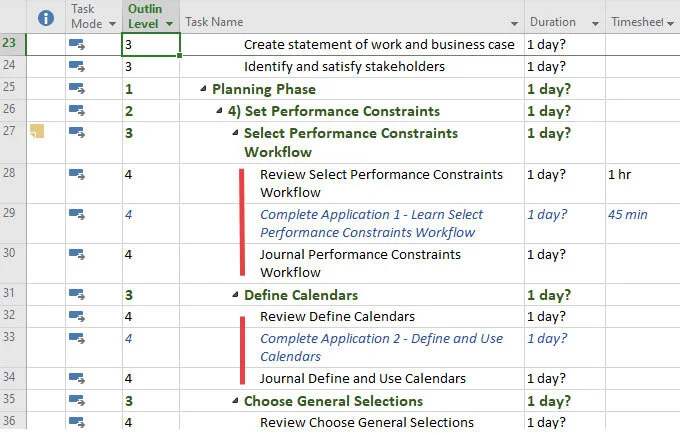
Figure 3. Outline Level 4.
However, in this case, there isn’t much we could write about those tasks, in fact writing scope statements would be unnecessary busywork. With a WBS, we are always walking a fine line between having enough detail in a project plan that provides enough information for meaningful formal communication about the project and so much detail we spend more time managing the plan in Microsoft Project than actually working on the project.
If you are hesitant about writing a scope statement for a task because it seems meaningless, it might be an indication that you have broken down the project too far.
In the figure above, Level 4 could be eliminated and listed in the Notes field for Level 3 as part of the scope statement.
As mentioned several times, too much detail is often as bad as too little.
Project Examle

I remember looking at one detailed task in a schedule at MacDill Air Force Base that had costs of several million dollars. The commander said the project was broken down far enough for a billion-dollar project. But, for that task with a budget of several million dollars, there was a lot of definition and requirements in Notes for the task.

It is common for organizations to specify the level detail. One group at CP Ships, did not want tasks in the WBS broken down further than 40 hours of work.
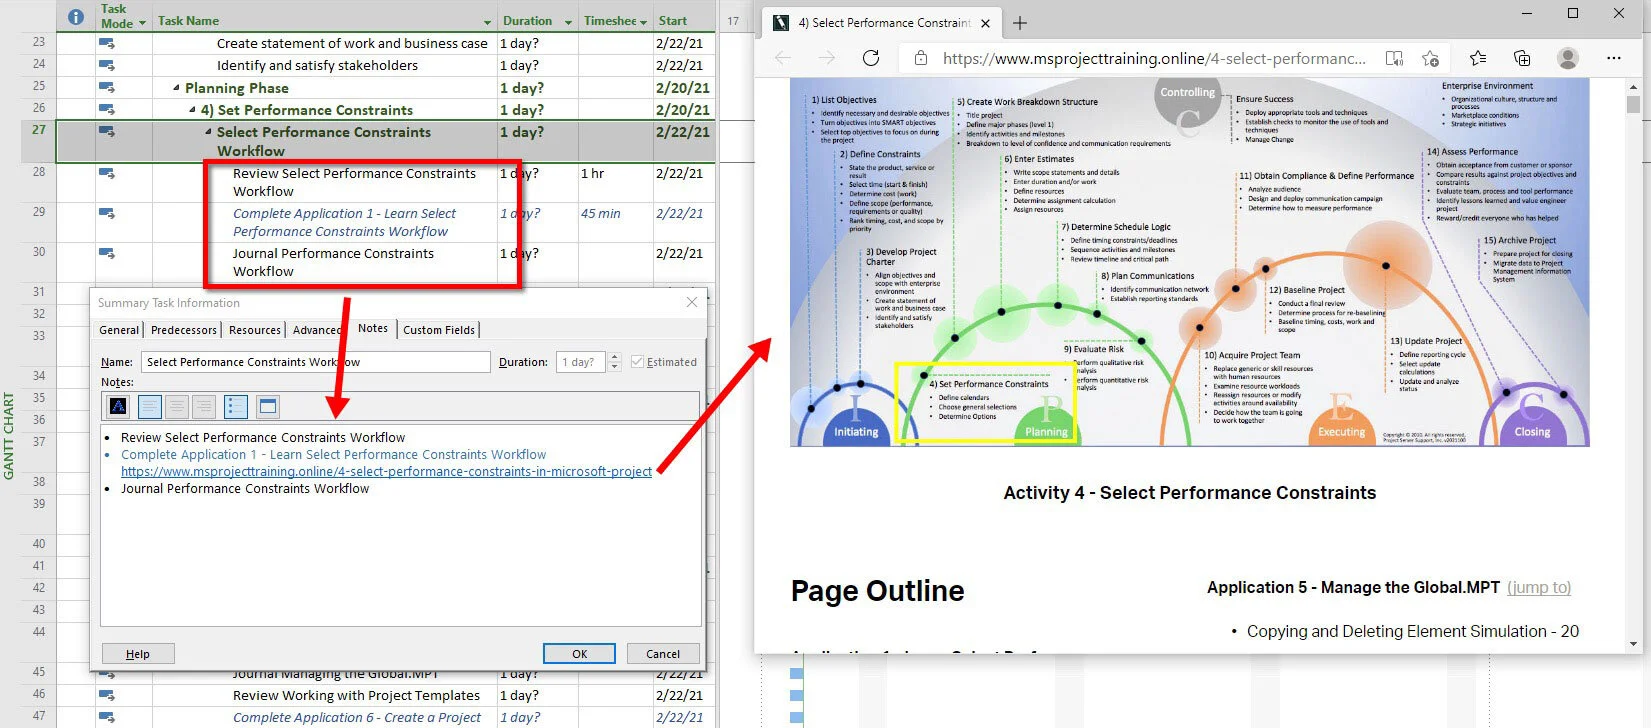
Figure 4. Entering for a detail task.
The next step in the Enter Estimates workflow is to enter estimates of Duration and/or Work. For this particular project, we are going to enter Work estimates because the focus in this Master Class is on effort. Let’s do one together.
So far in the MS Project Master Class Plan.mpp, we have been entering duration. Although work and duration can be the same, they are different estimates. For instance, you might have only spent 4 hours on the last Activity, but it took you 2 weeks to complete it. The Actual Work was 4 hours, the duration was two weeks.
In your opened MS Project Master Class Plan.mpp project, Insert the Work field, this is where we will enter our estimates. For the three tasks under #27 enter the Work estimates for the three detail tasks shown in the figure below. I entered 30 minutes for #28 because the average person reads about 1 page in 2 minutes plus I added time to learn the workflow chart. For #29 there was already an estimate of 20 minutes.
In this example, you already have entered how long it took you to complete each task. That is one of the reasons to collect actuals, to provide data we can compile for better estimating in the future.
Another purpose of the Notes field is to capture any other information we want to keep track of. With this project plan, we are going to enter Actuals, but that might be several weeks away and we are already working on the plan. For now, in the Notes field for Activity 4 and 5 at Level 1, enter the dates you worked on these activities, just what week it was so that it will jog your memory when you enter actuals.

Figure 5. Work estimates and a custom field for keeping track of time spent on tasks.
The next step in the Enter Estimates Workflow, after you have entered estimates of Duration, Work and or both, is to define resources. In project management software there is a technique for estimating timing, work, and cost. That technique is to enter a part of the estimate like we just did when we entered work estimates, and then make the correct selections for how you want the rest of the estimate calculated when you assign resources.
Before you can assign resources you have to define resources.
In your project plan, switch to the Resource Sheet view. Type in your name, you are going to be a Work type of resource. Then enter your Standard Rate. You can enter this per hour, day…or year. Coming up with a Standard Rate can be extremely easy at times and at times extremely difficult. When I have built project plans for deploying Project Server, I used our billing rate, so it was very easy to calculate the cost of the project for the customer. If you are an individual who is taking this Master Class on your own time, what is your rate? Do your best to come up with a rate. There is a Note field available for each resource just like there is for each task and each resource assignment. Enter the rationale for your standard rate in the notes field (double click on the resource to open the Resource Information dialog box with the notes field).
Government agencies have published rates for various grades or ranks and the HR departments for most larger companies have rates for positions that often include the cost of a position deskspace. In other words, the salary for the position plus the cost of their office space, insurance, benefits, social security, etc.
If you are working with a coach, define that resource too.

Figure 6. Resource Sheet view for defining resources.
Return to the Gantt Chart view.
Before we assign resources, we have to make a couple of selections to make sure our estimates calculate like we want them to.
Memorize
Double click on a task to open Task Information, which gives you quick access to over 35 commonly used fields, plus all of the dependencies and resource assignments.
Double click on a resource to open Resource Information, which provides you with quick access to over 25 commonly used fields, plus a cost rate table.
Double click on a resource assignment in either the Task or Resource Usage views to open Resource Assignment Information, which gives you quick access to over 15 commonly used fields.
For the tasks in the figure below, open Task Information, and in the Advanced tab, make each task Fixed Work. This selection basically fixes your Work estimate and when you assign resources the software will change the duration of the task accordingly.
Last in this workflow, in the Task Information Resource tab, assign yourself to each task. There is an easier way to make these assignments that you will learn about below, but for now, select all three tasks and then right-click and select Information. Assign yourself again at 100%.
Insert the Cost field. We now have duration, work, and cost estimates, all that is left to complete the timing estimate is to link tasks or set dependencies.
Save your project.

Figure 7. Assigning resources to multiple tasks. Assigning resources also completes the process estimating duration, work and cost for a task in Microsoft Project.
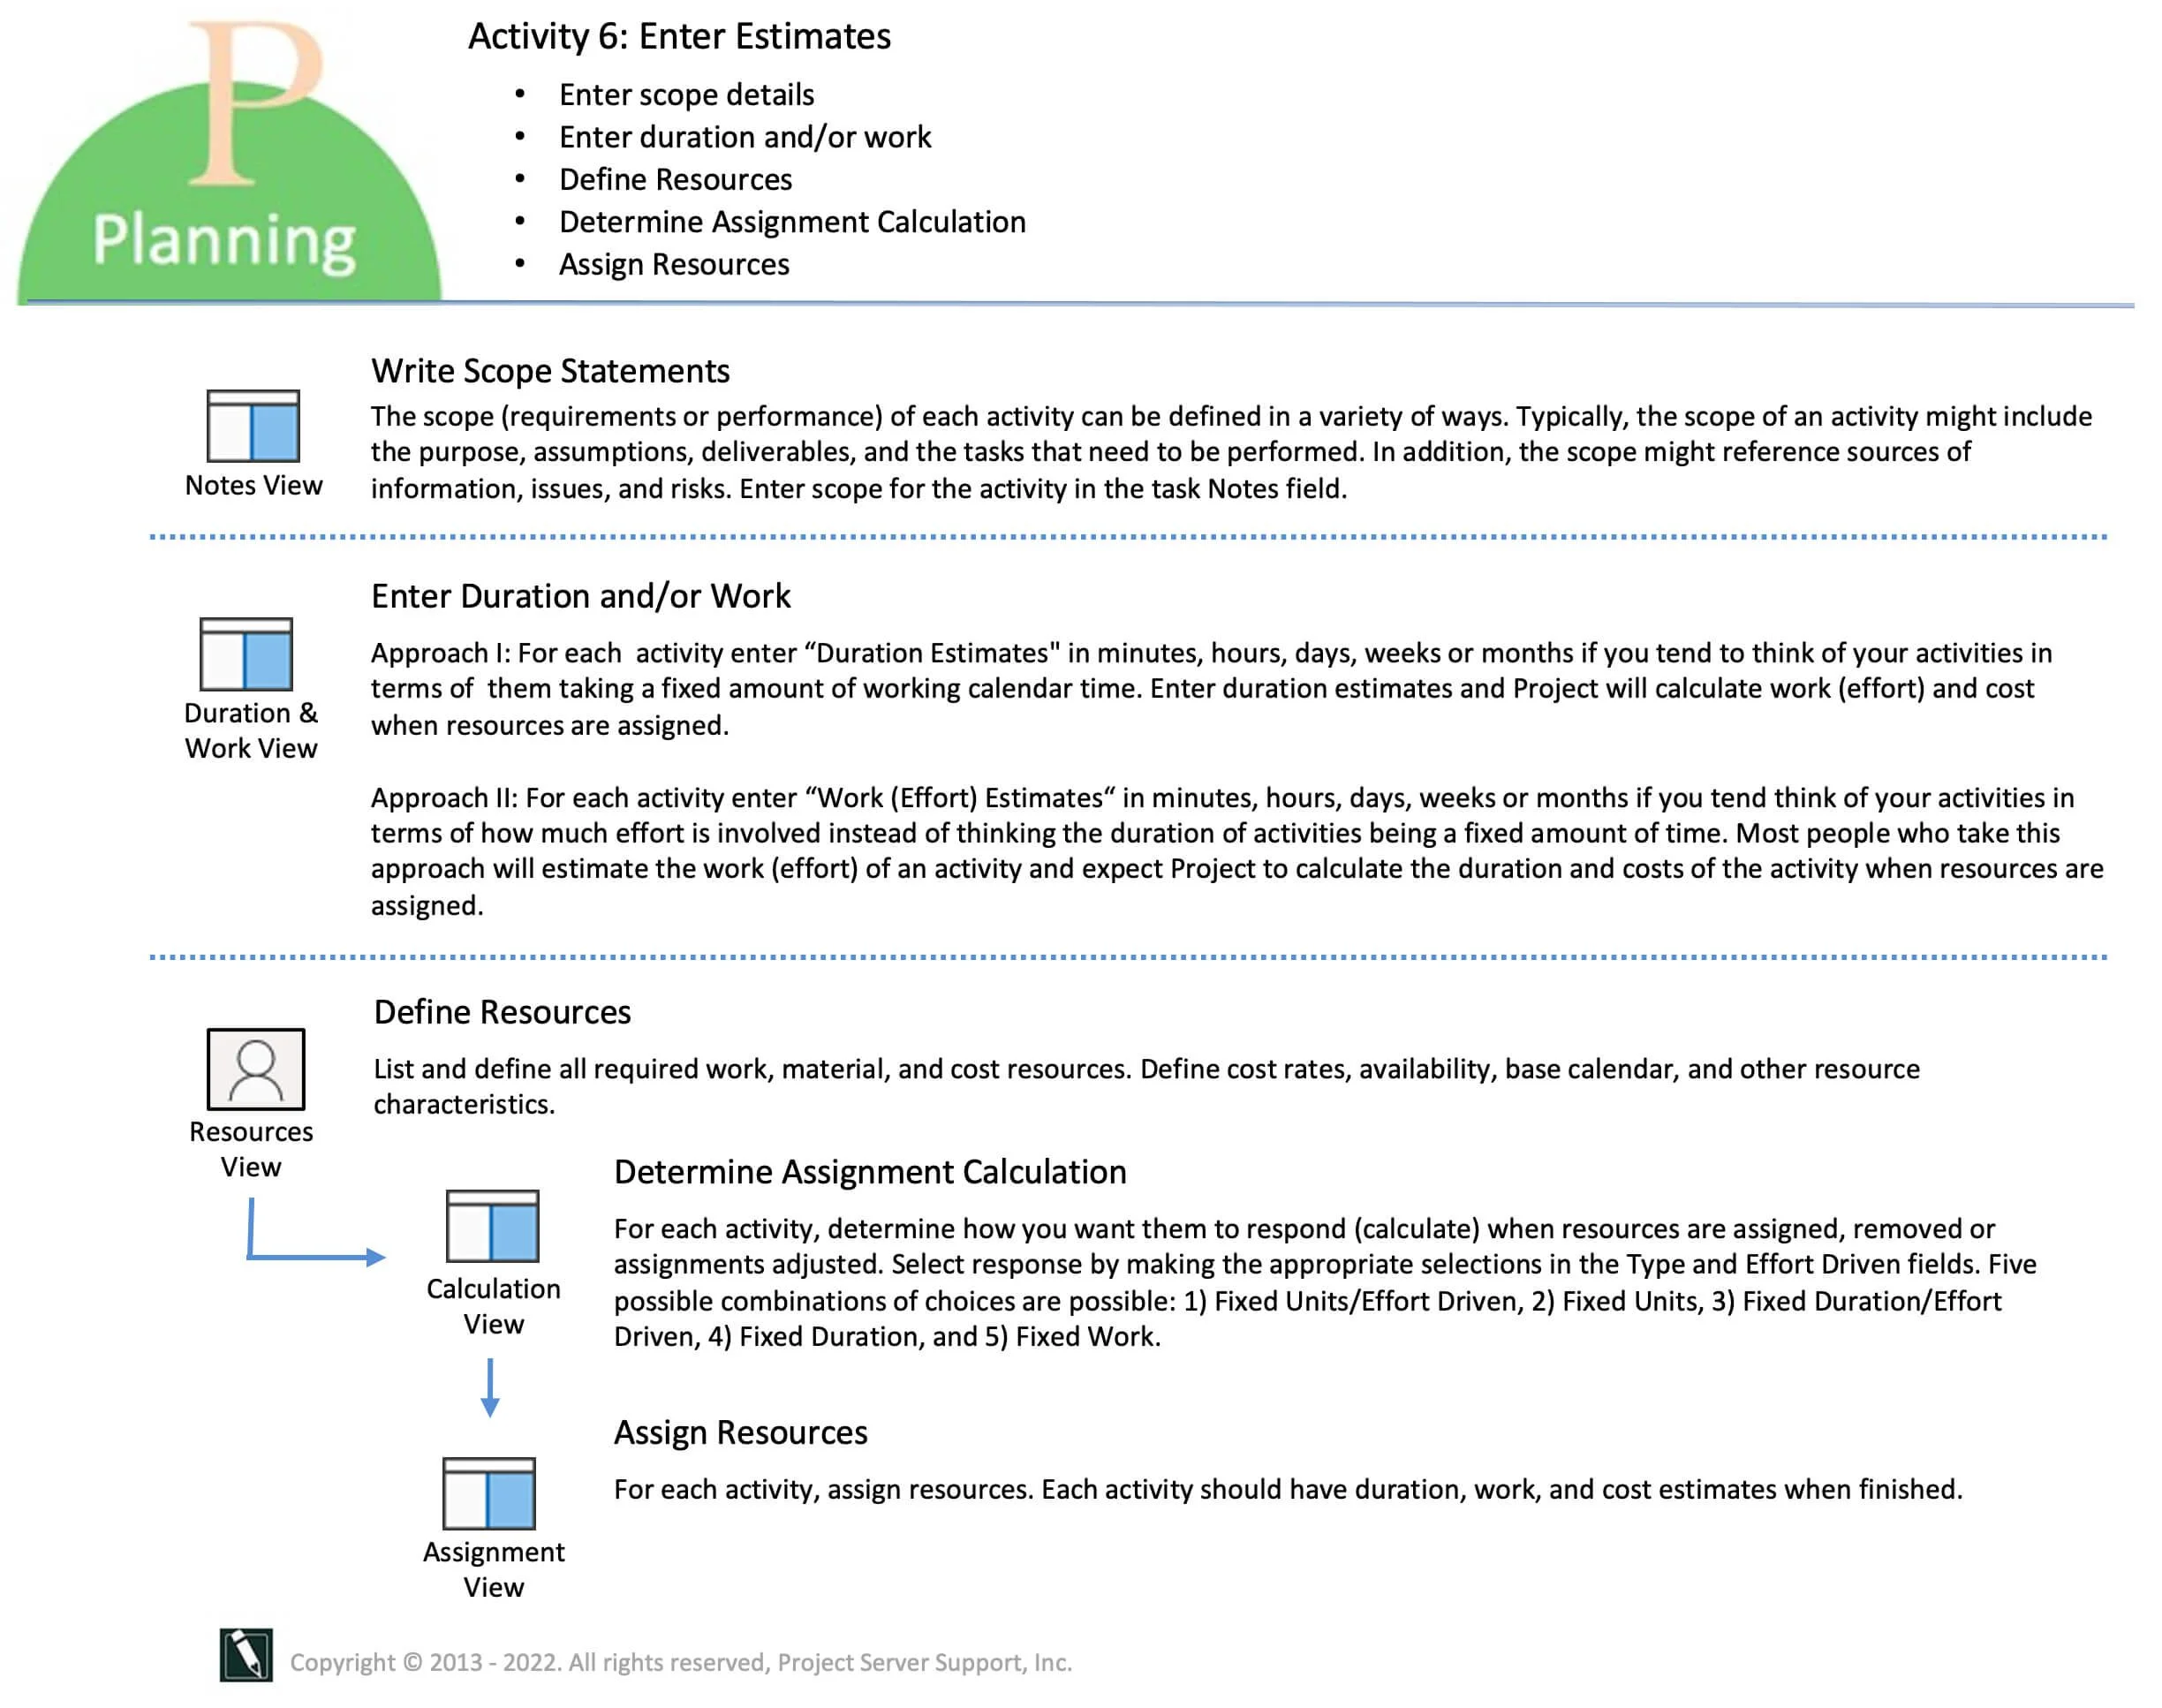
Figure 8. Enter Estimates workflow.

Download workflow a PDF
Return to the Master Class Book and review the next section for this Activity.
Content Links

There are three primary Notes fields in Microsoft Project and they all work in the same way.
These are:
Task Notes (found in task-based views)
Resource Notes (found in resource-based views)
Assignment Notes (found in either a Task or Resource Usage view)

Best Practice
When defining the scope of detail tasks or activities, use the same structure or answer the same questions. For instance, for each task you could list out:
Assumptions
Requirements
Tasks that need to be performed
References
Location of additional documentation

Task Type and the Effort Driven selections interact to determine how resource assignments are calculated.
There are three Task Type selections:
Fixed Units
Fixed Duration
Fixed Work
Combined with the Yes/No selection available with the Effort Driven field, there are five different scenarios or calculations when making resource assignments. Those are:
Fixed Duration
Fixed Units
Fixed Duration Effort-Driven
Fixed Units Effort-Driven
Fixed Work Effort-Driven
Of all of the features and functionality in Microsoft Project, these scenarios or resource assignment calculations are the most controversial among experts and confusing for new users.
The Master Class Book presents attempts to provide a balanced perspective on these calculations, although a preference or bias is clearly presented. This link to Microsoft support presents a slightly different perspective in several areas. We would certainly disagree with the statement on this support page, for instance, that the Fixed Units type “reflects most task realities in any project.”
That is simply our opinion. We believe it is important to look at different perspectives and decide for yourself. It could be that for you, or for your organization, Fixed Units is the right calculation for most of your detail tasks.
If you are using a coach while going through this Master Class, they may provide different perspectives as well.

Best Practice
Find your preference. As Yoda said, “Choose you have to, be wise you must.”
The selections you make do not have to reflect theoretical reality. They need to calculate the way you need them to.

Review
Read the Content Link above on Notes (jump to)

Define Scope for Detail Tasks and Milestones Simulation (20 minutes)

Download *.mpp file
To start this simulation, download the Scope-Statements.mpp by clicking on the download icon and open it in Microsoft Project. Rename the file to 6 - 1 Scope-Statements.mpp. Ensure your global settings in Project Options are correct and that you are using Microsoft Project Standard or Professional 2019, 2021, or Microsoft 365 updated for best results.
This project is already set up for entering scope statements in the note field.
In this project, the window is split with a Gantt Chart view on top and a Task Form on the bottom. In the table applied to the Gantt Chart is the Note field. This field will display up to 256 characters, although the actual notes field will hold thousands of characters and graphics. If a task has notes, the Indicator field will show a little note icon.
You can always double-click a task. The Task Information dialog box will open and the Note field is shown under the Notes tab.
Apply the Notes theme to the Task Form view on the bottom of the split window. To apply this or other themes to this type of view, select the view and right-click in the grey area to the right. The list of themes or details will open. Or, select the view and then select the Format tab on the ribbon.
You can split a window by going to the View tab on the ribbon and in the Split View group, check the Details box. Or, if you can find the little line in the bottom right corner of Microsoft Project, you can click, hold and drag the bottom view open or closed.
Figure 9. Split window in the scroll bar.

Figure 10. Notes theme or detail applied to the Task Form view.
With these views open, you can easily walk right down your WBS in the top view and add your scope statements to each detail task.
The Notes field is designed for anything you want to add to it, but we think it is the perfect place for scope statements. The Notes field offers basic formatting and you can copy and paste between fields.
Let’s say, Task 3 is going be the perfect weekend you have been looking forward to. Rename the task to: Perfect Weekend. You have to spend an entire weekend doing exactly the things you love to do the most.
Set some things up first. Change the project start date to 1/1/23.
Then, select the Start field for Exciting Weekend and select Friday 1/6/23. A timing constraint of Start No Earlier Than that date.
Enter a duration of 3 days.
Last, you have to be able to schedule the weekend activities,. There are several ways to open this weekend so make the weekend available however want.
Then, enter notes and fully define this perfect weekend. Your definition categories are:
Description
Deliverable
Constraints
Assumptions
Tasks (Activities)
Save the project.
Simulation Results
The 6 - 1 Scope-Statements.mpp, file should start 1/1/23. The Perfect Weekend task starts on 1/6/23 and should have the weekend available to schedule as working days. Notes for the Perfect Weekend task should be fully defined.

Figure 11. Task Notes field used to fully define task.

Journal
On the detail level, for activities (tasks) and milestones, the objective is to define the following constraints: Timing (such as duration and start/finish dates), Cost, Work, and Scope.
Task, Resource, and Assignment Notes could provide a wealth of information on building a house, starting a new business, or developing software. However, over the years reviewing hundreds of project plans, I have seen little use of Notes to describe better, decompose, or provide additional information for activities (tasks), milestones, resources, and assignments. Minimal effort has been put in the notes fields when reviewing the Microsoft Project template files.
Why do you think few people use Notes to define a task or milestone?
Since Microsoft Project does not have a specific feature for addressing the Scope of an Activity (task) or Milestone, where is that information best entered?
When defining the Scope of an Activity or Milestone, what are some examples of the types of information you might include?
There are two primary places to view, enter, and edit note information. How do you get to those two places?
How do you print note information?

If you are working with a coach, save and email them this file (6 - 1 Scope-Statements.mpp should look like Figure 11). If you are not working with a coach and you are planning to apply to either MS Project Master Class certificate, archive this completed simulation file so that you can submit it for review.

Return to the Master Class Book and review the next section for this Activity.


Estimating Approaches Simulation (30 minutes)

Download *.mpp file
To start this simulation, download the Estimating Approaches.mpp file using the download icon above and open it in Microsoft Project. Save the project as 6 - 2 Estimating Approaches.mpp. Ensure your global settings in Project Options are correct and that you are using Microsoft Project Standard or Professional 2019, 2021, or Microsoft 365 updated for best results.
We are going to take a more in-depth look at resource assignment calculations, but in general, there are two approaches to completing our estimates.
First, take a minute to review the Estimating Approaches chart below.

Note: Remember, all of the charts and posters can be downloaded.

Figure 12. Estimating Approaches in Microsoft Project Chart.

Download chart as PDF
In general, the functionality of Microsoft Project encourages us to:
Enter a Duration estimate, and it will calculate Work and Cost when we assign resources.
Or, enter a Work estimate and it will calculate Duration and Cost when we assign resources.
In the 6 - 2 Estimating Approaches.mpp file, there are three resources, each with different cost (standard) rates.
Ted at $150 an hour
Ben at $175 an hour
Susan at $200an hour
Approach 1: Enter a Duration Estimate. This is often called Fixed Duration estimating.
Task 1 has a duration estimate of 10 days. In the Resource Names column check Ben and Ted to assign them to the task.
The total assignment is 10 days in working time, 160 hours if they are working full time on the task at a cost of $26,000.

Figure 13. Fixing the duration estimate.
Approach 2: Enter a Work Estimate. This is often called Effort-Driven estimating.
All detail tasks have a 1-day duration by default, if you are going to do effort-driven estimating just leave the 1-day duration or you could enter a duration estimate like in the example, but the work estimate is fixed. An estimate of 80 hours was entered.
Assign Ben and Susan to the task.
The duration stays at 5 days at a cost of $15,000.
Assign Ted to the task. The duration goes to 3.33 days at a cost of $14,000.
Remove Ben from the task. The duration goes back up to 5 days and the cost remains the same.

Figure 14. Fixing the work estimate.
We are going to go into a lot more detail on how to refine these assignments and work with the calculations settings, but with a broad brush stroke, these are the two basic approaches to working with our estimates.
Let’s look at two more things before moving to a new step or section. First, do you remember where Project determines how to convert a duration so that if you say a task is two weeks duration and then you want to see duration in days, it knows how to make the correct conversion?
Go to the Project tab and then select the Change Working Time command. That conversion is a function of the interaction between how the project calendar is defined and schedule settings in Options. Click the Options… button.
Remember, as a general rule, the calendar definition should match the selections:
Default start time
Default finish time
Hours per day
Hours per week
Days per month
In Options, in this same Schedule category, find the Duration is entered in: and Work is entered in:
These selections perform two distinct functions, first, they are the default setting for entering duration and work, and, they determine how data is displayed for duration and work.
Let’s play with these a bit. Do the following:
Let’s say you want the default task duration to be in weeks. Before you make this change, look at your tasks. The durations are all in days. On the detail level, you can use days, but you can also use minutes, hours, weeks, and months. On the summary level, the units used will be the default setting.
Change the Duration is entered in: to Weeks. Click Ok and then Ok again.
Notice a couple of things, first, the duration conversion on the summary level turned to wks, and the detail task that Project calculated the duration turned to wk (weeks).
Create Task 3, make it auto scheduled, and then type 3 in the Duration field. The default unit is now weeks, not days.
This feature works a little bit differently with Work. Change Work is entered in: and select Days. Note the difference on the detail and summary level. For Task 3, enter 20 in the work field. 20 is 20 days by default, not 20 hours.
Save the project.
Simulation Results
The file 6 - 2 Estimating Approaches.mpp, should have the duration and work data and the conversions of the figure below.

Figure 15. Duration and Work default values selected in Project Options.

Best Practice
Without making any resource assignments, you could enter all three estimates (duration, cost, and work). You can associate resource names with tasks by using a custom field to make no calculations. But, if you want to work with resources, take the time to learn how to manage resource assignments well. The additional benefit will be that you will be able to manage resource workloads using Microsoft Project too.
The best practice is to use the entire scheduling engine in Microsoft Project.

Journal
Microsoft Project has always been hesitant to push for doing things in a particular way. Instead, Project’s preference has been to give users the freedom to do some things in various ways. A person could enter the duration, work, and cost manually. Or they could decide to have Project assist in calculating duration, work, cost estimates.
What are the two primary estimating approaches in Microsoft Project?
What are you expecting Microsoft Project to calculate when assigning resources if you initially enter a duration estimate?
What are you expecting Microsoft Project to calculate when assigning resources if you initially enter a work estimate?
Can you (if you want to) have a schedule where you enter both duration and work estimates? Or, in which you enter the duration for some tasks and work for others?
Where in Microsoft Project is the conversion information for what represents a day, week, or month? In other words, if you enter five days duration for a task and then show duration in hours, and it converts five days to 40 hours, how does Project know what that conversion is?
Where in Microsoft Project do you change the default units used for duration and work entries? Where do you change the unit display on the summary level for the duration, and where do you change the unit display for work?

If you are working with a coach, save and email them this file (6 - 2 Estimating Approaches.mpp should look like Figure 15). If you are not working with a coach and you are planning to apply to either MS Project Master Class certificate, archive this completed simulation file so that you can submit it for review.

Return to the Master Class Book and review the next section for this Activity.


PERT Customization Simulation (45 minutes)

Download *.mpp file
To start this simulation, download the PERT.mpp file using the download icon above and open it in Microsoft Project. Rename the file to 6.3 PERT.mpp. Ensure your global settings in Project Options are correct and that you are using Microsoft Project Standard or Professional 2019, 2021, or Microsoft 365 updated for best results.
This file has a macro, so enable macros if asked. If you have macros disabled, select Disable all macros with notification, close the project, reopen and enable macros.
Speaking of security, Disable all macros with notification is the best selection. That selection can be made in Options / Trust Center / Trust Center Settings.
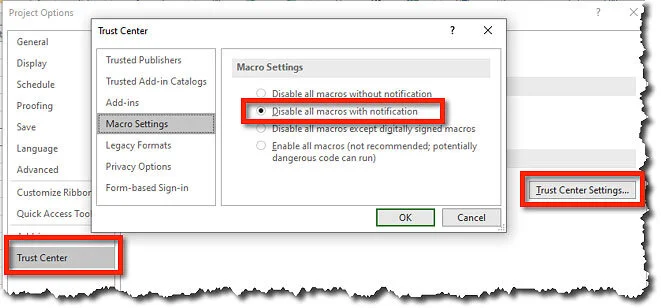
Figure 16. Disable all macros with notification.
In this step, we are going to customize a few basic fields so that you can quickly use the PERT calculation for any task when there is some uncertainty related to the duration of a task. While we do this, we are going to:
Create a view.
Create a table that can be placed in a task-based view that uses tables like the Gantt Chart view.
Take a peek at the Visual Basic Editor.
Attach some macros and place them as commands on the Quick Access Toolbar.
Customize six fields.
Manage all of the customizations in the Organizer.
The primary fields we are going to customize are for the PERT formula. One field is going to be a variance field we will use later in this MS Project Master Class. These are the custom fields we are going to use. They are duration fields and there are 10 custom duration fields available:
Duration5
Duration6
Duration7
Duration8
Duration9
We are going to want a task table to use the PERT calculation so we are going to create a new view and a new table to apply to that view.
A table in Microsoft Project is a collection of fields or columns. Since a table is applied to a view, we are going to make the table first.
Follow these steps to create a new Table:
On the ribbon, select the View tab / Tables command / More Tables….
Select the Entry table and select Copy.
Name this Table PERT Table. Spell and space the name correctly because we are going to use the view in a macro that is in the file you just downloaded.
In the fields below, use the Table editing buttons (Cut, Copy, Paste, Insert and Delete) to create a table that has these fields displayed:
ID
Indicators
Task Mode
Name
Duration
Duration5
Duration6
Duration7
Duration8
Duration9
Click OK to save this new view. There is no need to apply the table at this time.
Your custom table should look like the figure below.

Figure 17. Creating a Table that can be used in a task-based view.
Follow these steps to create a new Gantt Chart type of view that you will apply the PERT Table.
On the ribbon go to the Task tab, select the lower part of the Gantt Chart command and then select More Views.
Select the New button.
This is going to be a Single view. A Combination view is a view that is a split window with a view on the top and bottom of the window.
Name the new view PERT View. Spell and space the name correctly because we are going to use the view in a macro.
The first decision is what type of view or screen to base this new view on. We are going to use the Gantt Chart screen but look at the list. There are 17 different types of views in Microsoft Project and you can create more than enough views based on these 17 different types.
For this new view, select the PERT Table, the No Group Group, and the All Tasks filter and Show in menu.

Figure 18. Creating a new view.

Tip: When creating a new view that might include a new table, group and filter, use the same naming convention so that you remember what element goes with what element.

Note: Let’s clear up a little confusion related to this All Tasks filter and the All Resources filter for resource-based views. There is always a filter applied to every view in Microsoft Project. (With with the exception of the Timeline view which doesn’t use filters). When you are in a view and you want to apply a filter, or you want to go back to showing all tasks or all resources, you will not find these two filters listed with the same name. While in a view these two filters are named [No Filter]. Several versions ago, Microsoft decided to call these two filters the [No Filter] filter, when in a view, but if you are creating a new view and selecting a filter, the old naming convention is used. Microsoft just did not make the edit. The All Tasks filter, in this case is the same as the [No Filter] filter.
Click OK to save this new view, and then Apply.

Note: You created the PERT Table applied in this new view by using the Table Definition dialog box. You can edit this table in that dialog box whenever you want, or you can edit the table when it is applied to in a view. For instance, rearrange or add/hide columns, with the table applied. Either way, in either location, you are making permanent changes to the table.
The field customization we are going to do is pretty simple, so we will run a macro that does most of the work to save some time. Then you will manually create one custom field.
In this next section, you will work with macros and run those macros from a custom command on the Quick Access Toolbar.
If you record a macro or write the code, that information is available in the Visual Basic for Applications Editor. To access the editor, press Alt+F11 on your keyboard. The other ways to open the VBA Editor is to edit the ribbon, display the Developer tab and then click on the Visual Basic command, or select the View tab and select the bottom part of the Macros command at the end of the ribbon and select Visual Basic.
In the VBA editor, click View and select Project Explorer to view your list of projects. You will have at least two projects showing in the explorer; the Global.MPT and the 6.3 PERT.mpp. Under the 6.3 PERT.mpp, expand the macros or Modules folder. There are two macros there.

Figure 19. VBA Editor, showing macro that will change the name of custom fields and add a formula to a custom field.
Next, double click on the Apply_PERT_View macro. This macro will apply the new table and view you just created regardless of what view you currently have applied. That is why you were asked to name them correctly. If you named them differently, you can edit the names or change the code in the macro. Or, in the Organizer, you can edit the name of the table and or a View.
These two macros are the type of macros you are likely to run routinely; such as before your weekly reports are due. One macro may make the appropriate checks or computations and the other runs the correct reports. Completing this weekly routine only requires clicking a couple of commands, so it is almost always worth the time to record or write the macros.
Close the VBA Editor.

Figure 20. Macro in VBA that applies a view.
Next, we are going to attach these macros to the Quick Access Toolbar. Macros can be attached to the toolbar or to any “custom” group under each of the ribbon tabs or to a new custom tab. Follow these steps to attach the macros.
First, add the two macros and the view and table you created to the Global.mpt by using the Organizer. To make things less confusing in the next step, delete the macros from the project in the Organizer once they are added to the Global.mpt.
Open Options and select Quick Access Toolbar.
In the Choose commands from the drop-down menu, select Macros.
Find and then select the two macros we just looked at and Add them to the toolbar. Move them to the very top of the toolbar.
ApplyPERT_View
PERT
Select the PERT macro and click the Modify… button. Name this macro Run PERT Macro.
Select the ApplyPERT_View macro and click the Modify… button. Name this macro Apply PERT View, and select the calculator icon to represent this command.
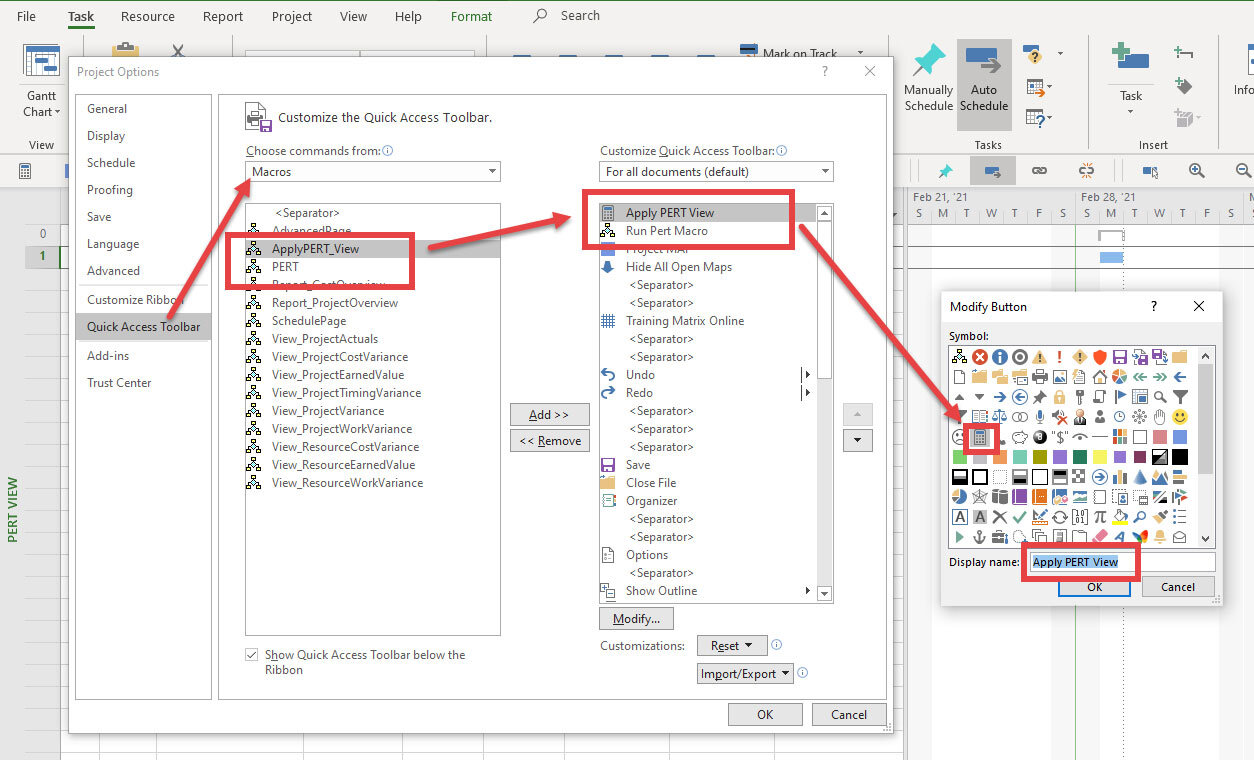
Figure 21. Adding a macro to the toolbar.
Click OK to save your edits to the toolbar.
Then, on the toolbar, click the Apply PERT View icon to apply the PERT view and then click on the Run PERT Macro icon. If you have done every correctly, your custom duration columns will have custom names and the Expected column will contain the formula.
([Duration2]+(4*[Duration3])+[Duration4])/6
For Task 1, enter these estimates to test the Expected Duration formula, enter these values:
Optimistic Duration = 3 days
Most Likely Duration = 6 days
Pessimistic Duration = 10 days
The Expected Duration should equate 6.17 days. Enter that expected duration into the Duration field.
The last thing to do is to move the custom fields over to the Global.MPT file so you can use these custom fields with any project. Once you have done that you can remove the Run PERT Macro from the toolbar, you will not need it anymore. You can also delete that macro from the Global.MPT file.
Save the project.
Simulation Results
The 6.3 PERT.mpp file should contain the custom PERT View and the PERT Table. The Expected Duration should calculate PERT. Task 1, should have the durations listed in the figure below.

Figure 22. Custom fields for PERT calculation.
Try the PERT calculation in a different project. Start a new blank project, name the project 6 - 4 PERT Test.mpp. Add Task 1, make it Auto Scheduled, and enter these duration estimates.
Optimistic = 10 days
Most Likely = 12 days
Pessimistic = 20 days
If everything works correctly, you should have a calculated Expected Duration of 13 days. If this were an actual task for which you were using the PERT formula, you would then enter 13 days in the Duration field.
Let’s examine the Expected Duration field closely. Select the column header, right-click, and select Custom Fields.
Let’s review a couple of things about this dialog box.
First, notice that there are custom Task, Resource, and Project (if you are working in the enterprise) fields. For each category of fields, there are several types of fields such as Cost, Date, Duration, Finish, etc.
You can Rename a custom field or Delete the customization for one of these fields. You can not delete the actual field or create a new type of field for a category. Some fields, such as the Duration 1-10 fields, are available for customization in Microsoft Project. Using four of these custom duration fields means you only have six available for customization. You can also Import a custom field from another project into a custom field in the active project.
The contents of the custom field can have attributes like selections from a Lookup… table that you create. For instance, you might have liked to specify any of the 120 store locations where the work could be performed for each task. Those 120 locations would appear in a drop-down list to choose from.
In the case of our Expected Duration custom field, the macro added a Formula. This is why the radio button is selected for Formula. To view or edit the formula, select the Formula… button.
You can write a formula for a custom field. Otherwise, the Field and Function buttons will help you search for the fields you need and add the functions you want.
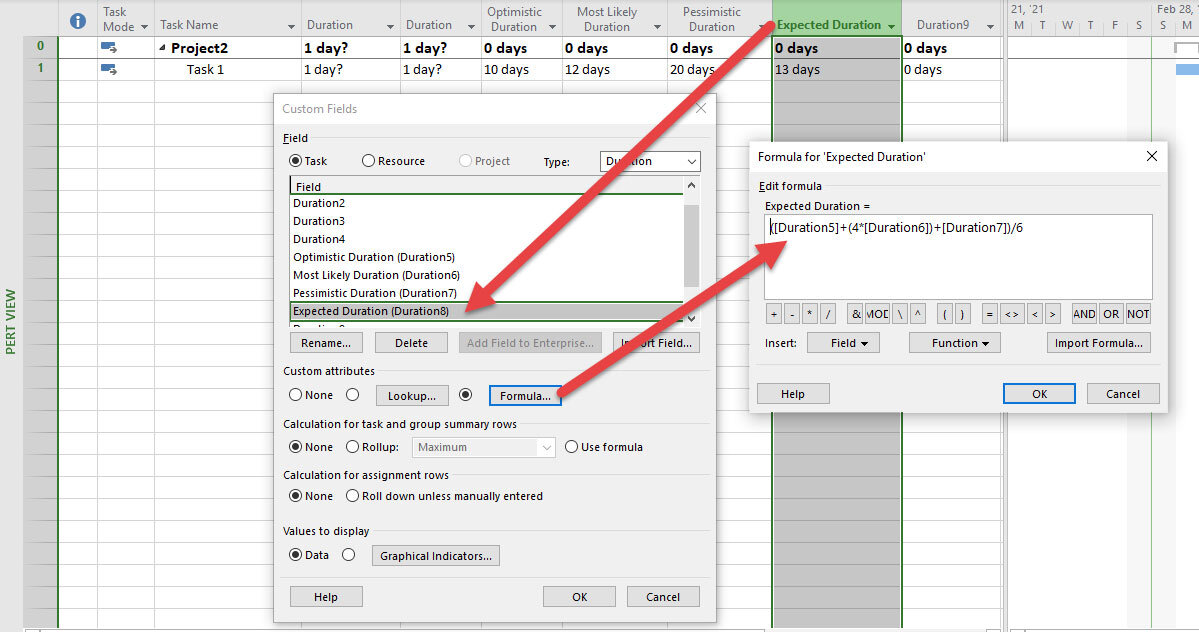
Figure 23. Custom field and formula.
As mentioned in the Master Class Book, PERT estimates are also an important input for risk analysis. Uncertainty increases risk, and risk analysis involves mitigating that risk by determining the cause. The difference between Optimistic and Pessimistic can be valuable if you have the following PERT estimates.
Optimistic Duration = 10 days
Most Likely Duration = 12 days
Pessimistic Duration = 20 days
The Optimistic estimate assumes that all risk has been mitigated. The pessimistic estimate assumes that everything that could go wrong will go wrong.
None of us have the time or money to address every perceived risk, but when there is a large gap between Optimistic and Pessimistic estimates, we should try to mitigate the risk.
Suppose you want Microsoft Project to flag you when the gap is over a certain amount of time. To do this, follow these steps:
Rename the Duration9 field to PERT Variance.
Using the Field selector button, Add a formula to the field that is Pessimistic minus Optimistic.
Next, flag any task where the difference is greater than five days. To do that, select the Graphical Indicators..button and add the selections in the figure below.
Simulation Results
The 6.4 PERT Test. mpp file should show the customization for Duration9. PERT Variance is the custom name, the formula is Pessimistic Duration - Optimistic Duration, and the graphical indicator is a red flag if greater than 5 days.

Before you save and close this project, be sure to move this last custom field over to the Global.MPT file.
Before you save and close this project, be sure to move this last custom field over to the Global.MPT file.

Journal
Where do you currently get your estimates? That is a question I have asked hundreds of groups of people, and the answer, 95% of the time, is SWAG (scientific wild-ass guess.) Scientific is often replaced with statistical, stupid, or simple.
SWAG is used to describe an estimate derived from experience, general impressions, and heuristic or approximate calculations rather than an exhaustive search, proof, or rigorous analysis. The SWAG is an educated guess but is not the best or most accurate estimate. Using PERT does not make an estimate less SWAG.
SWAG was once was defined on the U.S. Army website. After the definition, a statement said, “Not recommended to use with senior officers.”
SWAG estimates are not recommended for projects either.
What is a Parametric Database?
What are the two primary aspects of PERT?
What is the PERT formula used in estimating task duration?
Can you use this PERT formula for estimating work and cost?
What is the difference between Tables and Views in Microsoft Project?

If you are working with a coach, save and email them these files (6.3 PERT.mpp should look like Figure 22, and 6 - 4 PERT Test.mpp should look like Figure 24). If you are not working with a coach and you are planning to apply to either MS Project Master Class certificate, archive these completed simulation files so that you can submit them for review.

Return to the Master Class Book and review the next section for this Activity.

Define Resources
Memorize
This step is on defining resources. As you have already read about in the Master Class Book, there are three types of resources in Project and each type is defined differently. Take a minute to memorize these types and the unique characteristics of each one.
Work Type
There is a base calendar for making exceptions such as defining shifts, workweeks, days off, and family leave and vacation.
Work is calculated when assigned to a task.
The cost (standard) rate is calculated in minutes, hours, days, weeks, months, or annually.
Cost tables are available.
Workloads are shown across the timeline.
Material Type
No issue of availability.
No work is calculated.
The cost (standard) rate is per unit.
Cost tables are available.
Cost Type
No issue of availability.
No work is calculated.
No Cost (standard) rate, cost entered when the resource is assigned.
Project Example
What is missing in Microsoft Project is a Variable Type of resource. Characteristics of this type of resource would include:

There is a base calendar for making exceptions in availability.
Work is not calculated.
The cost (standard) rate is calculated in minutes, hours, days, weeks, months, or annually.
Cost tables are available.
Availability is viewed across the timeline.
At Abbott Laboratories, one group was using Microsoft Project to schedule labs. The software worked well for them, but they did not what the software to calculate work. Calculating work skewed the project data.
We have used MS Project to schedule training and consulting engagements. Unconventional use of the software but very useful. Given the ability of Microsoft Project to schedule events, we are surprised it isn’t used more. We have had customers use the software to schedule training, street fairs, music festivals, and in the case of one paper corporation, scheduling the onsite engagements of engineers across three paper plants being built in three different countries.

Define Resources Simulation (30 minutes)

Download the *.mpp file
To start this simulation, download the Resource Definition.mpp file using the icon above and open it in Microsoft Project. Rename the file to 6 - 5 Resource Definition.mpp. Ensure your global settings in Project Options are correct and that you are using Microsoft Project Standard or Professional 2019, 2021, or Microsoft 365 updated for best results.
Let’s suppose your company does training and development and it has sold a training workshop to a customer that has to be developed from scratch and you are the project manager. The job is time and materials, so the rates are those you are actually going to bill the customer. At the top of the next column, define the list of resources.
As mentioned in the Master Class Book, the best way to learn this functionality is to repeat the cycle 10 times, or as many times as it takes for you to get it. In general, our experience is that it takes most people around four times and the light bulb goes.

Figure 25. Define, Determine Calculation, Assign Resource Cycle.

Best Practice
As mentioned in the Master Class Book, managing Time, Cost, and Scope all together at the same time is the real skill of a seasoned project manager.
In the 6 - 5 Resource Definition.mpp file, define these additional resources:
Project Manager, Work type, Standard Calendar, Max Units of 100% standard rate of $1,000 per day. Enter Company in the Group field.
Customer Contact. This one is a little more difficult to define because there is no cost on your end and they have told you they are not available for more than around 8 hours weekly, so you want to track their time.
Plus, your company has the initiative to develop a parametric database, so that on future projects like this one you want to be able to give a customer a realistic estimate of how much time will be expected from them.
In addition, this resource is on vacation for the month of August 2021. Beginning September 1, 2021, and when they are hoping to wrap up the project, they are available 20 hours a week.
The customer would be a Work type, Standard Calendar, Max Units of 20% to start, standard rate of $0. Enter Customer in the Group field.
The figure below shows the availability definition for the Customer Contact resource.
Figure 26. Adjusting Resource Available and exceptions to the base calendar.
If you defined this correctly, you can go to the Resource Usage view, scroll out to August 2021, and zoom in on the timescale monthly; you will see that the resource is available at 20%. It is unavailable for August, then availability goes up to 50% in September.

Figure 27. Resource Usage view showing availability contour.
Go back to the Resource Sheet view and define these additional resources.
Group Facilitator, Work type, Standard Calendar, Max Units of 100%, standard rate of $1,200 per day, Enter Contractor in the Group field.
Video Studio Rental, Material type, and the rate is $900 per day, which would be $900 per unit. Weekends are $700 per day; enter $900 in Table A and $700 in table B.
Each time you book the studio, there is a setup fee regardless of the number of days. Enter $300 in the Cost/Use field.
Enter Studio as a Material Label. Enter
Enter Non-work in the Group field.
Edit Suite, Material type, $300 per day, so that would be $300 per unit.
The price is going up to $400 in the fourth quarter of 2021.
Enter VEdit as a Material Label.
Enter Non-work in Group field.
Initially, the setup fee is $100, but that goes up to $150 fourth quarter too.
Focus Group, Work type, you will need 24 people in two locations and the focus group sessions will be on consecutive Saturdays.
Select the Saturday Calendar, Max Units 1,200.
You will pay them $100 each for three hours, but you mark that up to the customer by 100%.
Enter Contractor in Group field. This example is typical of the type of resource definition that you have to figure out on your own depending on how you intend to use the project plan. In this case, let’s say you are going to be giving updates to the customer, so you want to enter a standard rate of $200 per three-hour session, so you could enter this as $67 an hour if you round up.
Lunch for Focus Group. Cost type of resource. Enter Non-work in Group field.
Transcript Service to record the focus group. Material type, $500 per session so $500 per unit.
Enter Transcript as a Material Label.
Enter Non-work in Group field.
Use the flag field to mark the resources you just defined and highlight the background in yellow. Hint: Create a highlight filter using one of the flag fields.
If you sort the Group field A - Z, you should have the defined resource list shown below.
Save the project.
Simulation Results
The 6 - 5 Resource Definition.mpp file should look like the following figure. This figure does not revel the entire definition of resources so double check your work.

Figure 28. Resources flagged and highlighted in the Resource Sheet view.

Best Practice
#1 Define Resources
#2 Determine Assignment Calculation
#3 Assign Resources
Cycle through these three steps until the light bulb goes on

Journal
There are a few invaluable routines in this Master Class like this one 1) define resources, 2) determine how tasks will calculate when resources are assigned, and 3) assign resources. The user develops a best practice with a succinct routine and quickly learns a complicated portion of the software.
1. Where in Microsoft Project are resources fully defined?
2. Can you explain the following primary fields used when defining resources?
- Type
- Material Label
- Base Calendar
- Group
- Max Units
- Standard Rate
- Cost Per Use
3. What are the possible things you could manage to address Work Type resources' workloads better if you wanted to?
4. If you wanted to, what are the possible things you could manage to address better the cost associated with a Work or Material Type of resource?
5. What is the primary type of resource missing in Microsoft Project?

If you are working with a coach, save and email them this file (6 - 5 Resource Definition.mpp should look like Figure 28). If you are not working with a coach and you are planning to apply to either MS Project Master Class certificate, archive this completed simulation file so that you can submit it for review.

Return to the Master Class Book and review the next section for this Activity.

Make Assignment Calculation Selections
Review
Review Task Type in the Content Links above. (jump to)
As already mentioned, we tend to disagree on a couple of points made by this Microsoft technical writer, however, with this particular feature set, it is important to consider different perspectives as you determine what is the best fit for you.
We are on the 2nd step in the simple process of learning how to complete our estimates by assigning resources.
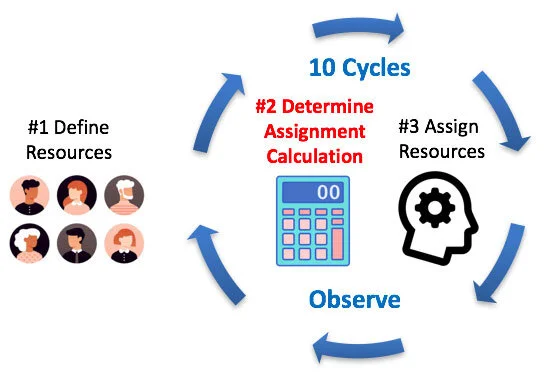
Figure 29. Define, Determine Calculation, Assign Resource Cycle.

Assignment Calculations Simulation (10 minutes)

Download *.mpp file
To start this simulation, download the Assignments Calculation.mpp using the download icon above and open it in Microsoft Project. Rename the project to 6 - 6 Assignment Calculation.mpp. Ensure your global settings in Project Options are correct and that you are using Microsoft Project Standard or Professional 2019, 2021, or Microsoft 365 updated for best results.
Notice in this split window that the Type and Effort Driven fields are shown as columns in the top view. The bottom view will display the field information and Notes field.
Figure 30. The five possible calculation selections.
Each task is labeled for one of the five ways estimates are calculated when resources are assigned.
First, make the appropriate selections in the Type and Effort Driven fields for each task.
Second, in the Notes field for each task, enter:
Given the selection, what estimate would you start with, work, duration or both?
When you assign resources or adjust resource assignments, what are you expecting to have happen?
Save the project.
Simulation Results
The goal of this simulation is to encourage you to look at these calculation settings before making assignments. Not looking is the biggest mistake many MSP users often make. The 6 - 6 Assignment Calculation.mpp should have the correct selection for each task. There are five different combinations of selections.

Best Practice / Best Perspective
Change the way tasks are calculated when resources are assigned whenever you want. The data does not change, but when you change assignments, the calculation is different.
You may want assignments calculated one way at one point in planning and another way later in planning.
Fixed Duration is most like the project management idea of Fixed Duration estimating and scheduling, which states that a task takes a certain amount of time no matter who assigns it. For example, a human pregnancy is 40 weeks, no matter how many people are involved.
Fixed Work is most like the project management idea of Effort-Driven estimating and scheduling, which states that a task should take less time when more people are assigned. For example, the duration of licking 10,000 envelopes should go down with more people assigned; take people off the assignment, and the duration goes up.

Journal
There are several areas in Microsoft Project that are difficult. You have cleared the most significant hurdle once you understand the basics of these calculation selections that interact with resource definition and assignment.
1. What are the five different combinations of selections in the Type and Effort-Driven field?
2. What is the concept of Fixed Work?
3. What are the selections for making a task Fixed Work?
4. What is the concept of Fixed Duration?
5. What are the selections for making a task Fixed Duration?
6. Regarding these calculation selections, there are nine perspectives provided. In your own words, can you summarize those perspectives?
7. For your projects, do you have an idea of what type of calculation selections you will use?

If you are working with a coach, save this file, 6 - 6 Assignment Calculation.mpp, and email it to them to review. If are planning to apply to either MS Project Master Class certificate, archive this completed simulation file so that you can submit it for review.

Return to the Master Class Book and review the next section for this Activity.

Assign Resources
This is the 3rd step in understanding what happens to your duration and work estimates on detail tasks when you assign resources.
The trick is to cycle through making different calculation setting and assigning resources in different ways until the light bulb goes on, you basically understand how things are calculated and you have figured out how you want do assignments.

Warning: As you walk through these different scenarios, especially if you deviate from the script, you might encounter calculations that do not make sense. Likely it isn’t you, it is the software. It is almost inconceivable that software, at this point in time, that is 30 years old, that produces so much revenue, that has almost all of the market share, can cost up to $600 a year per license - does not always calculate consistently and correctly. After having worked with thousands of Microsoft Project users, across a myriad of situations and types of projects, we have concluded that overall, Fixed Duration is the most reliable, valid and common sense set of calculation settings. However, this setting is not always consistent with the way people think about their projects at this point or the way they want the software to calculate.

Figure 31. Step 3, Assign Resources.

Assign Resources Simulation (45 minutes)

Download .mpp file
To start this simulation, download Assign Resources.mpp using the icon above and open it in Microsoft Project. Rename the file to 6 - 7 Assign Resources.mpp. Ensure your global settings in Project Options are correct and that you are using Microsoft Project Standard or Professional 2019, 2021, or Microsoft 365 updated for best results.
The objective of this simulation is not to master all of these calculations. But is important that you discover how you want tasks to calculate when you assign resources. It is important for you to become skilled at doing your way.
The following is a review of each of the five sets of calculation settings.
Fixed Units
Expand the Fixed Units summary task.
The first thing to do is always glance at is your calculation selections. Check to make sure each of these three tasks are Fixed Units.
Apply the Work theme to the Task Form view on the bottom of the split window.
Then open the Assign Resources dialog box, Resources tab / Assign Resources command. This is the only floating dialog box in Microsoft Project.

Tip: You can double click on a resource name in the Assign Resources dialog box to define a resource or see how a resource is defined. You can also add a new resource and define them from this dialog box.
Figure 32. Defining resources or viewing resource definition from the Assign Resources dialog box.
Assign the Editor to Task 1.
What was calculated?
Why was the editor assigned at 100% and why was $2,960 calculated?
Assign the Customer to Task 1.
Why was the Customer assigned at 50%? Be sure to check the project start date.
What happened to duration? But there are two people assigned now?
Why was no additional cost calculated?
Why is the Customer assigned 20 hours of work and the Editor 40h?
Assign the Instructional Designer to Task 1. Do those calculations make sense?
Right now, with the way things are calculated, this might be what you would expect with Fixed Duration settings. The duration does not change, but the work and cost change based on the assignments. This is the confusing aspect of these calculation settings. Depending on how you assign resources, one set of selections may seem very much like another.
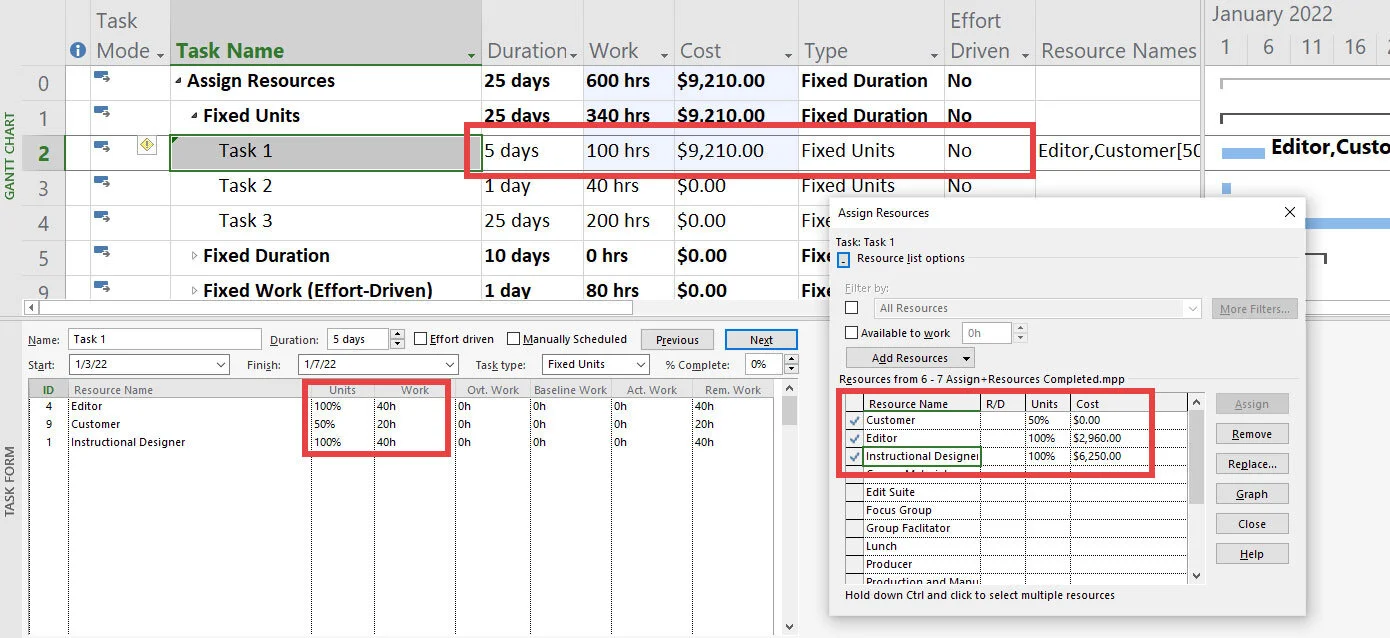
Figure 33. Assignments to a Fixed Units task when there is an estimate of duration.
Task 2 has both a duration and work estimate.
Assign the Editor, Group Facilitator, and the Producer to Task 2. Do those calculations make sense?
Not to me. With the first assignment, it seemed that the work estimate was fixed. Then it seems the duration was fixed. But, just because no theory or principle is driving this calculation, this may be the way some users want or need resource assignments to calculate.
Figure 34. Fixed Units calculation when there is a duration and work estimate.
Change the duration estimate for Task 3 to 2.5 days.
Assign the same three resources to Task 3.
Are the calculations the same?
Is that what you expected?
No, it doesn’t make a lot of sense to me. Again, it is just a possible calculation.

Figure 35. Not all calculations are appropriate or make sense. This task started off with an estimate of 2.5 days and 200 hours of work.
What if you change the duration or work? Change the duration of Task 1, from 5 days to 3 days.
What if you change the work? Change the work of Task 2, from 120 hours to 60 hours.
Change Task 3 to 2.5 days.
Do calculations make sense? If not, toggle back and forth with undo and redo buttons. It seems now that the Units assigned are fixed, not the duration or work estimates. Perhaps the name of the setting Fixed Units means just that, once resources are assigned, those units are fixed. This makes sense when you think about it. Fixed Duration fixes the duration estimate, Fixed Work fixes the work estimates, and Fixed Units fixes the units once a resource is assigned.

Figure 36. Fixed Units refers to the units resources are assigned. Those units tend to be fixed.
What if you change Units? This is where the idea of Fixed Units starts to make more sense. Remember, for a Fixed Units task, the duration is determined by the longest resource assignment.
For Task 1, change Instructional Designer’s assignment to 50%. The task changes to 6 days. Can you explain that calculation?
If the Instructional Designer is going to work 24 hours on the task, and they can only work 4 hours a day, the task has to take 6 days.

Figure 37. The duration of a Fixed Unit task is driven by the longest resource assignment.
If you swap out the bottom view with a Task Usage view and zoom in the timescale with the top view displaying every day, you will notice that the Editor is working 8 hours for three days. The Customer is working 4 hours for the first three days, and the Instructional Designer is working 6 hours a day until they have completed 24 hours of work. At 4 hours a day, it will take 6 days to complete the task. The duration of the task is determined by the longest resource Unit assignment. It is Fixed Units.

Figure 38. Resource assignment driving the duration of the task.
Fixed Duration
Expand the Fixed Duration summary task.
The first thing to always do is take a glance at is your calculation settings. Check to make sure each of these three tasks are Fixed Duration.
With this calculation type, the duration estimate stays the same and the work and cost adjust accordingly based on resource assignments.
Assign the Group Facilitator and Instructional Designer to Task 1. What changed?
Adjust the assignments. Let’s say the instructional designer only needs to work a couple of hours a day. In the bottom view change Units to 20% and then click OK. The Group Facilitator is going to conduct five days of classes upfront, so just enter 40h in the Work field, and then click OK.
Did the duration change? Try this, on this same task assign the Group Facilitator 120 hours and click OK. Obviously, the resource is going to be over-allocated, but did the Duration change?
No, because the duration estimate is fixed.
Figure 39. Assignments to a Fixed Duration task. The duration does not change because it is fixed.
Let’s assign some non-work resources. Material or Cost resources do not change the duration, or the work, regardless of the assignment calculations.
Select Task 2.
In the Assign Resources dialog box, filter for Material resources.
Double click on each resource to review the Standard Rates.
First, assign the Video Studio Rental. We need the studio for 2 days. The Standard Rate for this resource is $900. Can you explain the cost?
Next, we need 75 sets of course materials, the Edit Studio for 3 days, and the Transcript Service 4 times.
Then filter for Cost resources. Assign the Lunch resource. We are budgeting $15 for each person and we expect 75 participants.
Notice that the duration does not change and there is no work calculated.

Figure 40. Material Type resource assignments.
Last, select Task 3 and filter all of the Work resources, select all of the resources, and assign them to the task.
Did the duration change?
If you think the duration should change based on resource assignments, you have to make the change. Change the duration to 2 days.
Cost and Work change accordingly.
Fixed Duration is a simple, reliable, and consistent way to have assignments calculated.

Figure 41. Fixed Duration task assignments.
Fixed Work
Fixed Work means that when you assign resources, the work estimate is kept constant and the duration and cost change appropriately. The Fixed Work calculation is the closest setting to this idea of Effort-Driven estimating and scheduling. Assign more resources to a task and the duration goes now, remove resources and the duration goes up.
The selection isn’t as robust as we would like, in complex situations the setting fails to calculate sensibility, but if Effort-Driven is what you want, this is likely the best setting.
Expand the Fixed Work summary task.
The first thing to remember is to always glance at is your calculation setting. Check to make sure Task 1 is Fixed Work.
Assign the Project Manager, the task changes to 10 days duration because they are going to spend 80 hours on the task.
Assign the Seminar Leader, the duration is cut in half, both resources are sharing the 80 hrs of work.
Assign the Writer to Task 1. The duration goes down.
Remove the Writer and the duration goes back up.
Change the Work from 80 hours to 60 hours, what changes?
Change the Project Manager’s Work to 20 hours and click OK. What changes?
Change the Seminar Leader’s Work to 40 hours and click OK. What changes?
As mentioned in the MS Project Master Class Book, this setting can be useful in the early phases of planning, especially if you start with estimates of Work. With this setting you could, quickly complete a “What if” on a very large schedule. “What if I assign five people on this task, three people on that task, and seven on that task?”
Of course, real people are not all equal, do not have the same level of skill, and work at the same speed. When you get to the point of assigning the actual people, you could change every task to Fixed Duration and refine your assignments. If you make a switch like this, none of the calculations will change until you make a change to assignments.

Figure 42. Fixed Work tasks. The work estimate is fixed, the duration and cost change based on assignments.
Fixed Units Effort-Driven
The next two selections have no theoretical basis that I am aware of, but they are calculations that may very well work for you.
This calculation setting is closely related to Fixed Work. Some users, especially since this was the default settings for at least the first 10 versions of Microsoft Project, find this calculation suitable.
Expand the Fixed Units Effort-Driven summary task.
The first thing to always do is to glance at is your calculation setting. Check to make sure each of these three tasks are Fixed Units and Effort Driven is Yes.
By now, you know what calculations to look at when you make an assignment, possible changes to:
Duration
Work
Cost
Individual Work assignments
Assign the Project Manager and Seminar Leader to Task 1. Then adjust the Work on the task to 60 hours, then change the Project Manager’s units to 50% and click OK.
Does this calculate differently than Fixed Work?
To see the difference between these settings and Fixed Work, do the following:
Enter 80 hours for Task 2.
Enter 80 hours for Task 3 and make the task Fixed Work and make the task 1 day duration.
Assign the Project Manager and Seminar Leader to both tasks. You can select both tasks and select both resources and assign them all at once. So far the calculations are the same.
Then, change the Duration of both Task 2 and Task 3 to 10 days. The calculation for each task is much different.

Figure 43. Calculation for Fixed Units Effort Driven.
Fixed Duration Effort-Driven
Expand the Fixed Duration Effort-Driven summary task.
The first thing to always do is to glance at is your calculation settings. Check to make sure each of these three tasks are Fixed Duration and Effort Driven is Yes.
Assign the Project Manager and the Seminar Leader to Task 1. The calculations should be self-explanatory.
What is the difference between Fixed Duration Effort-Driven and Fixed Duration?
To see a difference between Fixed Duration vs. Fixed Duration Effort Driven, do the following:
Make sure Task 2 and Task 3 are 10 days in duration.
Make Task 3 just Fixed Duration and Effort-Driven is No.
Assign the Project Manager and Seminar Leader to both tasks.
Change the Work for both tasks to 80 hours.
Change the Duration for both tasks to 5 days.
So far, the calculations have been the same. Now, do this:
Assign the Editor to both tasks.
This calculation is a type of hybrid of Fixed Duration. You are telling Microsoft Project to keep the Duration fixed, but when it is Effort-Driven, attempt to share the work evenly across the resource assignments.
Save the project.
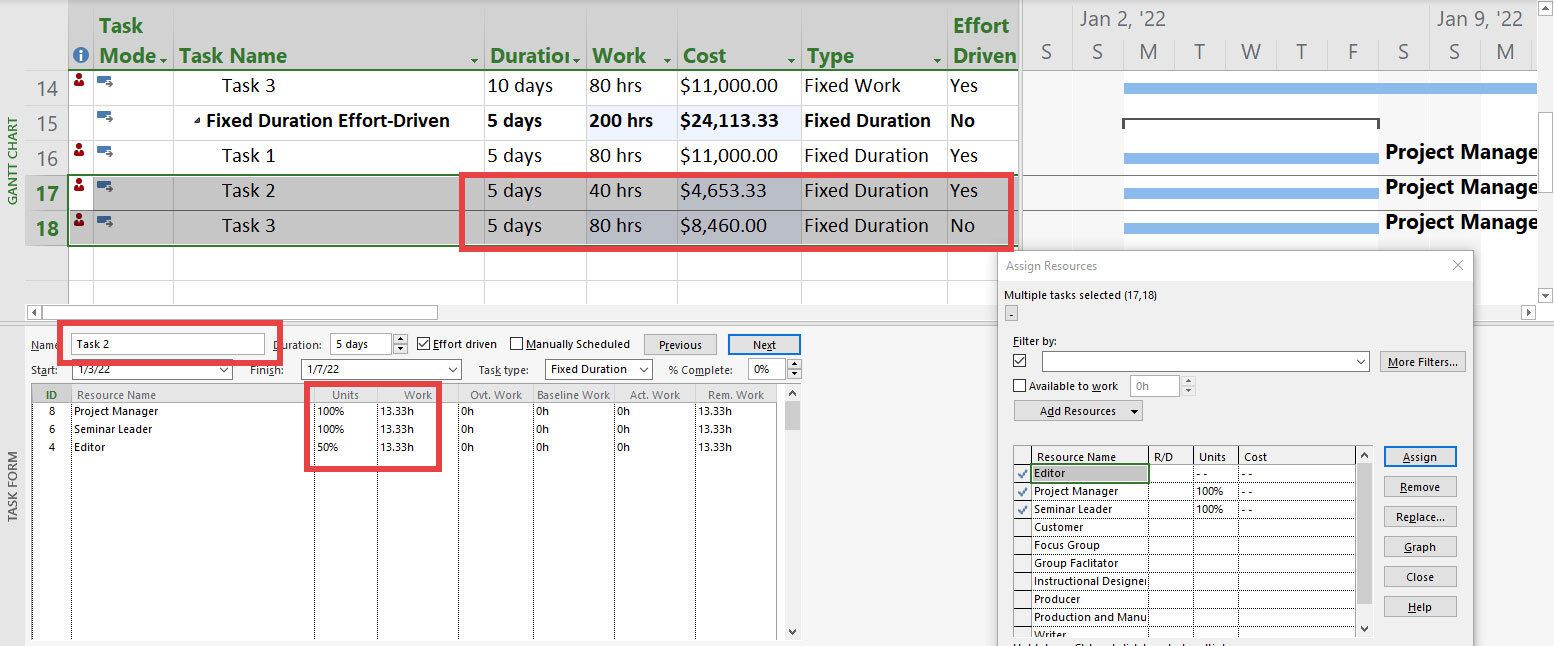
Figure 44. Fixed Duration Effort Driven calculation.
Simulation Results
The 6 - 7 Assign Resources.mpp should look like Figures 32 - 44.

Update MS Project Master Class Plan
Open your current MS Project Master Class Plan.mpp file in Microsoft Project. Ensure you have:
Used the Table of Contents in the Master Class Book, and the Outline at the top of this page to update the WBS through Activity 6: Enter Estimates.
In the Work field, for all detail tasks through Activity 6, enter estimates of work.
In the custom Timesheet field, enter your actual work for each detail task.
Save your project.

Journal (Best to see figures in the Master Class Book)
What do you think is the key to quickly understanding this aspect of Microsoft Project?
Knowing the selections determines how the task will calculate based on assignments. Opening the Resource Assignment floating dialog box. The key is having much information on the screen—a split window with timing, work, and cost fields. A project small enough that most of the data is visible.
What is your takeaway for each set of resource assignment calculations settings for each of the five calculation possibilities?
If you assign Sam to a 10-day Fixed Unit task at 25% and then change his work to 60hrs, what are you expecting to happen?
What are you expecting to happen if you assign Sam at 10% to a 5-day Fixed Duration task?
What are you expecting to happen if you assign Sam to a 1.67-day Fixed Work task?
What are you expecting to happen if you assign Sam to a 5-day Fixed Units Effort-Driven task?
If you change Sam’s units to 25% on the same task, what are you expecting to happen?
What are you expecting to happen if you assign Sam to a 5-day Fixed Duration Effort-Driven task?
How do you make one or more of the same edits to a group of selected tasks using the Task Information dialog box?

If you are working with a coach, save and email them these two files, 6 - 7 Assign Resources.mpp and MS Project Master Class Plan.mpp, to review. If are planning to apply to either MS Project Master Class certificate, archive these completed simulation files so that you can submit them for review.

Return to the Master Class Book and review the next section for this Activity.

Review of Best Practices
Assigning Resources
Without making any resource assignments, you could enter all three estimates (duration, cost, and work). You can associate resource names with tasks by using a custom field to make no calculations. But, if you want to work with resources, take the time to learn how to manage resource assignments well. The additional benefit will be that you will be able to manage resource workloads using Microsoft Project too.
The best practice is to use the entire scheduling engine in Microsoft Project.
Estimates Objective
The real skill in project management is juggling three balls at the same time when managing a project:
Scope (this includes WBS with well-defined performance for each detail task.
Time (schedule and the resource management related to that schedule).
Cost (this includes resource work and availability).
Defining Scope for an Activity
When defining the scope of detail tasks or activities, use the same structure or answer the same questions. For instance, for each task, you could list out:
Assumptions
Requirements
Tasks that need to be performed
References
Location of additional documentation
Task Type
Find your preference. As Yoda said, “Choose you have to, be wise you must.”
The selections you make do not have to reflect theoretical reality. They need to calculate the way you need them to.
Resource Assignments Routine
#1 Define Resources
#2 Determine Assignment Calculation
#3 Assign Resources
Cycle through these three steps until the light bulb goes on
Resource Assignment Calculations
Change the way tasks are calculated when resources are assigned whenever you want. The data does not change, but when you change assignments, the calculation is different.
At one point in planning, you may want assignments calculated one way, later in planning, another way.
Fixed Duration is most like the project management idea of Fixed Duration estimating and scheduling, this idea that a task takes a certain amount of time no matter who is assigned. Human pregnancy is 40 weeks, no matter how many people are involved.
Fixed Work is most like the project management idea of Effort-Driven estimating and scheduling, this idea that a task should take less time when more people are assigned. The duration of licking 10,000 envelopes should go down with more people assigned, take people off the assignment and duration goes up.

Activity 6 Exam
Figure 45. Activity 6: Enter Estimates exam.
Simulation Files
If you are working with a coach and are sending them all of your files at the end of each Activity, or archiving your files because you are going to earn a certificate, these are the files for this Activity:
MS Project Master Project Plan.mpp (Ensure you have:
Used the Table of Contents in the Master Class Book, and the Outline at the top of this page to update the WBS through Activity 6: Enter Estimates.
In the Work field, for all detail tasks through Activity 6, enter estimates of work.
In the custom Timesheet field, enter your actual work for each detail task )
6 - 1 Scope Statements.mpp (This file should look like Figure 11, except your content is different).
6 - 2 Estimating Approaches.mpp (This file should look like Figure 15).
6 - 3 PERT.mpp (This file should look like Figure 22).
6 - 4 PERT Test.mpp (This file should look like Figure 24).
6 - 5 Resource Definition.mpp (This file should look like Figure 28).
6 - 6 Assignment Calculation.mpp (Each task should have the correct Type and Effort Driven selections).
6 - 7 Assign Resources.mpp (This file should look like Figures 32 - 34).

Using Process Bridge? Its easy to follow the workflow…

Figure 46: Process Bridge Activity 6: Enter Estimates.
You can either use the Planning* tab on the ribbon or the Activity 6: Enter Estimates floating toolbar to walk through this Activity.
A - The Enter Estimates workflow is under the Planning tab on the ribbon.
B - Select the Enter Estimates Bar command to open the Enter Estimates floating toolbar.
C - From the Activity 6: Enter Estimates group…
Define Scope
Enter Duration and or Work
Define Resources
Determine Calculations
Assign Resources
D - From the floating toolbar…
Review the Workflow online
Open Notes
Build Team From Enterprise (if using Project Server)
Define Scope
Enter Duration and or Work
Define Resources
Determine Calculations
Assign Resources
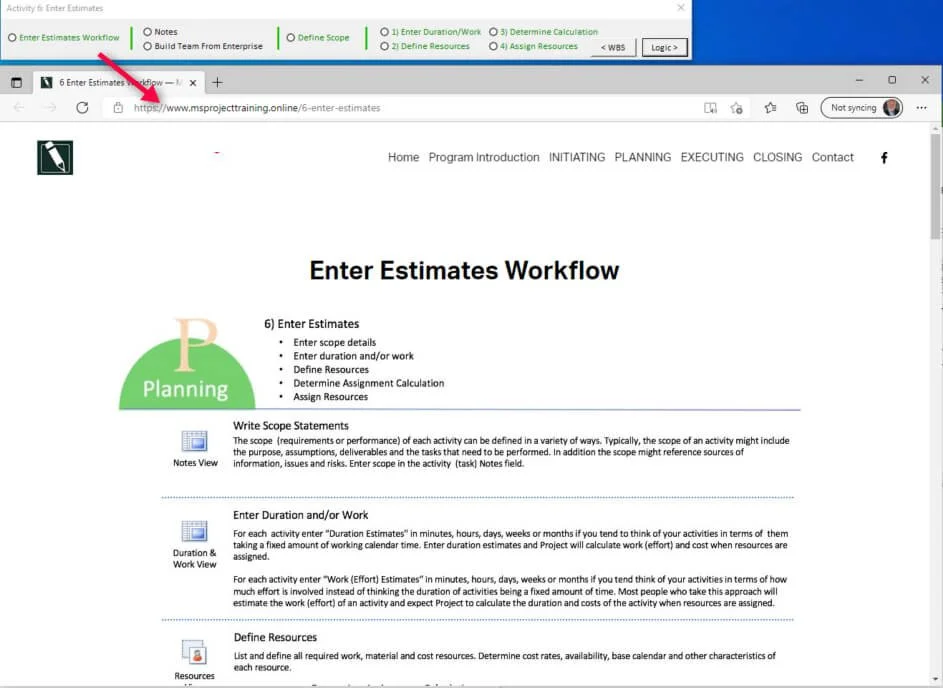
Figure 47: Enter Estimates Workflow.
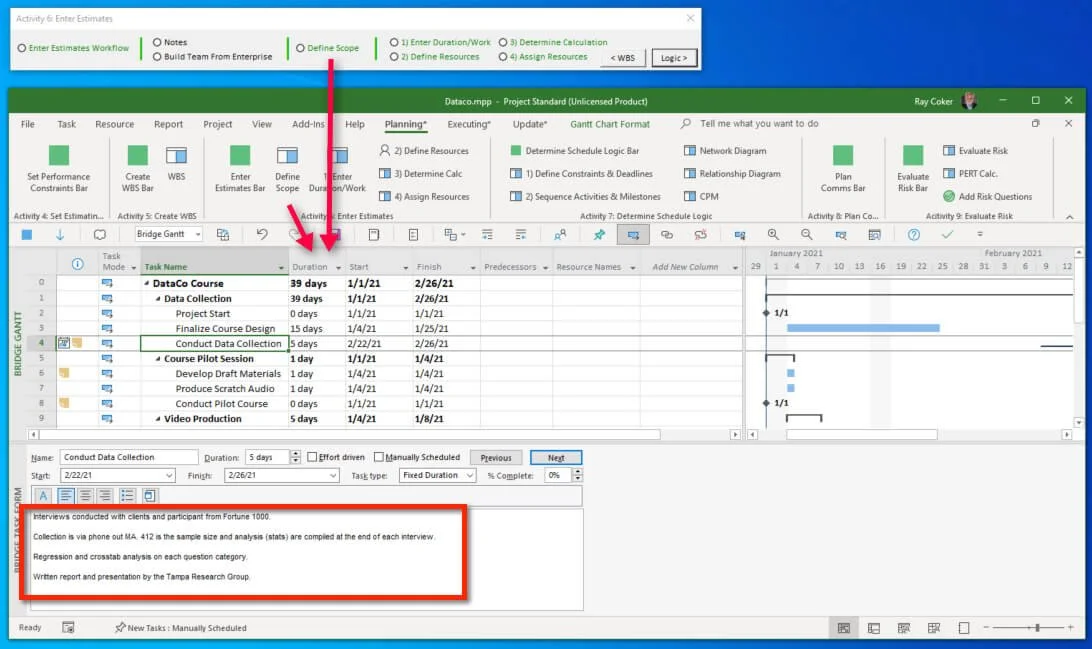
Figure 48: Define Scope Command.
Click the Define Scope command.
A Gantt Chart view is applied in the top view and a Task From view on the bottom. The Notes theme is applied to the Task Form.
Walk down your WBS in the top view and enter the scope statement for each detail task.
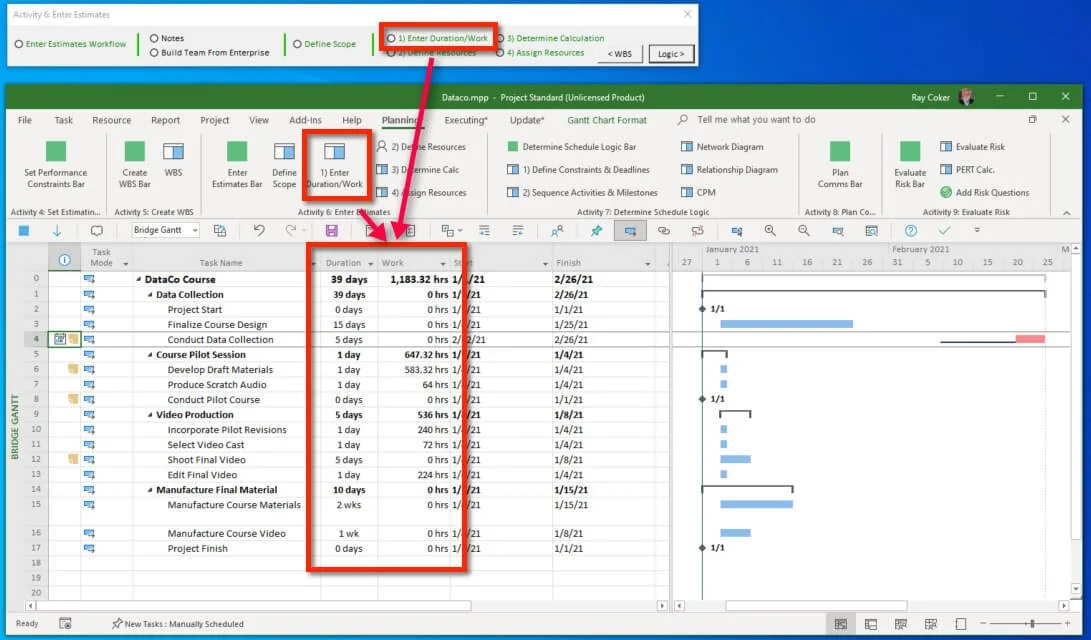
Figure 49: Enter Duration/Work command.
Click the Enter Duration / Work command and a Gantt Chart view is applied for entering duration and or work estimates.

Figure 50: Define Resources command.
Define resources by clicking on the Define Resource View command.
A Resource Sheet view is applied with the basic definition fields applied to the table.
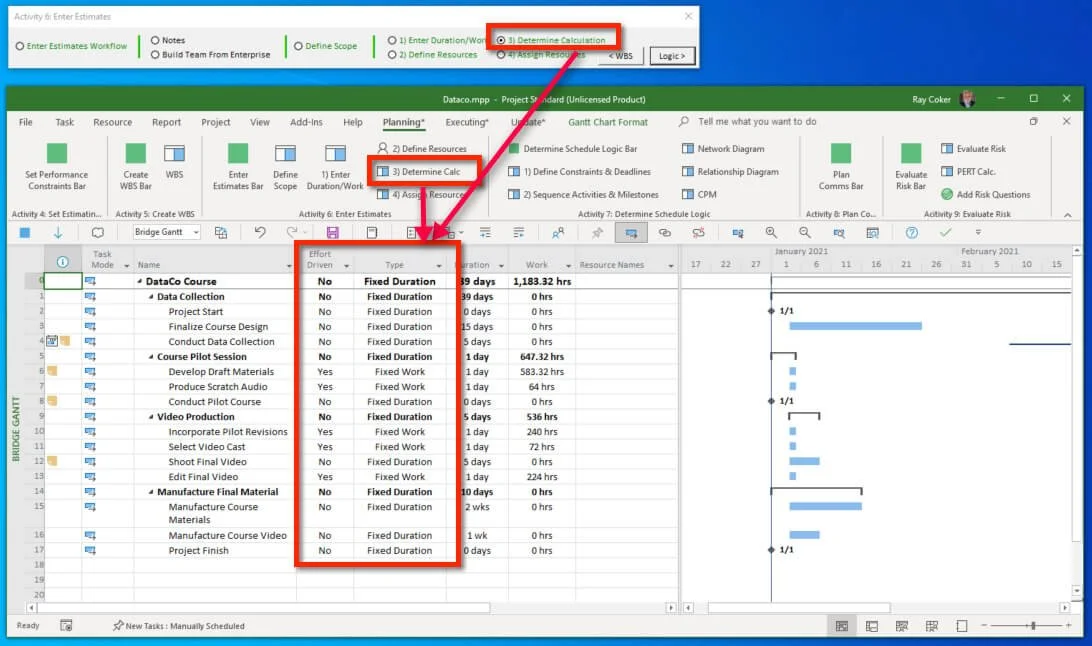
Figure 51: Determine Calc command.
Determine how you want estimates calculated when you assign resources by clicking on the Assignment Calculation View.
A Gantt Chart view is applied and the Type of Effort Driven fields are displayed.
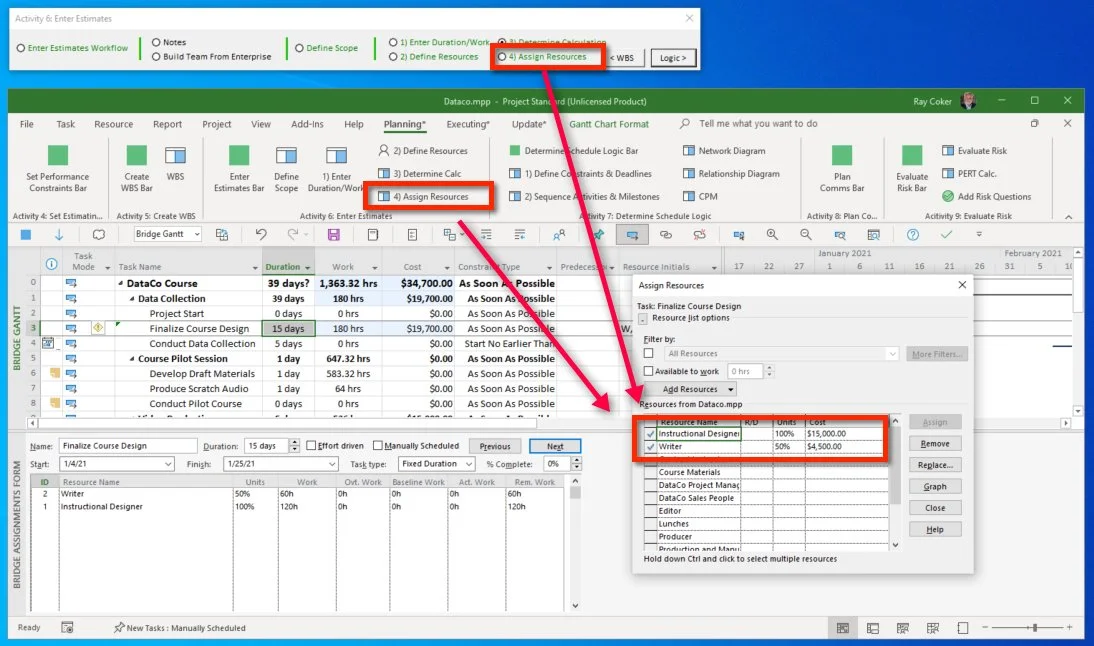
Figure 52: Assign Resources command.
Assign resources by clicking the Assign Resources command.
A split window is applied. In the top view, the Duration, Work and Cost fields are displayed.
In the bottom view, the Work theme is applied to the Task Form view.
The Assign Resources floating dialog box is opened to Assign, Remove and Replace resources on tasks.