
Last Updated: Valentine’s Day, 2022

Activity 4 - Select Performance Constraints
Application 5 - Manage the Global.MPT with the Organizer (jump to)
Copying and Deleting Element Simulation - 20 minutes (jump to)
Sharing Custom Elements - 15 minutes (jump to)
Setting up Process Bridge - 15 minutes (jump to)
Application 6 - Create a Project Template (jump to)
Saving a Template Simulation - 15 minutes (jump to)
Application 7 - Copy and Import a New Project (jump to)
Copying a WBS and Importing a WBS Simulation - 15 minutes (jump to)
Finalized Updates to the MS Project Master Class Plan.mpp (jump to)
Review of Best Practices (jump to)
Activity 4: Select Performance Constraints Exam (jump to)
Simulation Files (jump to)
Process Bridge (jump to)
Page Outline
Application 1 - Learn Select Performance Constraints Workflow
Activity 4 Workflow Simulation - 20 minutes (jump to)
Set Performance Constraints Content Links (jump to)
Application 2 - Define and Use Calendars (jump to)
Working with Calendars Simulation - 30 minutes (jump to)
Application 3 - Choose General Selections (jump to)
Scheduling from a Finish Date Simulation - 15 minutes (jump to)
Application 4 - Format Gantt Chart (jump to)
Gantt Chart Formatting Simulation - 15 minutes (jump to)

Set Performance Constraints Workflow
Review
Review and learn Activity 4: Set Performance Constraints workflow in Figure 9 below.

Figure 1. Activity 4 in Project MAP.

Note: This is Activity 4: Select Performance Constraints in the Project MAP project lifecycle.
Initially, every task in Microsoft Project is scheduled against the working time defined in the Project Calendar. Then, a schedule is determined by the use of calendars for tasks and resources. Defining Calendars is the first big task of setting up performance parameters.
There are three types of calendars that need to be defined:
(1) The calendar that is used by the schedule or project.
(2) Calendars that might be used by tasks that need to be scheduled against a calendar that is different than the Project Calendars.
(3) All resources that are defined as Work type, meaning there is work or FTE calculated when they are assigned to tasks, have a calendar. Usually, most resources on a project use the Project Calendar, however, this would not be the case if you were scheduling different shifts of resources.
For each Work type of resource, the calendar can be used to make non-work exceptions for things like vacation, family leave, or time unavailable for the project.
In other instances, resource calendars may be used to reflect shift work. The calendar for the project may reflect a standard business day, but resources may be scheduled against their own unique calendars. For instance, on an international project, the project calendar may reflect the standard UK business day and workweek because most of the work is being done there, but some team members (resources) may use their own respective Hong Kong, U.S., and German calendars.
After calendars are defined, and before you start entering tasks, set up Project Information. The decisions in Project Information are a type of metadata on the project level.
When is the project going to start?
How is the project going to be scheduled?
What calendar is going to be used for the project?
At this point in the workflow, you are likely to begin doing some customization of Microsoft Project views, such as Gantt Chart Gridlines. The context-sensitive Format tab on the Ribbon provides a good indication of what can be customized for a particular view.
Last, in this workflow, end-user preferences and defaults need to be defined. Many of these selections in Project Options determine how calculations and how tasks are scheduled.

Tip: Many of these preferences and defaults are local settings or unique to the project; typically populated in a *.mpt file or a Project Template that is used to start a project. Organizations use template files to build expert plans for certain types of projects. The use of template files enforces standards and shortens the planning process.

Journal
In Application 1, for each Activity in this MS Project Master Class Book, you will be asked if you can think of a better workflow for the Activity. If you are new to using Microsoft Project, you will likely not know what a better workflow might be.
The question intends to get you to begin thinking of, in this instance, the best way for you to select the performance constraints for a new project. As you learn Microsoft Project, we assume that you will develop your way of using Microsoft Project.
Can you think of a better workflow for Activity 4: Select Performance Constraints when you are setting up a new project? If yes, what is that workflow?

Best Practice
Before entering tasks or resources, create or edit the base calendars that will be used for the project, tasks, and resources. Then determine how the project will be scheduled and make the appropriate selections in Project Options.
Start a new project from a project template (*.mpt).

Activity 4 Workflow Simulation (20 minutes)

Download .mpt file
To start this simulation, download the Activity 4 Overview.mpt file by using the icon above and opening it in Microsoft Project. Rename the file to 4 - 1 Activity 4 Overview.mpp. Ensure your global settings in Project Options are correct and that you are using Microsoft Project 2019, 2021, or Microsoft 365 updated for best results.
This is a Microsoft Project template file. It has an extension of *.mpt rather than the extension of *.mpp for a project file. In this Activity we are going to review creating and working with template files. In general, the best practice is to start a new project from a template file. To do this, open a template file and click Save. Microsoft Project will save it as a .mpp file. Any *.mpp file can be saved as a template file.
Review the following in this template file:
The first thing we are going to work on in this Activity is calendars. Open the calendars used in this project by selecting the Project tab on the ribbon and then select the Change Working Time command in the Properties group. This is where you can create and edit calendars used for the project, tasks, and resources.
Notice this list of calendars in the drop-down list at the top. There are four calendars,
24 Hours
Night Shift
Standard (this calendar is being used as the project calendar)
7 Day Calendar

Note: Work resources are also listed, each is using one of these four calendars.
Review each calendar. Note that the Standard calendar has an exception, 12/25/22 - 1/4/23, that is defined as Nonworking.
Each Work type of resource also has a calendar. Notice that when you select a resource, their base calendar is displayed.

Figure 2. Change Working Time.
Exit the dialog box and open Project Information (Project / Properties group / Project Information command.
(A) The start date for this project is 1/1/23, and it is formatted as a blue vertical line in the timescale area of this view.
(B) Because this project is scheduled from the Project Start Date, also a selection in Project Information, the finish date is calculated. This is formatted as a black vertical line.
(C) The calendar selected for this project is the Standard calendar and if you remember, 12/25/22 - 1/4/23 is defined as Nonworking. In Microsoft Project, all tasks are initially scheduled against the project calendar, so in this instance, the first task does not start until 1/5/23. Take a moment to make sure you understand that scheduling functionality.

Figure 3. Project Information.
These vertical start and finish datelines are formatted in Gridlines (Format tab on the ribbon / Format group / Gridlines command).
Last, open Project Options (File / Options at the bottom of backstage. Project Options is used more in Microsoft Project than other Office products for a simple reason, to effectively plan and execute a project effectively in Microsoft Project you must use most of the features. Expect to learn most of the selections in Project Options.
Memorize
These three dialog boxes will be opened continuously while using Microsoft Project, memorize the locations of their commands.
Change Working Time (Project / Properties / Change Working Time).
Project Information (Project / Properties / Project Information).
Project Options (File / Options).
Let’s make some changes. Remember, the project starts on the 1st, but the holiday in the project calendar ends on the 4th. The start date is entered in Project Information, the project calendar is selected in Project Information and the calendars are defined in Change Working Time.
For this project, remove the holiday from the project calendar. Do this by opening the calendar, selecting the exception row, and clicking the Delete button.
What happened?

Figure 4. Holiday exception in the project calendar.
Next, hover over the icons in the indicator column for Task 3 to read the indicators. The first indicator tells you that the 7 Day Calendar is assigned to that task. Go to the Organizer, select this calendar and rename this calendar to 7 Day Calendar (8-5). You will work with custom elements like calendars and use Organizer to manage these elements in a later application.
There are several ways to get to the Organizer. If you know where you want to go but don’t remember how to get there, you can always try to get there by typing in the Tell me what you want to do field at the top of the ribbon. Begin typing Organizer and then select it. In the Organizer select the Calendar tab, select the 7 Day Calendar, and then the Rename button. Click OK went done.

Figure 5. Indicators column showing a task calendar and a resource overallocated.
Indicators report on specific aspects of a task. In the following figure, a standard list of indicators is listed.
Let’s trigger these indicators on a new task. After the Finish task, enter a task named Indicators. Then do the following:
Select the task and then open the Task Summary dialog box. Task / Information on the ribbon. Click the Advanced tab, and then in the Constraints type field, select Start No Earlier Than. Also, why you are there, enter 4/3/23 in the Deadline field. Click Ok. The timing constraint Start No Earlier Than indicator shows.
Then, enter a start date of 4/5/23 in the Start field for this task. This task goes past its deadline on 4/3/23 indicator appears.

Figure 6. Notes in Task information.
Open Information again and in the Notes field:
Type in your favorite beer. If you don’t drink beer, type in your favorite drink. In the notes field, you can also paste graphic files. Copy a picture of your favorite drink off the internet and paste it in Notes. Click OK.
The Notes indicator has been added. The first line is Notes is also displayed when hovering.
Add a hyperlink. Select the task, right-click, and at the very bottom, select Hyperlink. In the address field, enter www.msprojecttraining.online. Click Ok, and the Hyperlink indicator shows.
Open Information, and add the Night Shift calendar in the Advanced tab. The Calendar indicator shows.
Open Information, assign the Engineer to the task under the Resource tab. The Engineer uses the Standard Calendar. When you click OK, two indicators will show; one tells you a resource is overallocated, and the other tells you there is not enough common working time.
Save the project.
Simulation Results
The 4 - 1 Activity 4 Overview.mpp file should look like the figure below. The project starts on 4/3/23 and finishes on 5/4/23. The Indicators task has seven indicators.
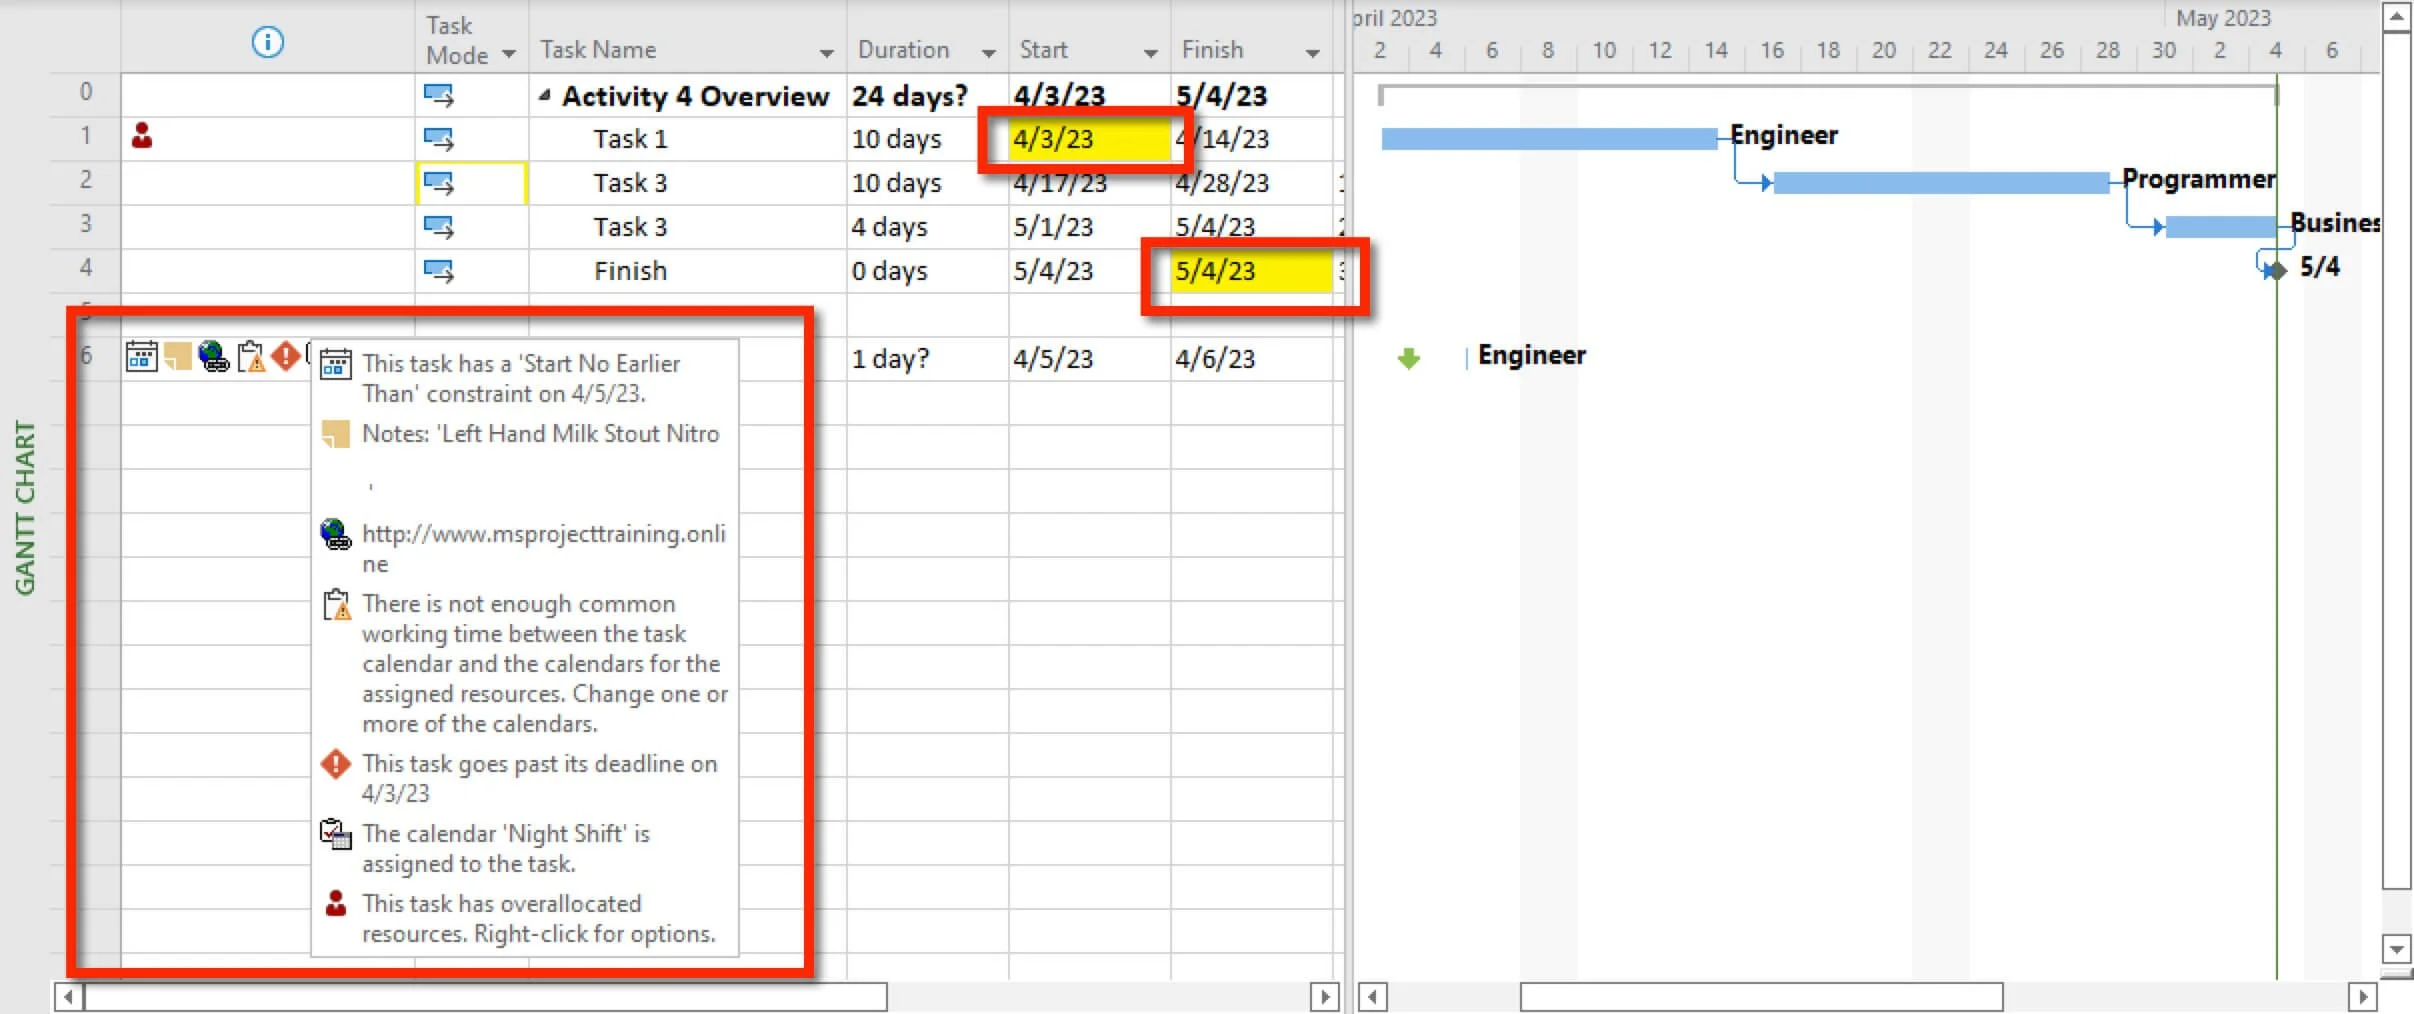
Figure 7. Common task indicators.

Download *.mpp file
One of the Microsoft Project files we are going to work with throughout this Master Class is named MS Project Master Class Plan.mpp. To start this simulation, download this file by using the icon above and opening it in Microsoft Project. Ensure your global settings in Project Options are correct and that you are using Microsoft Project 2019, 2021, or Microsoft 365 updated for best results.
Along the way we are going to build out this Master Class Plan and we are going enter how much time you actually spent working on this class.
Take a minute to review this file. Then in Project Information, enter the date for when you started the class.
Notice the Timesheet column, this is a custom text field. For now, record the amount of time you spend on each task. For example, if you spent 1 hour on reviewing this section in the Master Class Book and Online, enter 1hr. If you spent 45 minutes on Application 1, enter that information. If you are working with a coach, email them this file at the end of each activity, or along the way if so directed.
As show in the next figure, enter the amount of time you have spent on task #28 and #29.
Save the project.
Set this MS Project Master Class Plan.mpp aside, we are going to have you build on it as we progress through the Class. At this end of this Activity we are going to ask you to enter time spent on each detail task (a detail task has some duration and no tasks indented below it).
Project Example

Over the years, most contracts I have worked on have been time and materials. Because I was getting paid for my time, I never had an issue keeping track of my time spent because it was so easy to see the benefit. In many organizations, tracking time spent can become complicated. When I worked at Symantec, my manager called me in his office once and asked why I was reporting so much time. I traveled once or twice a week and usually went from the west coast to the east coast and back. He told me not to report travel time. I replied that "When he and his wife had finished dinner, walked out of the movie theater and slipped between the sheets I was still on the airplane, that I wasn't on the plane for my health, I was working." He asked if I was ever reading a book, listening to music, sleeping, or watching a movie? We debated the definition of work, and I conceded not to report any travel time as work, which put me at about 50 hours a week. I was not fond of that very much.
Over the years, I have seen near open rebellion when the troops are asked to report time spent daily or weekly. I remember a person once saying, "More useless bull .… from (the name of the company)" when asked to report a timesheet each week. This same individual several years later called me into the new company he was working for to roll out many of the same project management tools and techniques he had resisted. "Don't you remember?" I wanted to ask.
Asking team members to report time spent on project activities is a significant tenant in project management. Most of us can see the potential value, but few of us like asking team members to enter time spent or doing it ourselves.
I am asking you to report time spent for selfish reasons. Knowing how much time is being spent will refine this Master Class. In addition, we will also use your actuals to compare with the baseline later in the class.
There are two other reasons we are going to work with this file. One is it is a different type of project than you are likely to work on. Working with various projects is an excellent way to learn Microsoft Project. Last, working on this project is a learning technique. It gets you to look at and think through the outlines for an Activity in the Master Class Book and the Activity Online Application.
The Timesheet column is a custom field. Since we are going to build this project as we work along in the class, we will capture our time spent on the class along the way. When we are finished building the project, we will baseline the project and then take the hours in the Timesheet field and move them to the Actual Work field. Activity 4 has a work breakdown structure, duration estimates, and all of the detail tasks and milestones are sequenced. As we move along in the class, you will apply what you have learned to this file. In Activity 5: Create Work Breakdown Structure, you will create the next section of this plan.
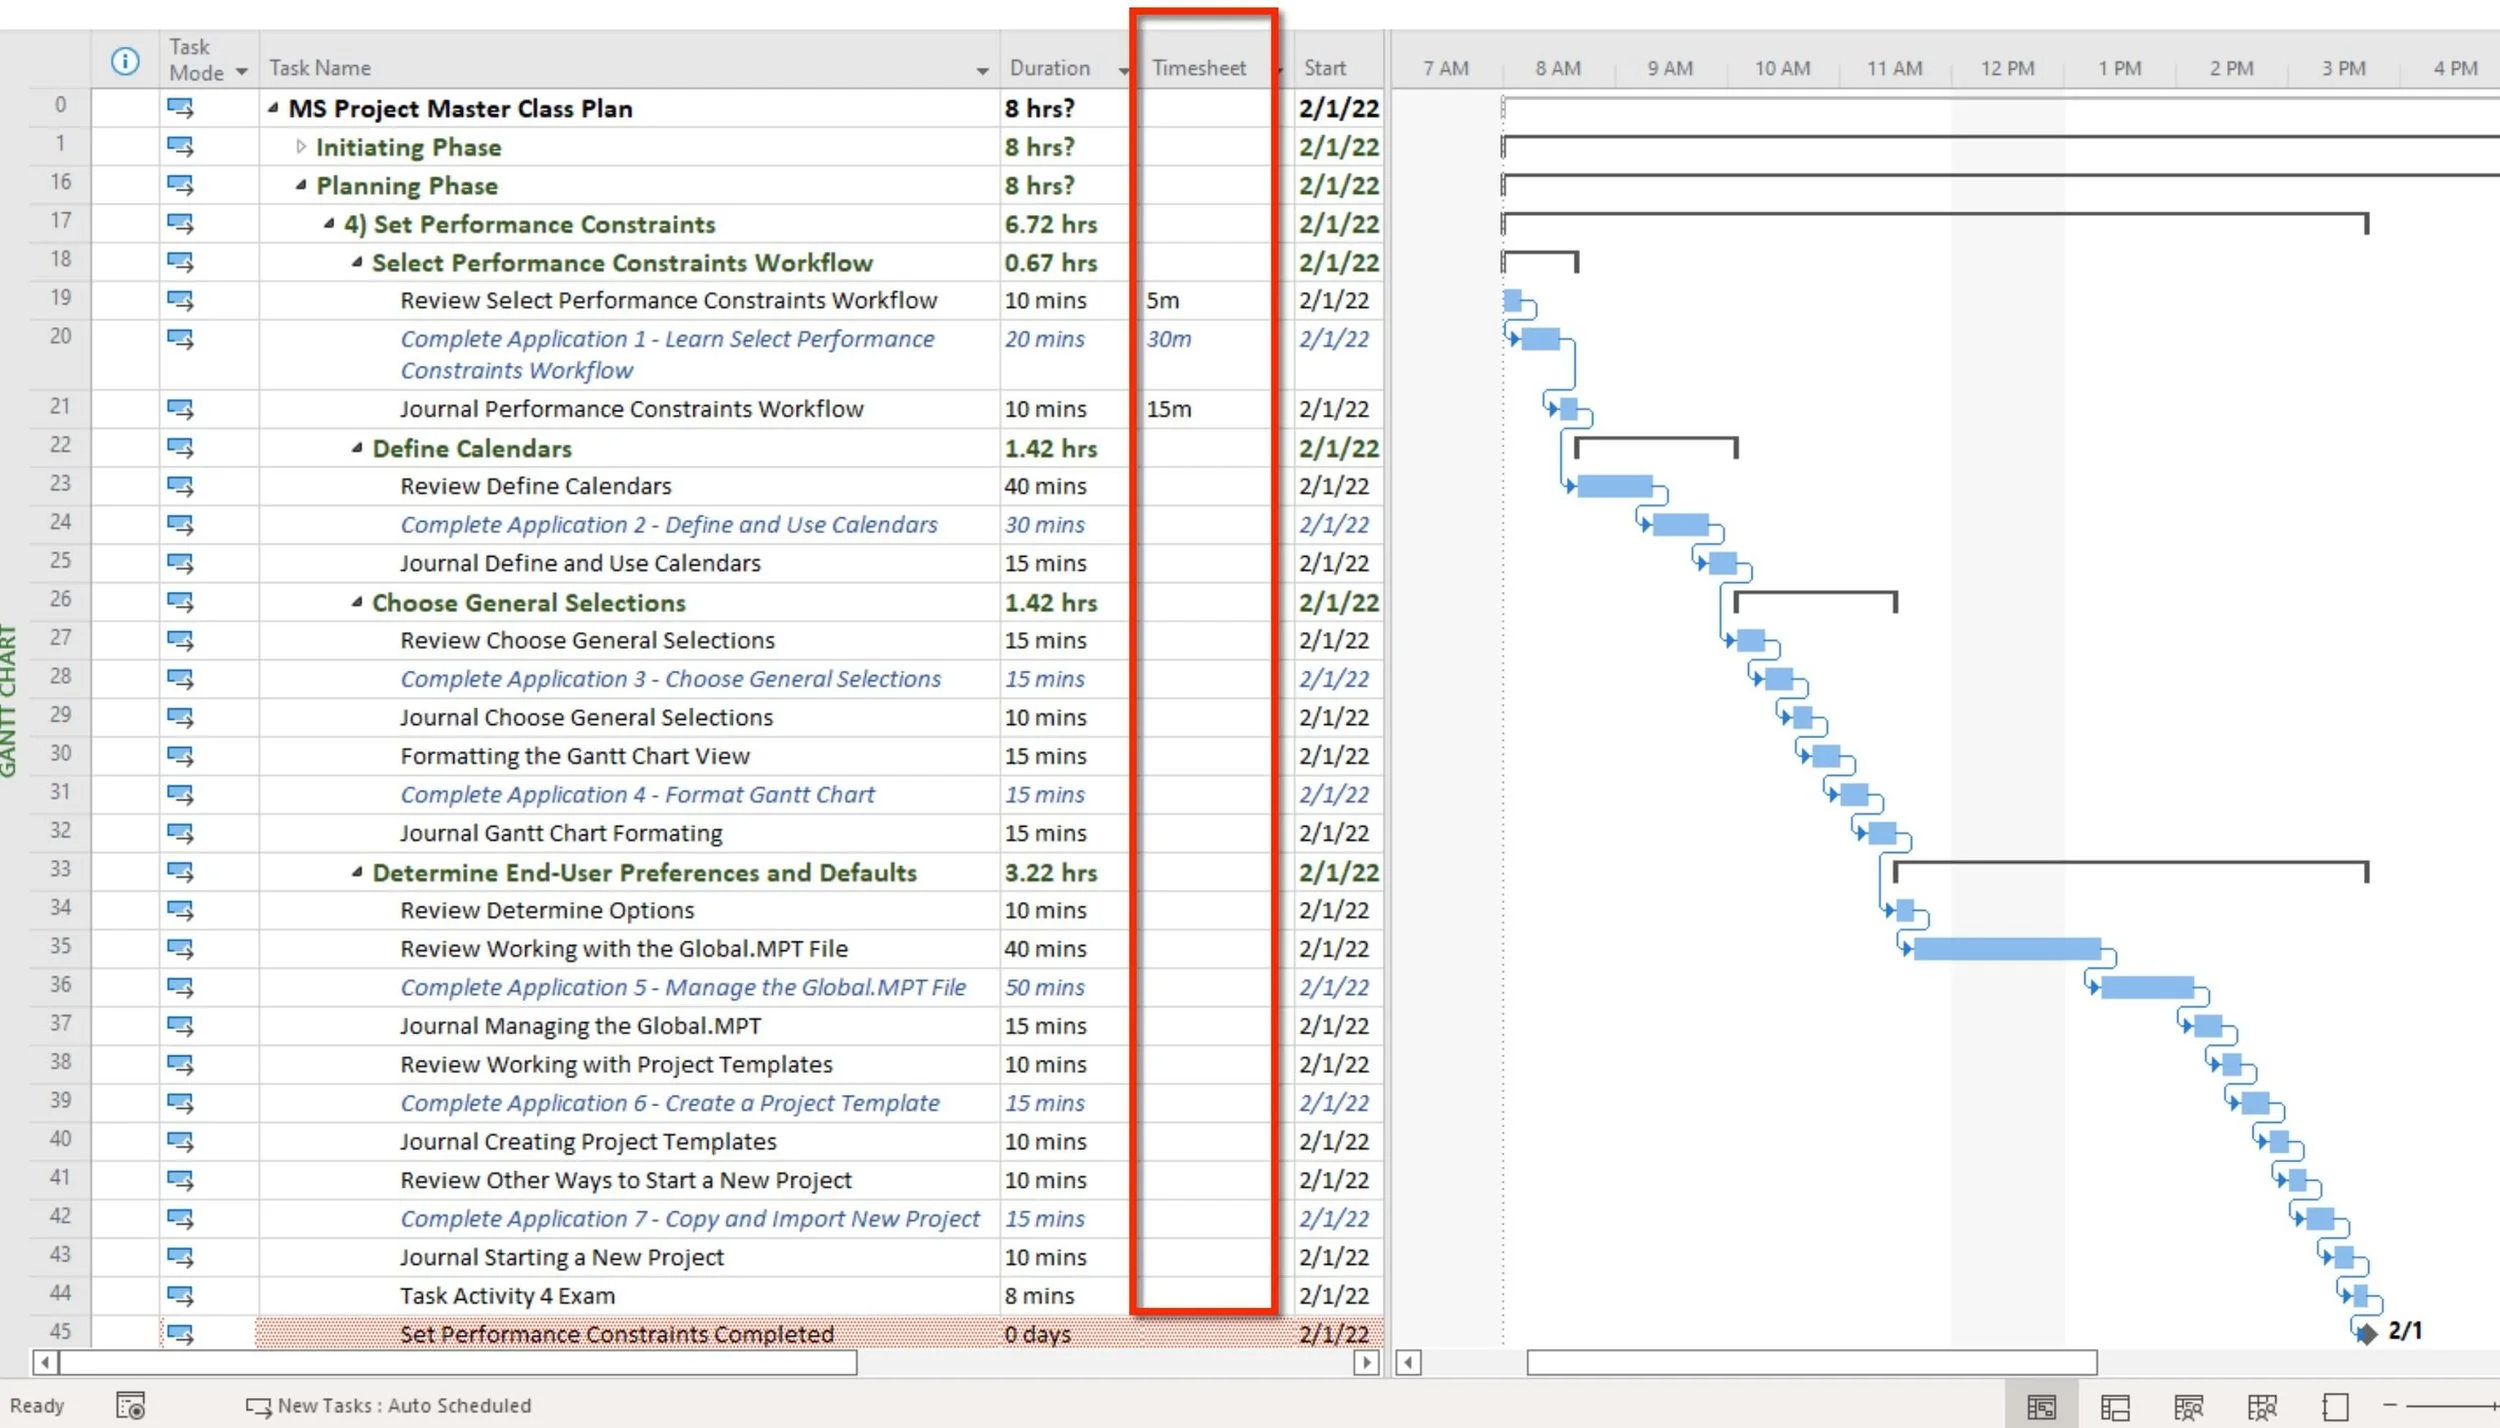
Figure 8. Entering time spent on each detail task.

Figure 9. Activity 4 Workflow Chart.

Download Workflow as PDF

If you are working with a coach, save and email them this file (4 - 1 Activity 4 Overview.mpp should look like figure 7). If you are not working with a coach and you are planning to apply to either MS Master Class certificate, archive this completed simulation file so that you can submit it for review.

Return to the Master Class Book and review the next section for this Activity.
Content Links

All Microsoft Project calendars are Base Calendars. By default, or out of the box, three Base Calendars are provided:
Standard business calendar
24/7 calendar
Night Shift calendar
When a new Base Calendar is created, that calendar can be used for Projects, Tasks and Resources.
The calendar for a Work type of Resource works a little bit different than a calendar does for the project or a task. When you create a Work type of Resource, you select a Base Calendar. Then, you can edit that calendar specifically for that resource. All of your resources may be using the same Base Calendar, for instance, but each resource could have their own unique vacation days reflected in their calendar.
Note: If you are using Microsoft Project with Project Server, you likely cannot create and use your own calendars. You will select from an available list of calendars. If you are using resources from the Project Server Resource Pool, those resources had been assigned a calendar and you likely cannot make any changes their either.

Best Practice
Keep it simple.
In most cases, make sure the Project Calendar definition matches the Calendar Options for a project in Options.
I do not recommend that you attempt to continuously update resource calendars with vacation and other non-work days without first evaluating the value vs. effort involved.

Each Work type Resource uses a calendar that can uniquely reflect their work schedule and availability. Some resources work different shits, or perhaps work a 4 day a week workweek or they have have every other Thursday off.
In addition, individual resources my not be available to work full-time on a project, or may not be available at all during certain time periods. A resource calendar is how to set these specific types of availability and non-availability up so you can better schedule resources.

A base calendar can be created for a task or groups of tasks.
By default, a task uses the Project Calendar for scheduling, unless a calendar is assigned to a task.
Project Example
At Sunbeam, much of their manufacturing was being done in China. Many of the engineering projects were run out of corporate but engineers were frequently flying to China.
The project plans used a standard U.S. workweek calendar, 8AM to 5PM daily. However, those tasks being worked on in China were scheduled using a task calendar that reflected a common six day workweek, 10 hours a day.

Everything in Microsoft Project, with some exceptions, is scheduled against defined working time.
Working time is defined by the use of calendars for the project, tasks and resources.
A calendar can also be adjusted over time. The work week can be defined differently for certain periods of the year.
Project Example

For over twenty years I was associated with a consulting organization for whom I had created licensed training materials. This company did a fair amount of project management work, they did some great project management work, and I was often brought in as the project management software expert. Internally, the company had a five-day workweek, but between Memorial Day and Labor Day they went to a summer schedule; a four-day workweek. This kind of schedule definition is easy to reflect in Microsoft Project by defining the project calendar work week overtime.

Best Practice
Most project managers in the U.S. use a standard 8 to 5, Monday through Friday, defined work holidays type of project calendar. They still realize it is common for professionals to work on weekends or evenings. For many, scheduling to the workday or workweek is good enough. In manufacturing, that is seldom the case, so often, the organization and context determine how precisely calendars are used.

When you define a Work type of Resource, that resource’s availability to work is based on the calendar you select for them.
First, select the base calendar for the resource. If the base calendar selected has any exceptions, like holidays, they will not populate the resource’s calendar. Use exceptions to define periods of time when the resource might unavailable. Exceptions might be holidays, when they are out of the country, family leave, training or away at a conference.
Second, you then can vary their available against a resource’s calendar. For example, if their base calendar says they work 40 hours a week, you could say that during third quarter, they are only available 20 hours a week for the project.

Best Practice
Having a good sense of a resource’s availability is a cornerstone of good scheduling. Avoiding resource bottlenecks and the inverse, underutilized resources, are critical skills associated with good planning and execution.

In Microsoft Project, scheduling is done from a Start Date or a Finish Date.
If you know the finish date for a project but are uncertain when to start a project, Scheduling from a Finish Date may be a useful technique during planning.

Best Practice
Suppose you schedule from the Finish Date; once you are far enough along with planning to determine when the project should start, schedule from the Start Date. When you are ready for execution, you should be scheduling from a start date.

Another part of calendar definition is adding holidays or any other type of non-working time.
You can also flip this idea and add working days to non-working days. For instance, you can open up a weekend that has already been defined as non-working, to be available as working days.

Note: The best way to make exceptions, is to: select a blank exception row. Select the actual day in the calendar above. Name the exception. Click Details to define the exception rules.

Best Practice
On long-duration projects, neglecting to schedule around holidays can significantly skew the duration of a project.
Seldom do we finish a project with time to spare, so defining holidays should always be a consideration when calculating the duration of a project.

Learning how the Organizer works can literally save you hundreds of hours of work.
The Organizer organizes all of your customization related to:
Views
Reports
Modules
Tables
Filters
Calendars
Maps
Fields
Groups
Our assumption is that a master Microsoft Project user does a lot of customization. Knowing how to manage and share your customization between projects, versions of Microsoft Project, and with other users will save you a great deal of time and it will enhance your experience using the software.
Project Example

I was doing consulting work for Siemens and this particular facility was using Microsoft Project to schedule the jobs related to large power plant generators on the shop floor. They were using the tool to help run their business and they had done extensive customization to Project Elements and they used Modules to take information to Excel for reporting.
I was helping them move to a new version and Project Server environment and they asked me how long it would take to migrate their customization to the new environment and I replied, “About five minutes.”
They were skeptical, since another consultant, who I considered at the time to be the best technical expert in the project management enterprise space at the time, had told them it would take four to five days.
For whatever reason, knowing how the Organizer worked was just a gap in this consultant’s understanding. We sat down and using the Organizer migrated all of their customization in about 10 minutes. Admittedly, it was twice the amount of time than I had estimated!

Best Practice
Whatever is in the Global.MPT file is available to all projects. Don’t let Microsoft Project determine what is in the file. Turn off “Automatically add new views, tables, filters and groups to the global” in Options.
Know the location of the Global.MPT and make sure it is routinely backed up.

Templates are a type of project in Microsoft Project with the extension of *.mpt, which stands for Microsoft Project Template.
Open a template file in Microsoft Project is like opening a *.dot template in Word that contains pre-formatted document settings, such as headers, footers, margins, font sizes, and other common page styles.
A template in Microsoft Project can contain custom Elements such as view snd report, local selections related to the scheduling engine in Options and Project Information, and it can contain a full blown project plan with WBS, initial estimates, dependencies and resource assignment.

Best Practice
There are few things better than starting fast with an expert plan. In a project group or larger organization, templates help drive standards and consistency. If they are fully developed they can significantly cut the time and effort involved in planning.

Define and Use Calendars
Review
Defining and using calendars are one of the more complicated features in the software. Read the Content Links above on Creating a New Base Calendar, Defining Calendar Working Days, Holidays or Non-Working Time, Resource Calendar and Vacation Time. (jump to)

Working with Calendars Simulation (30 minutes)

Download *.mpp file
To start this simulation, download the the Calendar Rules.mpp file by using the icon above and opening it in Microsoft Project. Rename the file to 4 - 2 Calendar Rules.mpp. Ensure your global settings in Project Options are correct and that you are using Microsoft Project 2019, 2021, or Microsoft 365 updated for best results.
First, let’s take a look at how calendars are used in this simple project.
Click on the Change Working Time command under the Project tab.
In the For calendar drop down menu is a list of available base calendars along with any Work type resource calendars. In this example, there is only one resource (Ted) so we are only seeing his calendar. His base calendar is the Standard calendar.
The calendar being used for the project schedule is identified as the (Project Calendar). Note how the work week and work days are defined by reviewing the work week under the Work Weeks tab. Click on the Details button under the Work Week tab.
Click on the Options button and note that the calendar options in Options are congruent with how the Project (Standard) Calendar is defined.
Observe the U.S. Federal Holidays as exceptions to the defined work weeks. (Two U.S. Federal Holidays are not listed, Juneteenth National Independence Day and Columbus Day.) Take a few minutes and click on the Details button to observe the rules for each exception. These nine holidays follow two different sets of rules.
1) Nonwork on the same day annually,
2) Nonwork on the same schedule annually.
Note: Does your organization use these basic holiday exceptions. It takes awhile to create this list. But, in this Activity, you are going to learn how to copy this Standard Calendar in a few seconds and use for any of your projects.
View the 7 Day Calendar and note that it has a seven-day workweek 8AM to 5PM. No exceptions are defined.
The calendar for Ted is based on the Standard Calendar. However, when a resource is created in Microsoft Project a base calendar is selected for the resource, You can select a different base calendar if you need to. Exceptions in the base calendar are carried over to the resources calendar along with the defined work weeks, but the exceptions are not listed in the Exceptions tab, they are still there because they are in the base calendar. The Exceptions list for a resource is for making exceptions against that base calendar. For instance, you could make an exception for Ted to work on a non-working exception that is in his base calendar. The base calendar could have a holiday exception on the 14th, in Ted’s calendar, his exception could be that he is working that day.
Note that Ted’s calendar has a nonworking exception, his birthday on the 14th.
Review
Review the Calendar Rules chart in the figure below.
Calendars interact with other features and scheduling rules like Task Type not mentioned in this chart. In addition, as a project plan grows in terms of the number of tasks, resources and dependencies, things get more complicated. In other words, the more you ask the software to do, the more the “rules” tend to bend. This makes completely understanding the scheduling engine, under all conditions, a complex undertaking.
However, by knowing the concepts and basic rules presented in the chart below, you can easily figure out most scheduling dilemmas. In other words, you don’t need to understand the hundreds of possibilities and nor the many formulas often presented in training classes. There is too many conditions and the formulas do not always hold.
Just learn these five basic rules and you can easily understand and predict most scheduling.
Memorize
Five important scheduling rules to memorize are shown in the graphic below.
Memorize these five rules:
All tasks are scheduled against the project calendar selected in Project Information.
A calendar assigned to a task trumps the project calendar.
The calendar of a resource assigned to a task trumps either the project or task calendar.
Unless you select Scheduling ignores resource calendars.
Elapsed time trumps all calendars.

Figure 10. Calendar Rules Chart.

Download Calendar Rules Chart as PDF
Using the same 4 - 2 Calendar Rules.mpp project file, let’s observe these five calendar rules in action.

Note: In this project file notice that some of the tasks are Auto Scheduled and Manually Scheduled. We will explain the difference between Auto Scheduled and Manually Scheduled tasks during Activity 7, but for right now, just assume that you will likely only use Auto Scheduled tasks in Microsoft Project. You most certainly will use them after the early stages of planning. In general, Auto Scheduled tasks are scheduled by following all of the rules in the Microsoft Project scheduling engine, while Manually Scheduled tasks, with few exceptions, do not.
In this project, observe the following:
Notice that Tasks 1 and 2 are both 10 days in duration. Those are working days defined by the project calendar. Friday, January 1st is a nonworking exception in the project calendar so Tasks 1 and 2 are not scheduled to start until the 4th, right after the weekend. Observe the scheduled start date in Project Information.
Assign the 7-Day Calendar to Task 1 by double-clicking on the task, going to the Advanced tab and selecting the calendar. Do the same for Task 3. Note the differences. You should be able to explain what is happening from a scheduling perspective.

Figure 11. Assignment of task calendars.
Next, assign Ted to Task 1 and Task 2 by selecting Ted in the Resource Name column. Then apply rule number three to Task 1, tell the task to ignore the resource’s calendar. To help see what is going on it is helpful to split your window. Split the window by going to View on the ribbon, and then checking the Details command. In the drop-down menu, select the Resource Usage view.
Viewing Ted’s assignments on these two different Auto Scheduled tasks will help explain or illustrate how the first three calendar rules are applied in the software. Notice that for both of these tasks, in the bottom view, Ted is not scheduled on Thursday the 14th. Why?
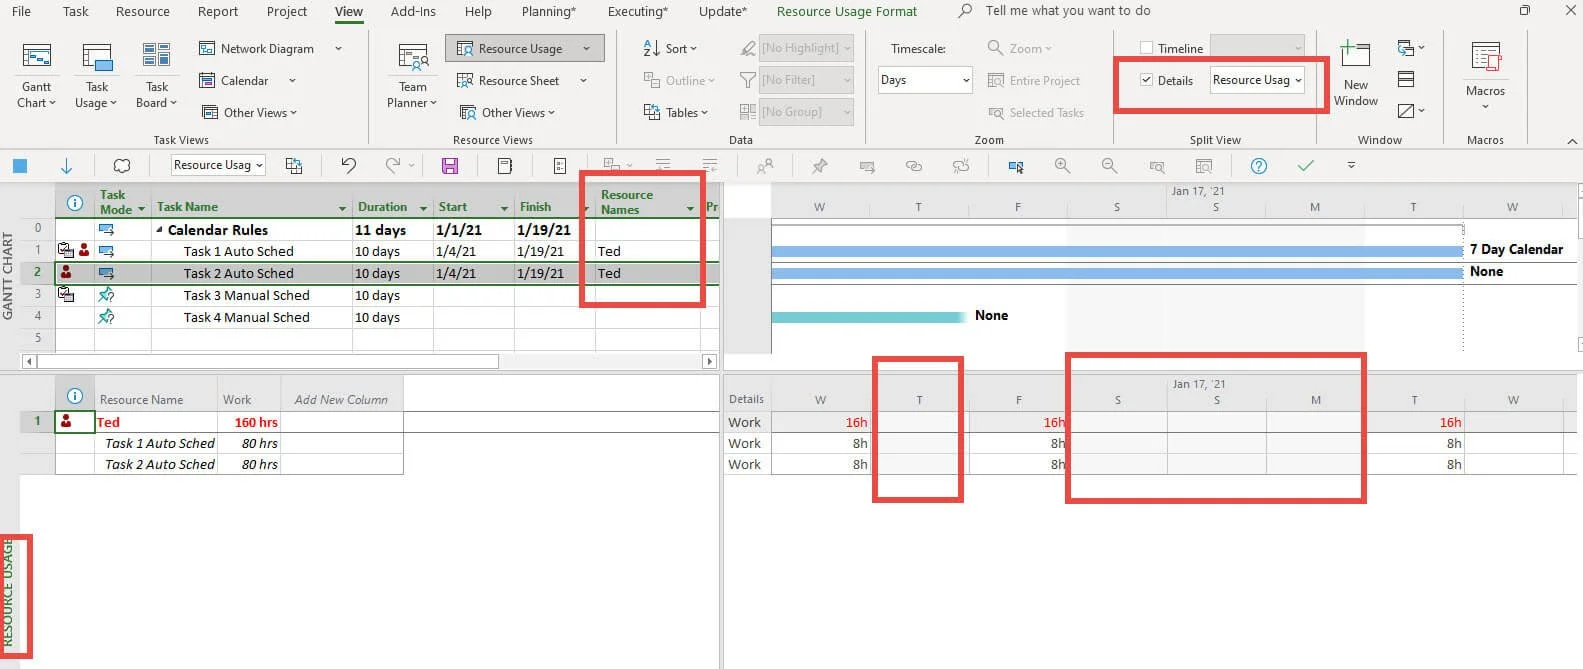
Figure 12. Example using the first three calendar rules.
Next, notice that Task 5 and 6 are both using elapsed time. Change Task 5 to 80 ehrs. Elapsed time is 24/7, so the task is scheduled over the weekend, holiday and into Monday.
Let’s suppose for Task 7, you would like to schedule the task on Saturday, January the 2nd. Change the start date to the 2nd for Task 7 in the Start field. The software will not allow that schedule because it is a nonworking day as defined by the project calendar, but the software does remember that you did try to schedule it on the 2nd. There are three ways to address this scheduling conflict:
You could make the 2nd a work day by making an exception in the project calendar, but that might schedule other tasks that you do not want to be scheduled on that day.
You could assign the 7-Day Calendar to the task.
Or, you could assign the task elapsed time. Remembering that elapsed time is 24/7, enter a duration of 8 ehr for Task 7. Project remembered you wanted to schedule the task on the 2nd. Elapsed time trumps all calendars so the task is now scheduled on the 2nd.
Simulation Results
The file 4 - 2 Calendar Rules.mpp, should look like the one in the figure below. The dates in yellow should match, the taskbars should be the same. Task 1 and 3 have the 7 Day Calendar assign. Ted is assigned to Task 1 and 2 but they are scheduled based on the task calendar used. Task 1 uses the 7 Day Calendar and Task 1 uses the project calendar. Task 5 and 7 are using elapsed time (ehrs) which trumps all calendars, the project, task or resource calendars.

Figure 13. Assigning elapsed time.

Best Practice
Use the Standard Calendar for the Project Calendar. If the calendar is different, make the changes.

Journal
How does Microsoft Project schedule? What are the scheduling rules that are followed?
There is a scheduling engine in Microsoft Project that will be reviewed in-depth. The scheduling engine is a collection of selections, tools, and features that determine when tasks occur in time. One of this scheduling engine's more complicated parts is project, task, and resource calendars.
What is a base calendar?
What are the five calendar rules? (Remember that knowing these rules does not encompass all the possibilities but understanding these five primary rules will help you figure out almost every scheduling abnormality.)
What is the best way to make exceptions to a calendar?
How are resource calendars used?
If you have a schedule that does not make sense, where do you go first to look for the problem? When I am looking at a schedule that does not seem to be making sense, this is the first place I look for a problem.
What is the general rule related to the Calendar selections in Options and the calendar selected for the Project?

If you are working with a coach, save and email them this file (4 - 2 Calendar Rules.mpp should look like figure 13). If you are not working with a coach and you are planning to apply to either MS Master Class certificate, archive this completed simulation file so that you can submit it for review.

Return to the Master Class Book and review the next section for this Activity.

Choose General Selections
Review
Read the Content Link above on Scheduling From A Finish Date. (jump to)

Scheduling from a Finish Date (15 minutes)

Download *.mpp file
To start this simulation, download the Schedule From.mpp file by using the icon above and opening it in Microsoft Project. Rename the file to 4 - 3 Schedule From.mpp. Ensure your global settings in Project Options are correct and that you are using Microsoft Project 2019, 2021, or Microsoft 365 updated for best results.
This project is scheduled from the finish date of 2/22/21 as you can observe in the Project Information dialog box.
Add a task, name it Task 6 to the schedule and place it after the Finish task. Make sure it is also auto scheduled. By default, the task is given a duration of 1 day and notice that the task is pushed right up against the finish date. The only things that could cause the task to start earlier in time is a successor task or a timing constraint.
The idea behind Scheduling From A Finish Date is to determine when a project should start based on a required completion date.

Figure 14. ALAP planning up against a finish date.

Note: This is often called ALAP planning (As Late As Possible). Planning against a finish date, in order to determine the best date to start a project.
Let’s suppose that 2/2/21 is when the project should start. If you are confident in that date, now is the time to Schedule from a Start Date.
Change that scheduling option in Project Information to schedule from the start date. Click OK.
Enter an auto scheduled Task 7 after Task 6. Notice this new task is scheduled right up against the start date. Task 6 is still scheduled an ALAP task, Task 7 is an ASAP task.
If you double click on each task to open Task Information and then select the Advanced tab, you will notice that Task 6 is ALAP and Task 7 is ASAP.
You can see this easier if you insert the Task Type column.
Save the project.
Simulation Results
The file 4 - 3 Schedule From.mpp, should look like the next figure. The Constraint Type column is shown. Task 7 is ASAP and the project is scheduled against the start date 2/2/21.
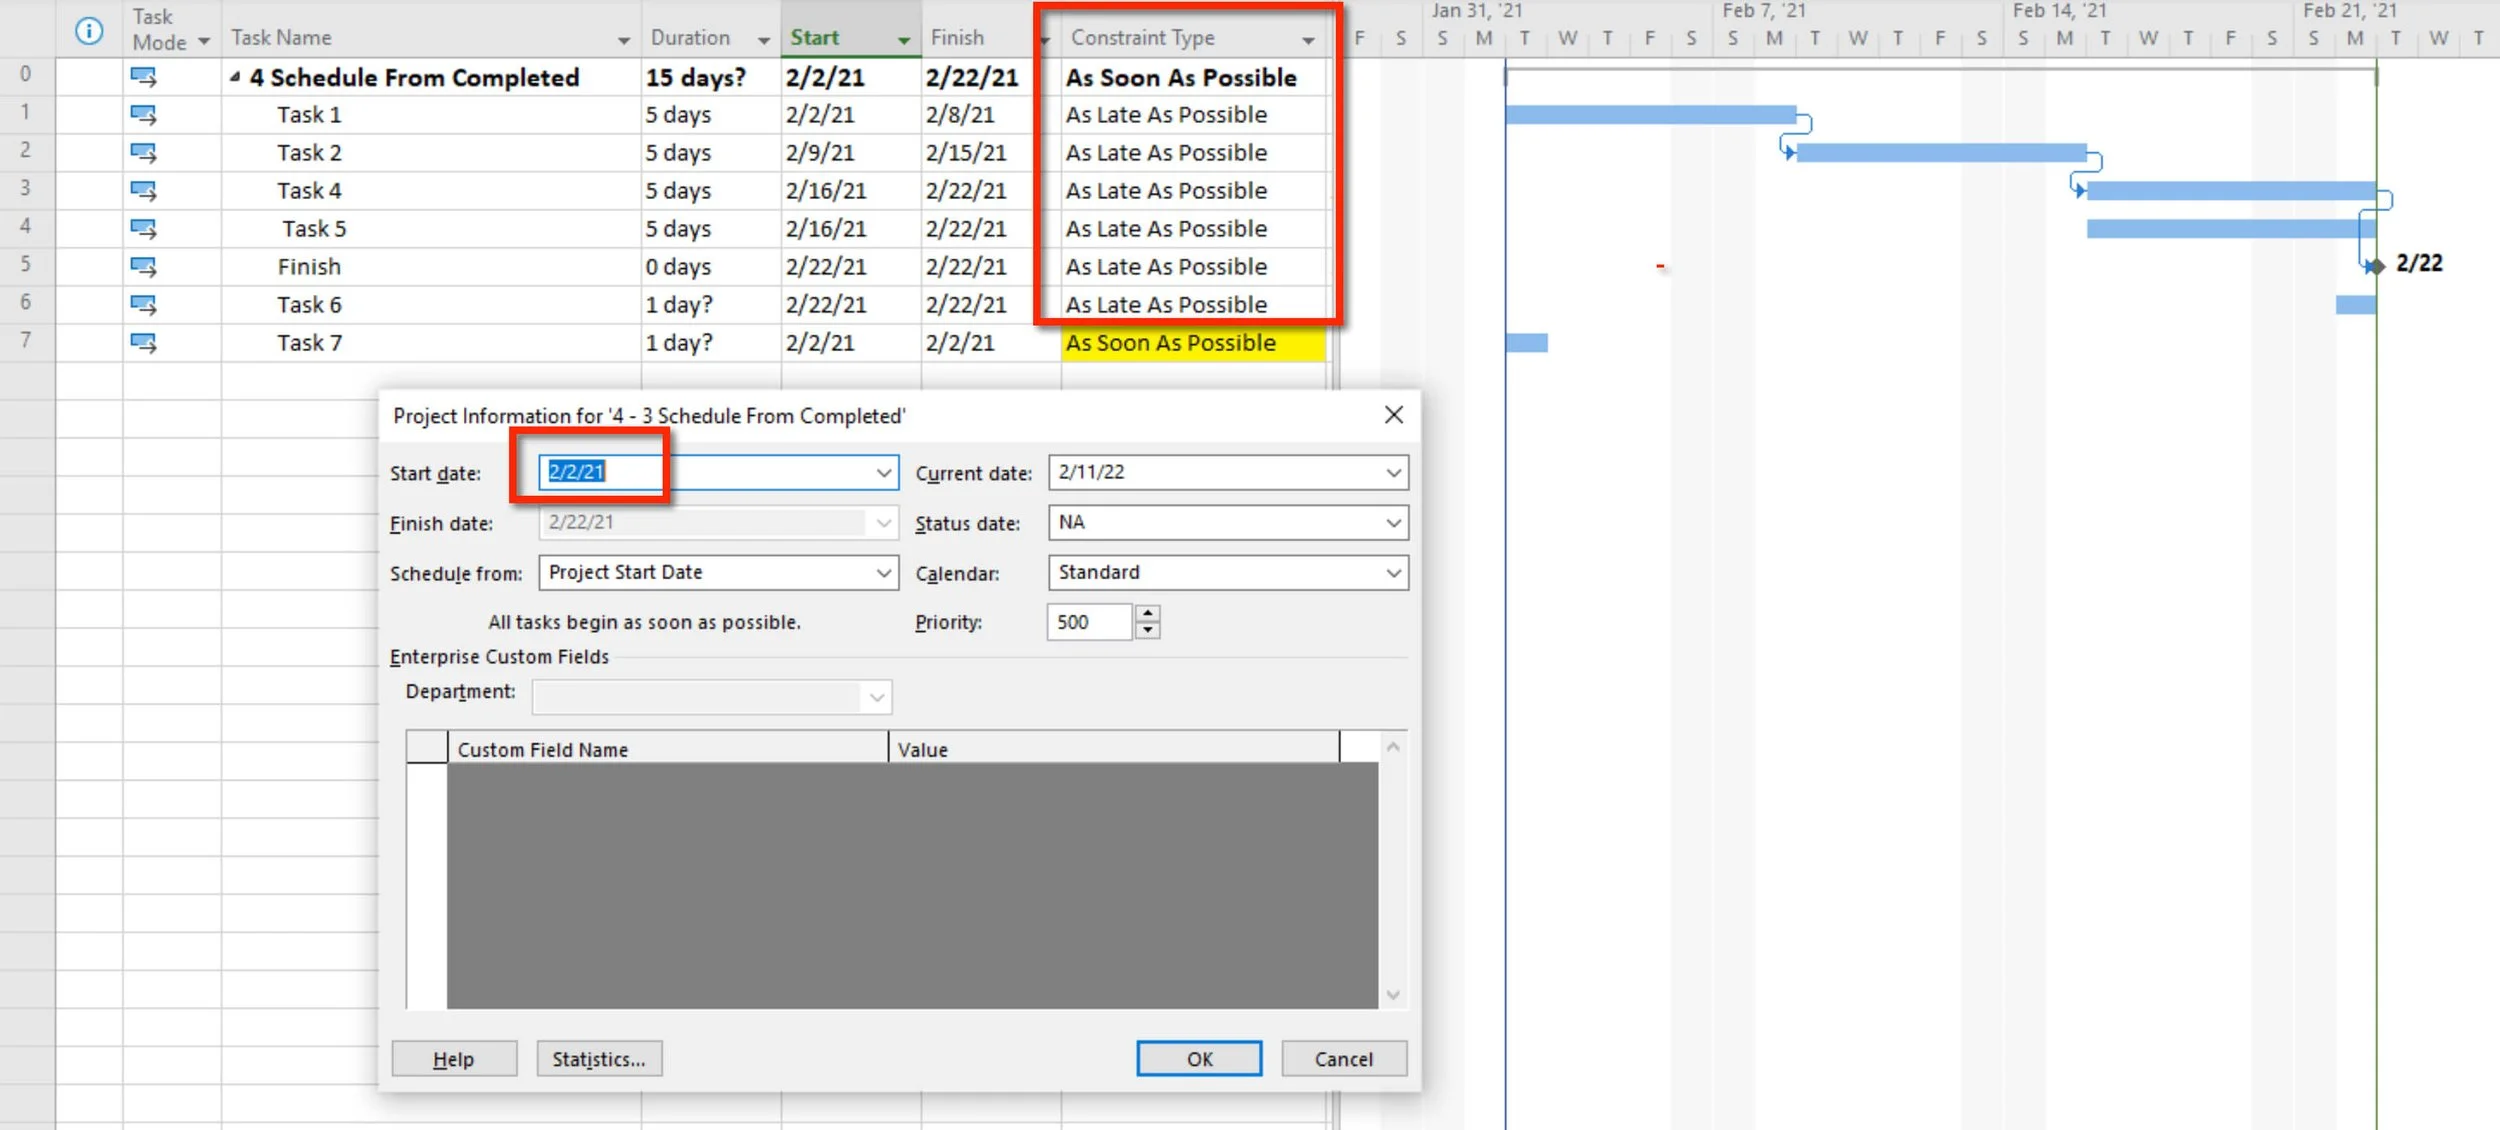
Figure 15: Scheduling from a Start Date.

Journal
Project Information is a unique dialog box in Microsoft Project. What is critical for you to remember about this dialog box? Not only will you go here frequently, but this is also where:
The project start or finish date is selected.
The Status Date is entered for updating.
Where you can temporarily change the current date.
Where the project calendar is selected.
What is the difference between scheduling from a start date or a finish date?
If you decide to schedule from a finish date, what do you do once you decide when to start a project?

Best Practice
Scheduling from a finish date is a scheduling technique available in the software and used by a few project managers. Most people schedule from a project start date. If they have a hard finish date, as most of us typically do, enter a Must Finish On timing constraint a Deadline date for the project finish milestone task.

If you are working with a coach, save and email them this file (4 - 3 Schedule From.mpp should look like figure 15). If you are not working with a coach and you are planning to apply to either MS Master Class certificate, archive this completed simulation file so that you can submit it for review.

Return to the Master Class Book and review the next section for this Activity.

Format Gantt Chart
One of the strengths of Microsoft Project over the dozens of online project management solutions available are the depth of formatting options. Because of the presentational aspects related to views like the Gantt Chart, formatting is a critical asset.

Gantt Chart Formatting Simulation (15 minutes)

Download *.mpp file
To start this simulation, download the Dataco Custom.mpp file by using the icon above and opening it in Microsoft Project. Rename the file to 4 - 4 Dataco Custom.mpp. Ensure your global settings in Project Options are correct and that you are using Microsoft Project 2019, 2021, or Microsoft 365 updated for best results.
Click on the Format tab and review the various formatting changes that can be applied to this Gantt Chart view.
Apply the Detail Gantt view. (View tab on the Ribbon / Gantt Chart command / More Views / Apply the Detail Gantt / and then and Zoom the Entire Project under the View tab.) Note that a lot of the formatting is different in this particular Gantt Chart view.
To zoom the timescale, select the View tab / Zoom group / and then select the type of zoom desired.

Figure 16. You might have a dozen or more Gantt Chart type of views with different formatting.
Memorize
There are several ways to change and apply different views. From this point forward, instructions will just ask you to apply a particular view. There are several ways to apply views, but memorize this way for now.
Select the View tab on the ribbon / click the lower section of the Gantt Chart command / More Views. The scroll box will show you the entire list of available views.
In addition, remember where to zoom a timescale.
Select the View tab on the ribbon / Zoom group / and then select the desired zoom. Notice you can zoom the entire project and it will fit all taskbars within the available space.
From this point forward, you will just be instructed to apply a view, or what to zoom, such as a task or the entire project.
Return to the Gantt Chart view.
Under the Gantt Chart Format tab on the ribbon, do the following:
Click Text Styles and select the Milestones Tasks item and make the background light green. Make the background color of the Summary Tasks item light purple.
Click the Gridlines command and change the Sheet Rows to light brown.
Click the Layout command and show the middle type of link lines and change the Bar height to 14.
Let’s say you want the progress and critical bars to show up more in this view and the baseline bars to fade. In the Bar Styles group, select the Format command and then Bar Styles.
The Bar Styles dialog box that opens allows you to do conditional formatting. The lower on the list an item or conditional row, the higher the formatting priority. For example, in the first Task row all Normal, Active, Not Critical, and Not Manually Scheduled task bars are shown as light blue.
Scroll down to Critical row. First, a task is formatted in light blue, but if it meets the Critical condition it is highlighted in pink instead of the light blue, because that Critical item is lower on the conditional list. Select the Critical row and change the color to a darker pink or red.
Scroll to the Progress row and change the color to black.
Scroll the Baseline row and change the color to a light yellow and then click Ok.
Save the project.
Simulation Results
The file 4 - 4 Dataco Custom.mpp, should have taskbars formatted like those in the Bar Styles dialog box below. Summary tasks have a light purple background. Milestones a light green background. Task rows have light brown gridlines. Taskbar height is 14 and link lines are like those shown below.

Figure 17. Bar Styles conditional formatting.
The text in the view is large, take that size back down to 12. (View tab / Format group / Text Styles command / All items / Size 12.

Journal
Journal questions do not cover everything you are learning about Microsoft Project. The questions focus on the most important things to remember and what I would like you to think about. For instance, the first question below relates to a characteristic I would like you to realize about Microsoft Project. It isn’t even something covered, but I was hoping you would think about it.
When attempting to learn software like Project, it is essential to recognize that in software years, it is ancient. It is a characteristic of the software just like it is for it to make up terms, like “timephased” or using a command with a name like “Change Working Time” instead of “Calendars.” Microsoft bought all rights to the software in 1985, released one DOS version, and then released the next version as a Windows product in 1990, the third Windows product for the PC. Remnants of those early days are still with the product.
Agile software development took off in the early 2000s. Microsoft has attempted to build some Agile features into recent product versions. I am not sure Project is the best product for Agile project management, so those few Agile features are not covered in this Master Class.
This will not be on the exam, but where do you think the word “Layout” comes from? Note the Layout command on the Format tab.
Why is the Gantt Chart view called the Central Display in Microsoft Project?
How do you format Gridlines? Why might it be important to format the Status Date?
What calendar is used in the Timescale for a Gantt Chart view? This is a bit of a trick question so wrestle with it a bit.

If you are working with a coach, save and email them this file (4 - 4 Dataco Custom.mpp, should look like figure 17). If you are not working with a coach and you are planning to apply to either MS Master Class certificate, archive this completed simulation file so that you can submit it for review.

Return to the Master Class Book and review the next section.

Manage the Global.MPT with the Organizer
Project Example
Over the years, I have always told workshop participants, “If I have only one hour to teach you one of the most important aspects of Microsoft Project, I would teach you how the Organizer and Global.MPT work. Understanding this feature will likely save you hundreds of hours.
Once at Siemens, I worked with people with an elaborate reporting system built on Microsoft Project that scheduled the huge jobs on the factory floor. They were upgrading to a new version, and they asked me how long I thought it would take to migrate their custom system. I told them 10 minutes. Another consultant had given them an estimate of five days the previous week. I am a consultant, and I tend to exaggerate a little. It took about 15 minutes when we did the work.
Review
Read the Content Link above on the Organizer. (jump to)
Then review the Global.MPT chart below.

Note: We will be revisiting the Organizer and the Global.MPT throughout this Master Class.

Figure 18: Global.MPT Chart.
Memorize
Memorize the five Organizer Rules below.
Suppose you create or customize an element in a project, copying the element over to the Global.MPT will make the element available for all projects. Elements can easily be shared with other users.
If an element is both associated with the Global.MPT and a project (on both sides of the Organizer) the element associated with a project used when the element is applied in that project.
Elements can be deleted, copied, and renamed. For some elements like Calendars and Maps, this is the only place to rename or delete.
Because of a Reset to Default feature for the views and tables that come with Project, do not rename those elements.
Expect the Organizer Rules to change slightly with a new Project version.

Download Global.MPT file as PDF

Copying and Deleting Elements Simulation (20 minutes)

Download *.mpp file
To start this simulation, download the Global Simulation.mpp file by using the icon above and opening it in Microsoft Project. There is no need to rename this file. Ensure your global settings in Project Options are correct and that you are using Microsoft Project 2019, 2021, or Microsoft 365 updated for best results.
There are five custom elements in the active view:
A custom view called Exercise View. This Exercise View is a double view that has a view on top and a view on the bottom.
The view on Top titled Exercise View A is custom. This view shows tasks and those resources assigned to those tasks. Work on each task and Work for each resource is timephased.
The view on the Bottom titled Exercise View B is custom. This is a Task Form view.
The Table applied to the top view, titled Exercise Table is custom.
The Exercise Filter that is applied to the view is custom. This filters out all tasks that do not have a resource assigned. This would include all summary task and milestones.

Figure 19. Double view or split window with a view on top and a view on the bottom.
In this simulation, you are going to make all five custom elements (three views, a table, and a filter) available for a new project.
If you changed views, Apply the Exercise View element (Task / Gantt Chart / Exercise View). Then Zoom the entire project (View / Entire Project) and then explore each of the custom elements identified above.
First, download the New Business Plan and save the project and give it this name: 4 - 5 Global Simulation.mpp. When you are finished with this Master Class you will be able to quickly evaluate Microsoft Project plans like this one.
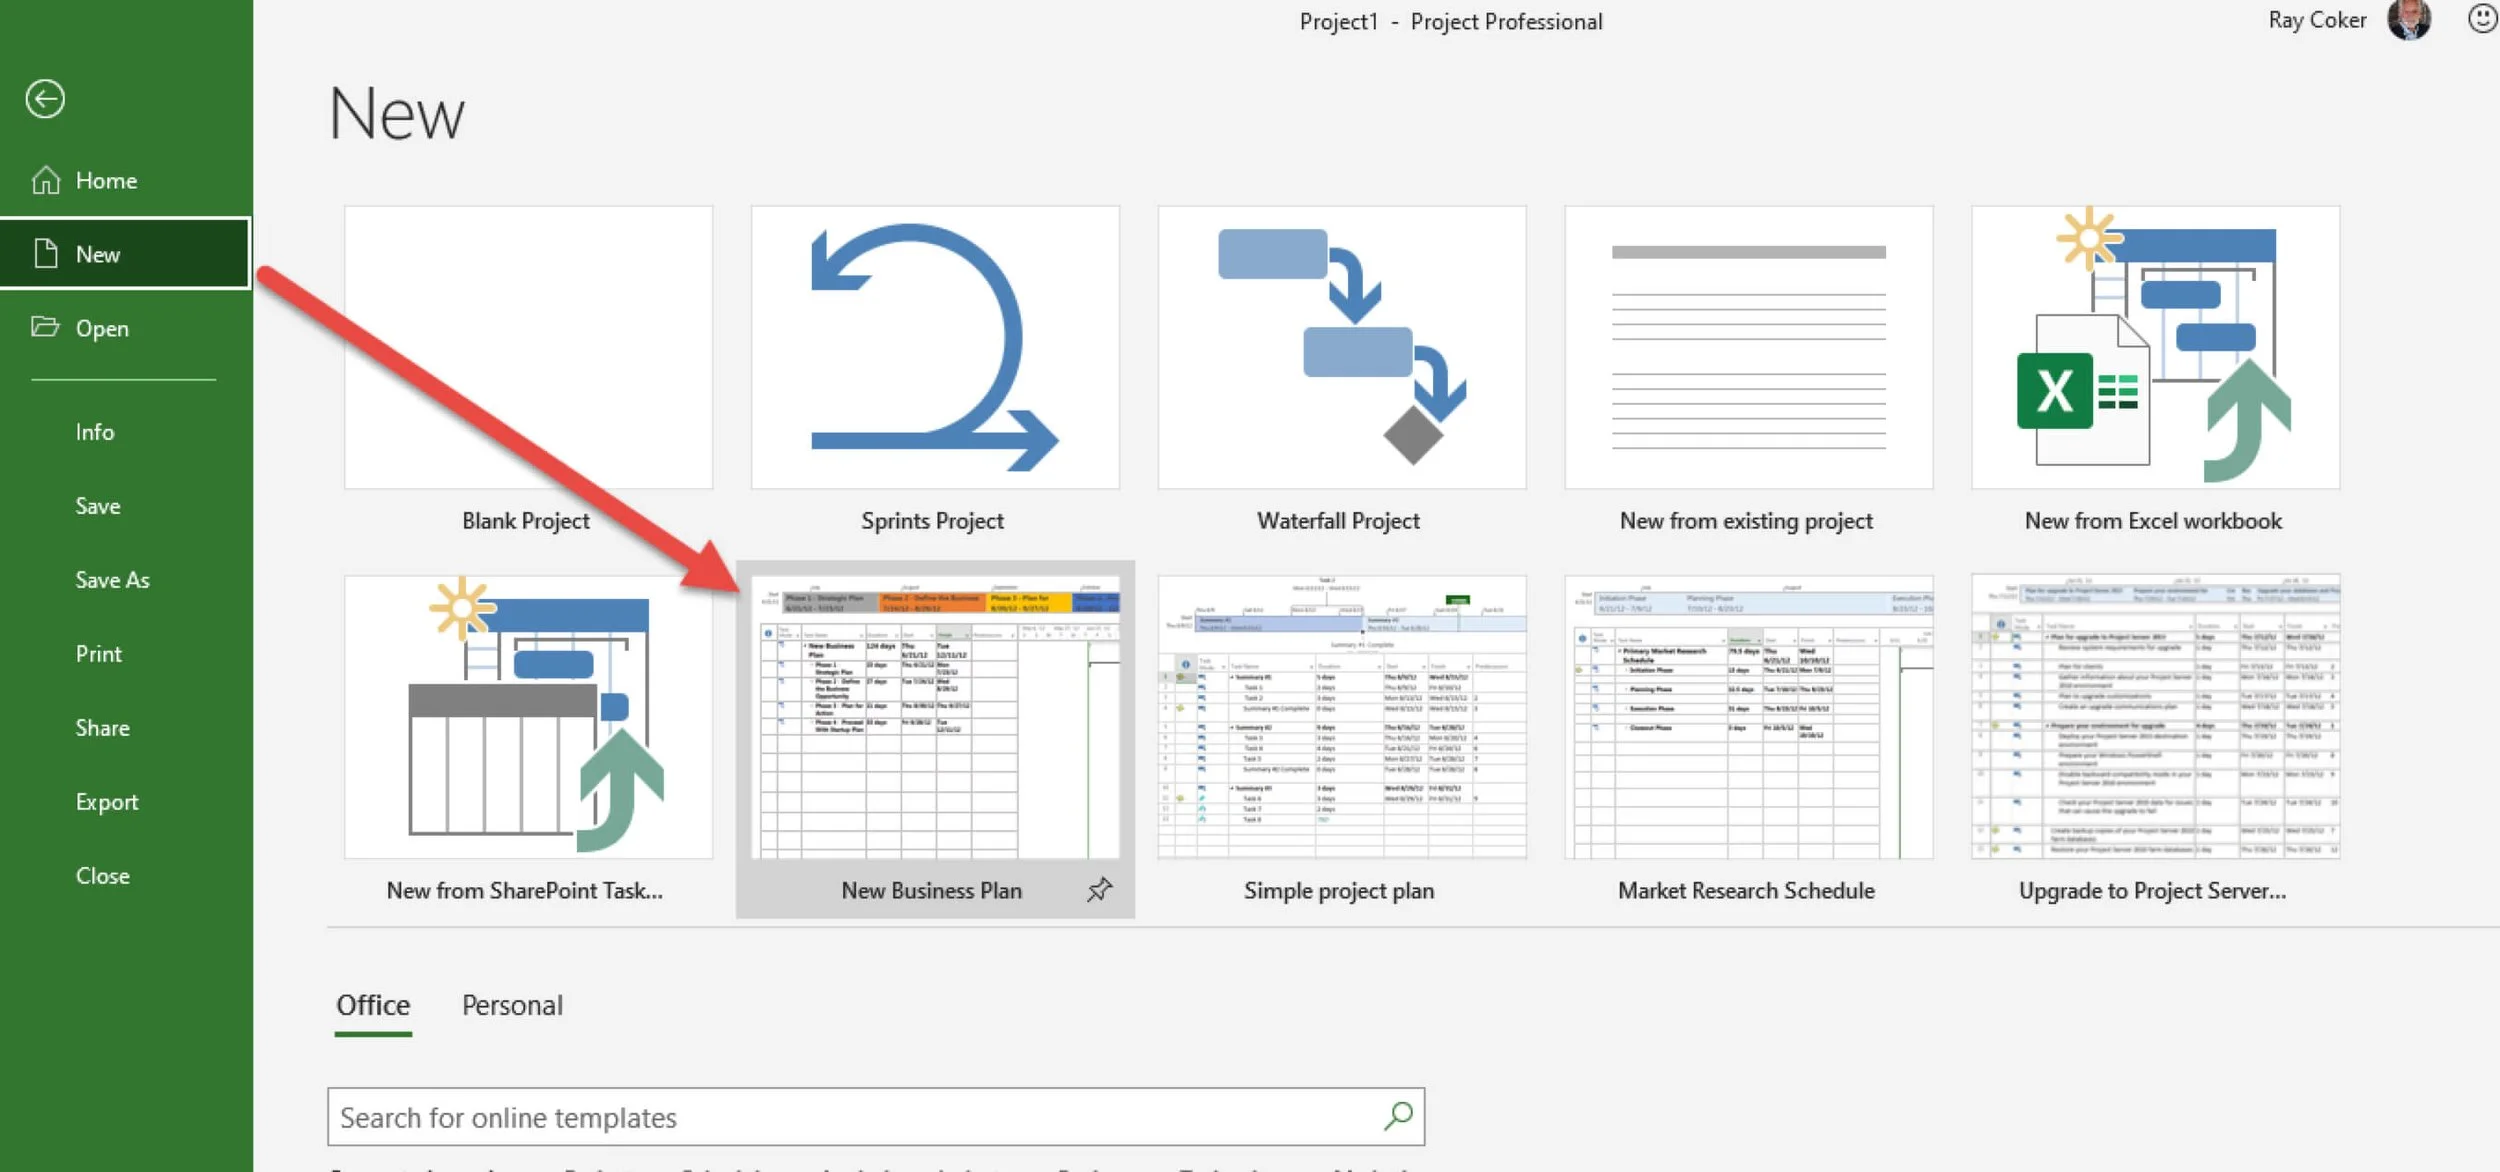
Figure 20. Starting a new project from a template.
In this simulation we are going to copy the custom elements from the Global Simulation.mpp to the 4 - 5 Global Simulation.mpp.
Open the Organizer (File / Info / Organizer). Or, type Organizer in the search field on the ribbon menu bar. The Organizer will be used to copy these five elements to the new project.
First, in the Organizer select the Global Simulation.mpp to the 4 - 5 Global Simulation.mpp as shown in the following figure.
Copy all five custom elements from the Global Simulation.mpp on the left to the 4 - 5 Global Simulation.mpp on the right.
Exercise View (This is a double view, with Exercise View A on top and Exercise View B on the bottom.
Exercise View A (This view is using the Exercise Table and the Exercise Filter).
Exercise View B.
Exercise Table (Table tab).
Exercise Filter (Filter tab).
There is no save option in the Organizer. These changes will be saved when the file is saved.
Save the 4 - 5 Global Simulation.mpp and disregard the Global Simulation.mpp.
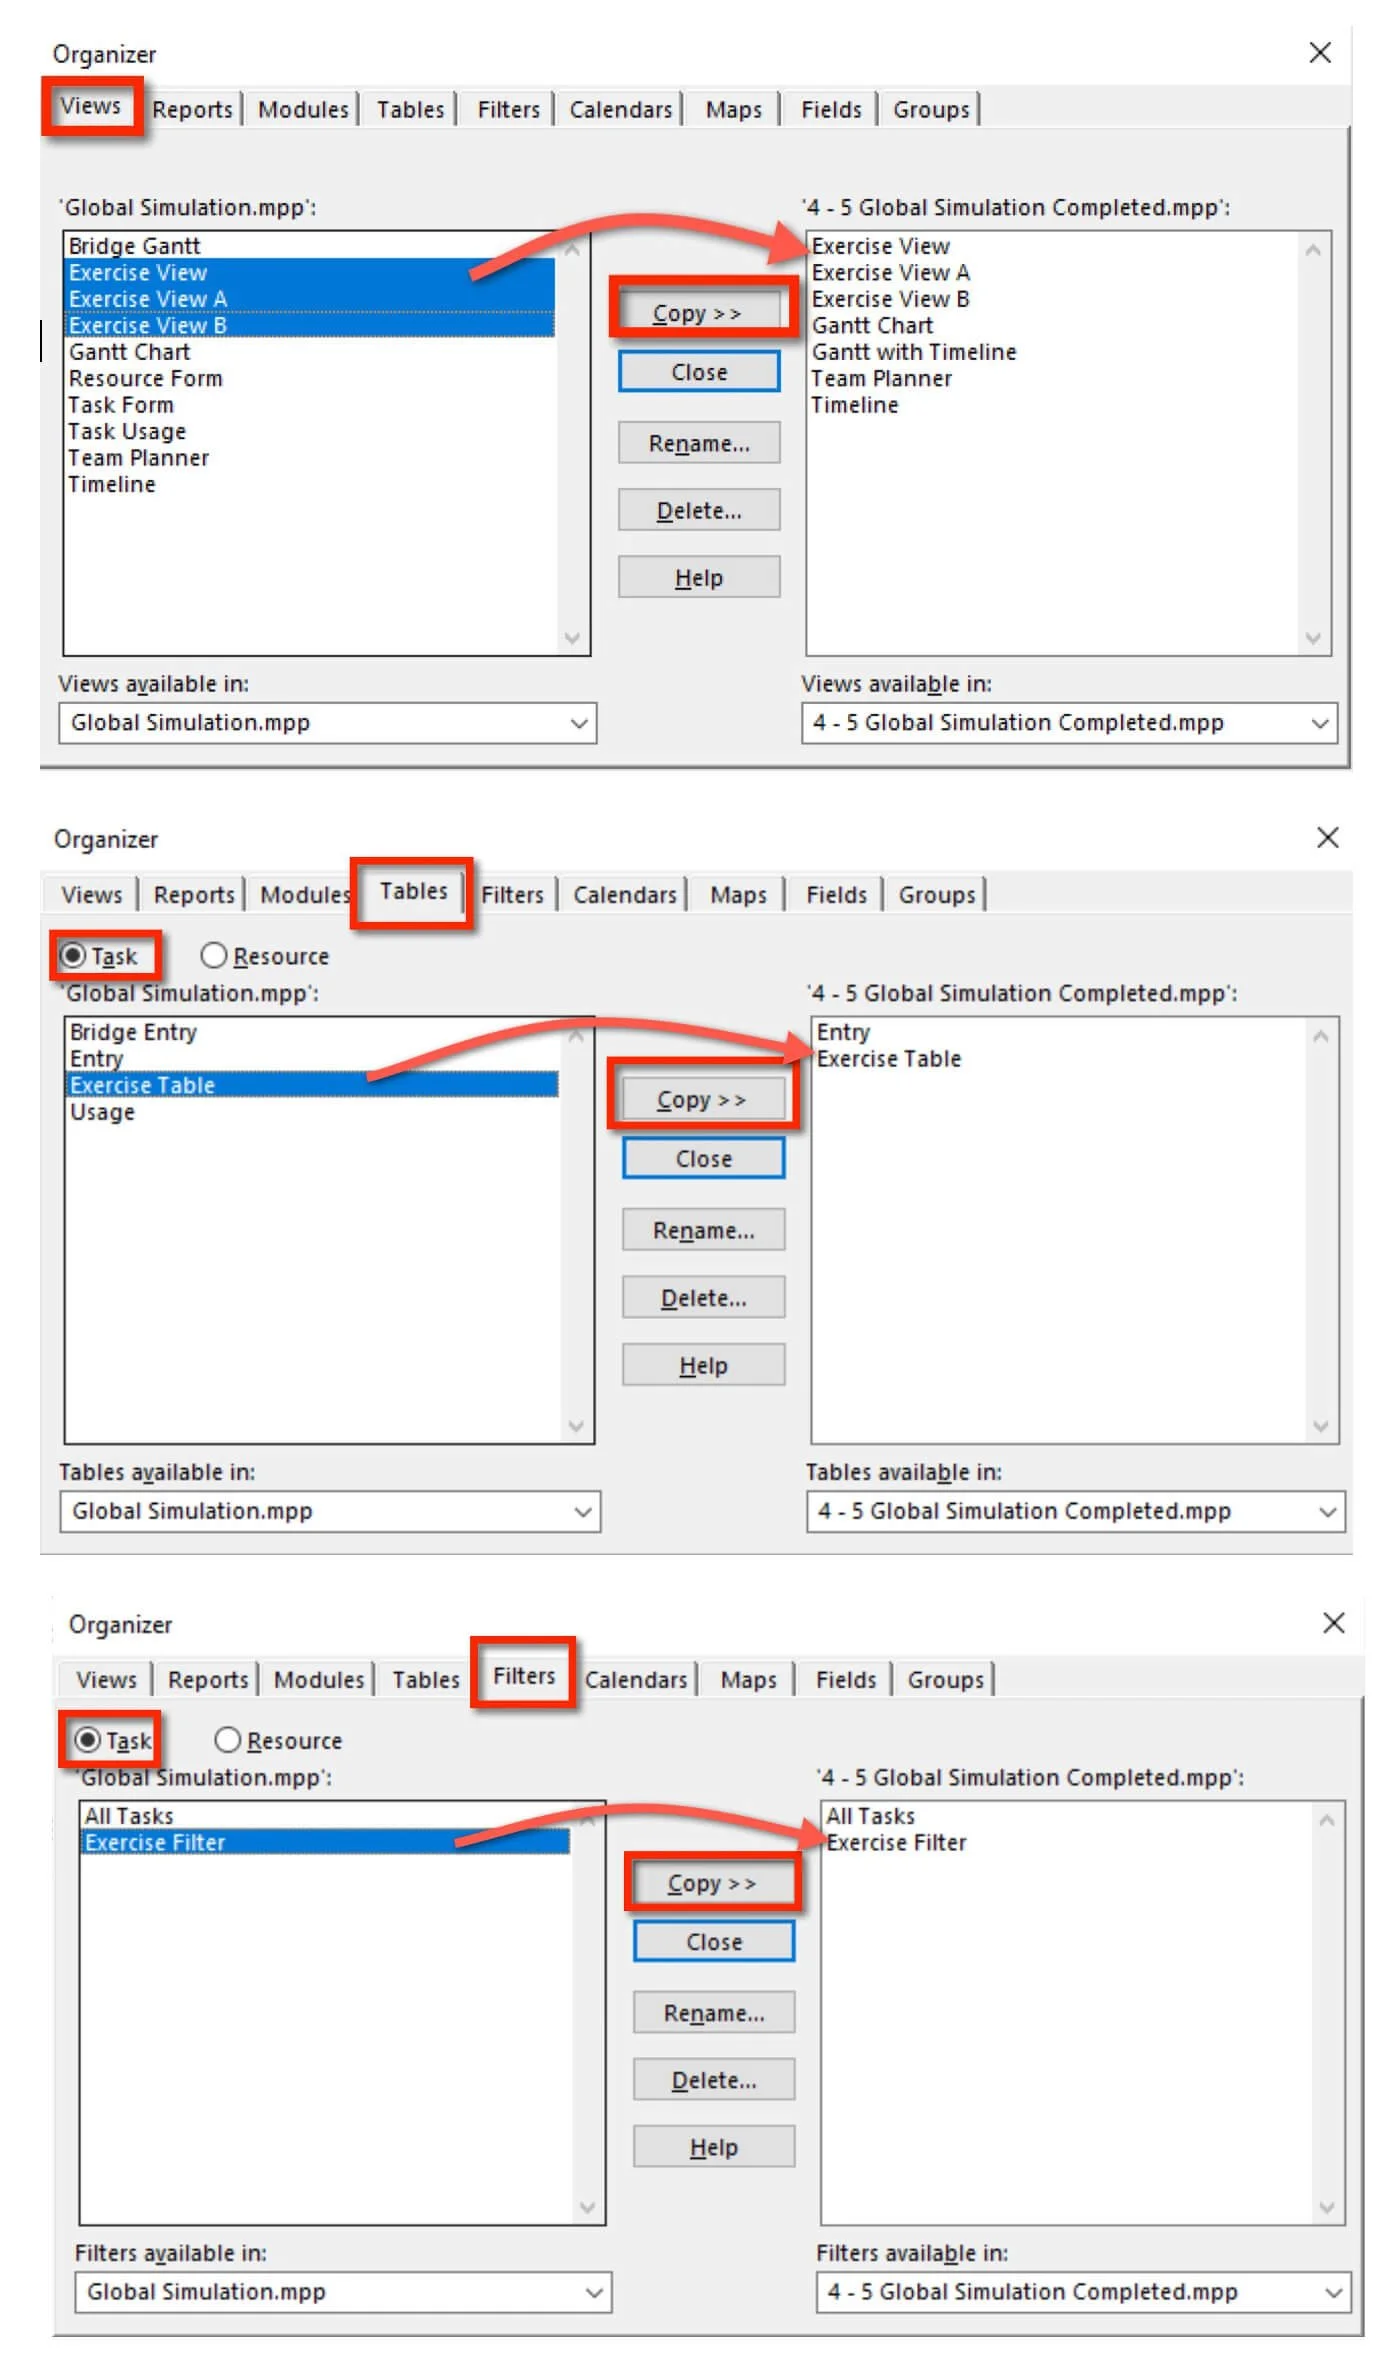
Figure 21. Copying custom elements from one file to another.
With the 4 - 5 Global Simulation.mpp file active, apply the Exercise view.
Simulation Results
The 4 - 5 Global Simulation.mpp file should look like the figure below. Exercise View A is on top of the split window. The Exercise filter is applied, only showing those tasks that have a resource assigned. The Exercise B view is on the bottom of the split window.
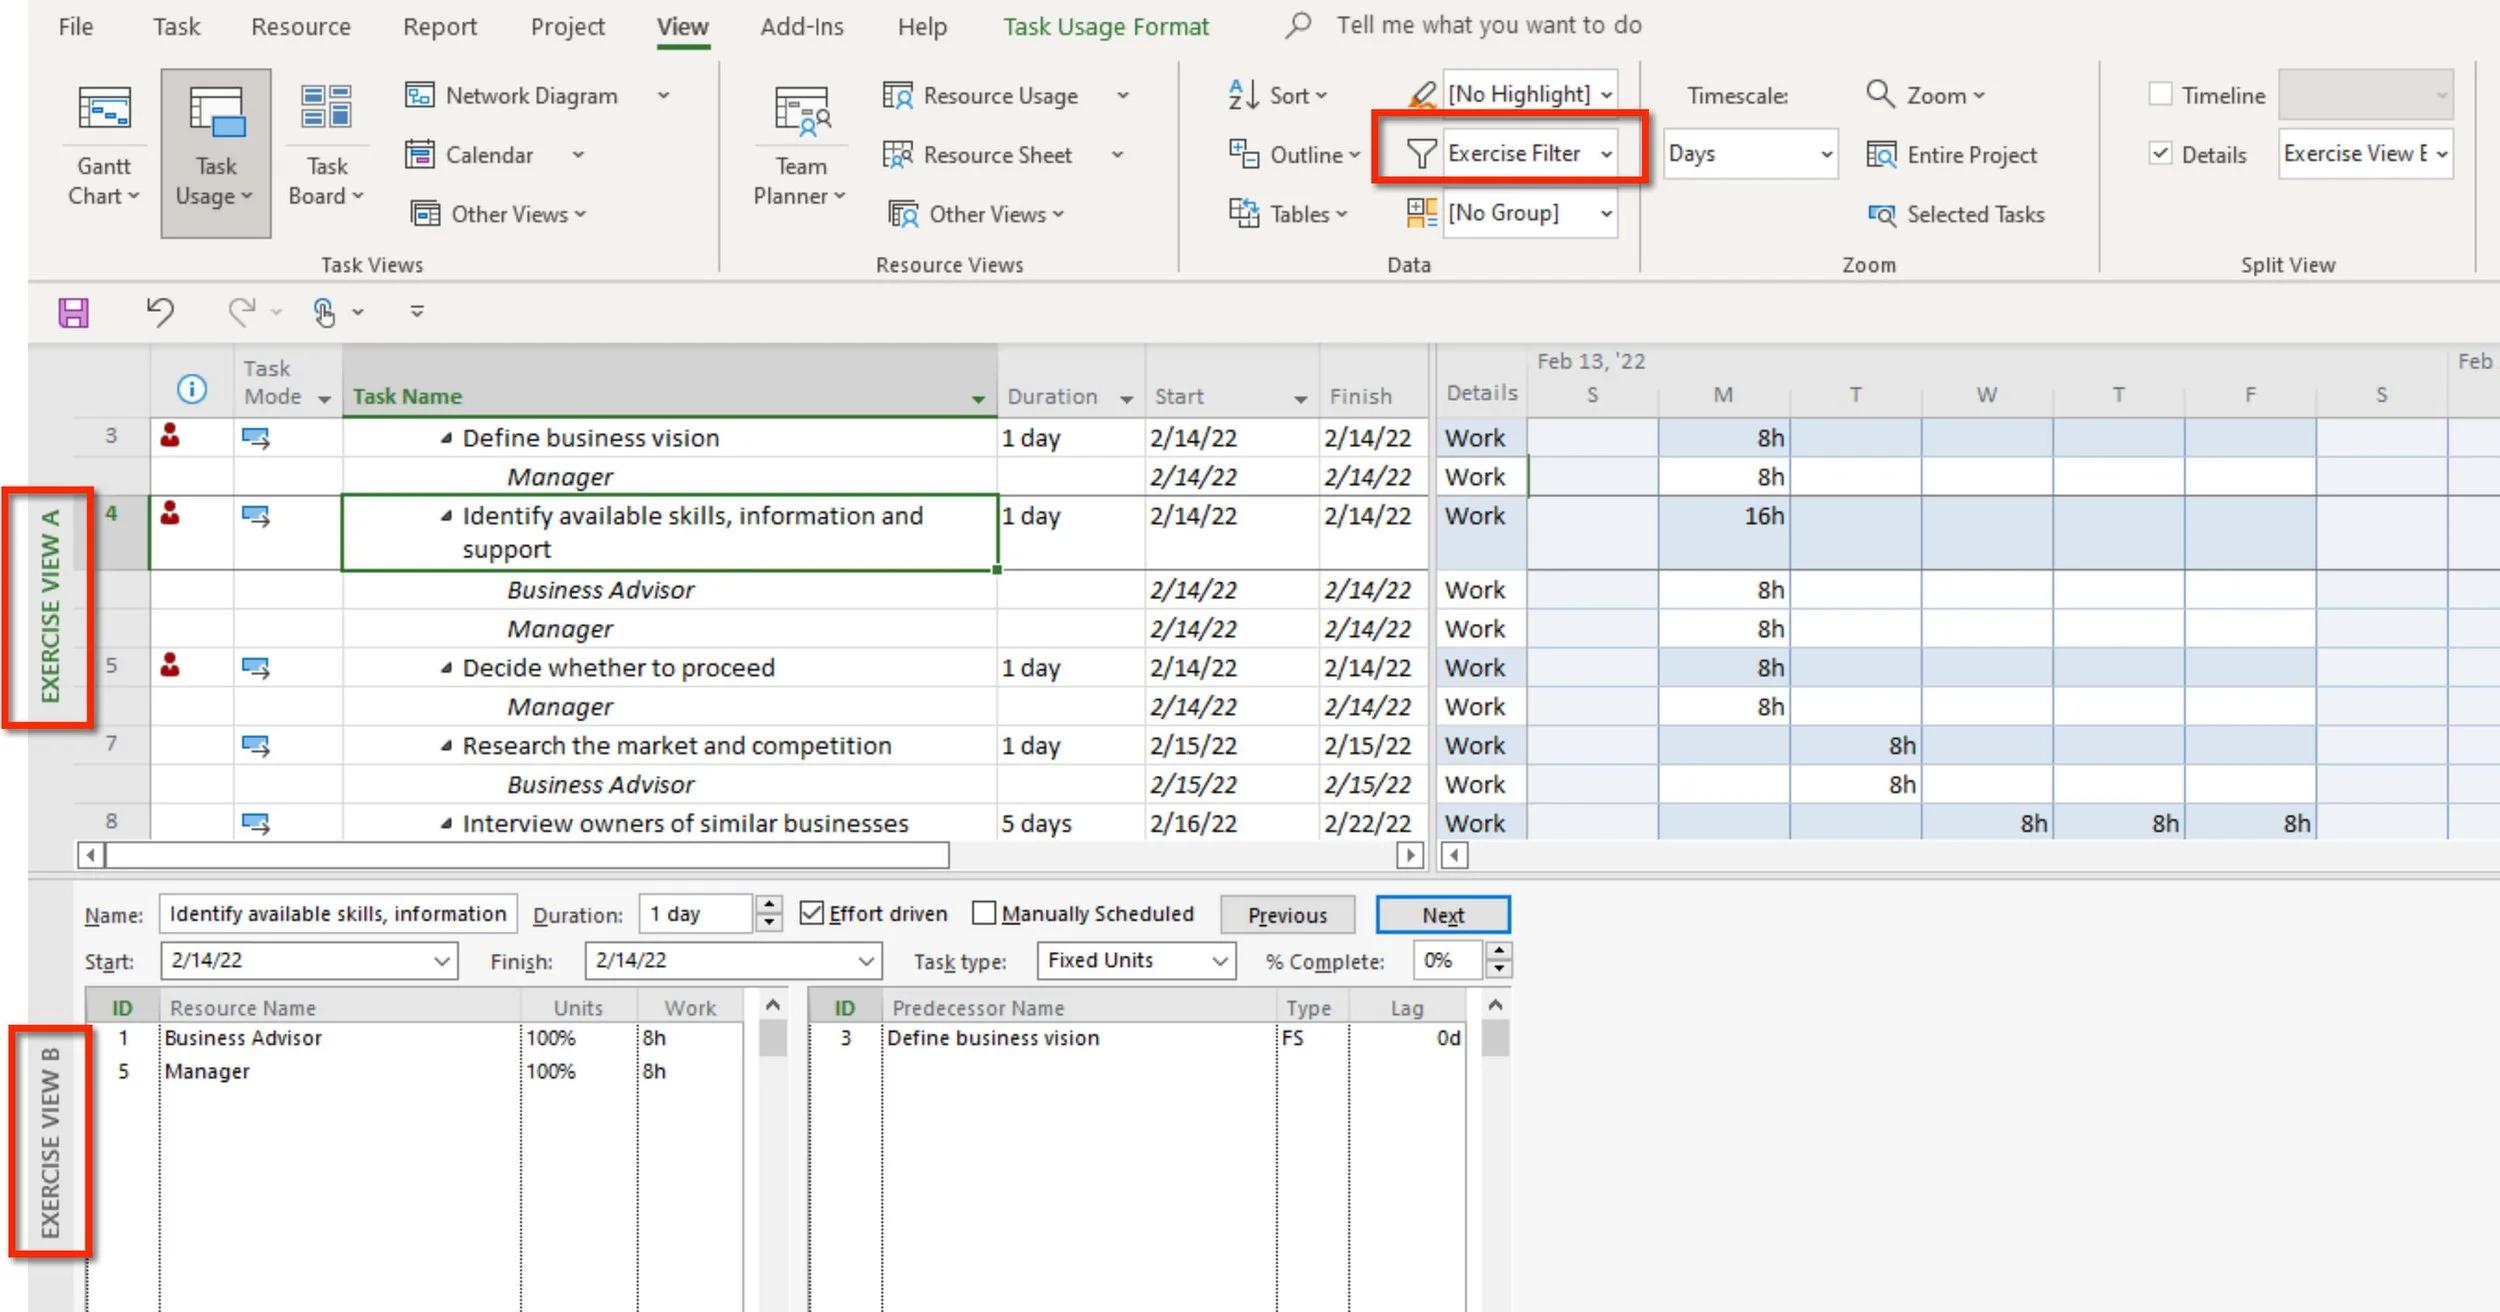
Figure 22. Simulation results.

Sharing Custom Elements (15 minutes)

Download *.mpp file
Remember when I said I would show you how to share a custom project calendar with all of your company holidays with another person in your organization?
To start this simulation, download the US Federal Holidays.mpp file by using the icon above and opening it in Microsoft Project. Ensure your global settings in Project Options are correct and that you are using Microsoft Project 2019, 2021, or Microsoft 365 updated for best results.
Review the holidays (exceptions) in the Standard calendar.
Included are most U.S. Federal Holidays except Juneteenth National Independence Day, Columbus Day and in lieu holidays. When a holiday falls on a nonworkday outside a full-time employee's basic workweek, he or she is entitled to an "in lieu of" holiday. The general rule is that the "in lieu of" holiday is the workday immediately preceding the nonworkday on which the holiday fell.
Try this without a lot of guidance. Start a new blank project and note that the Standard calendar does not have these exceptions.
Using the Organizer, copy the Standard calendar from the US Federal Holidays.mpp to the new project, replacing the Standard calendar.
Save the new project as 4 - 6 Holidays Project.mpp and close it.
Saving this calendar to the Global.MPT in the Organizer would make this calendar available to any open project. Changes to the Global.MPT are saved when you exit Microsoft Project, or the Global.MPT file, or any file, can be saved in the VBA Editor. Press F11 to open the VBA Editor. To save in the Visual Basic for Applications, select the file and click the save button on the toolbar.
When you open MS Project, Project looks under the user's profile for the Global.MPT.
Simulation Results
The Standard Calendar for 4 - 6 Holidays Project.mpp, should have almost all of the U.S. Federal Holidays.
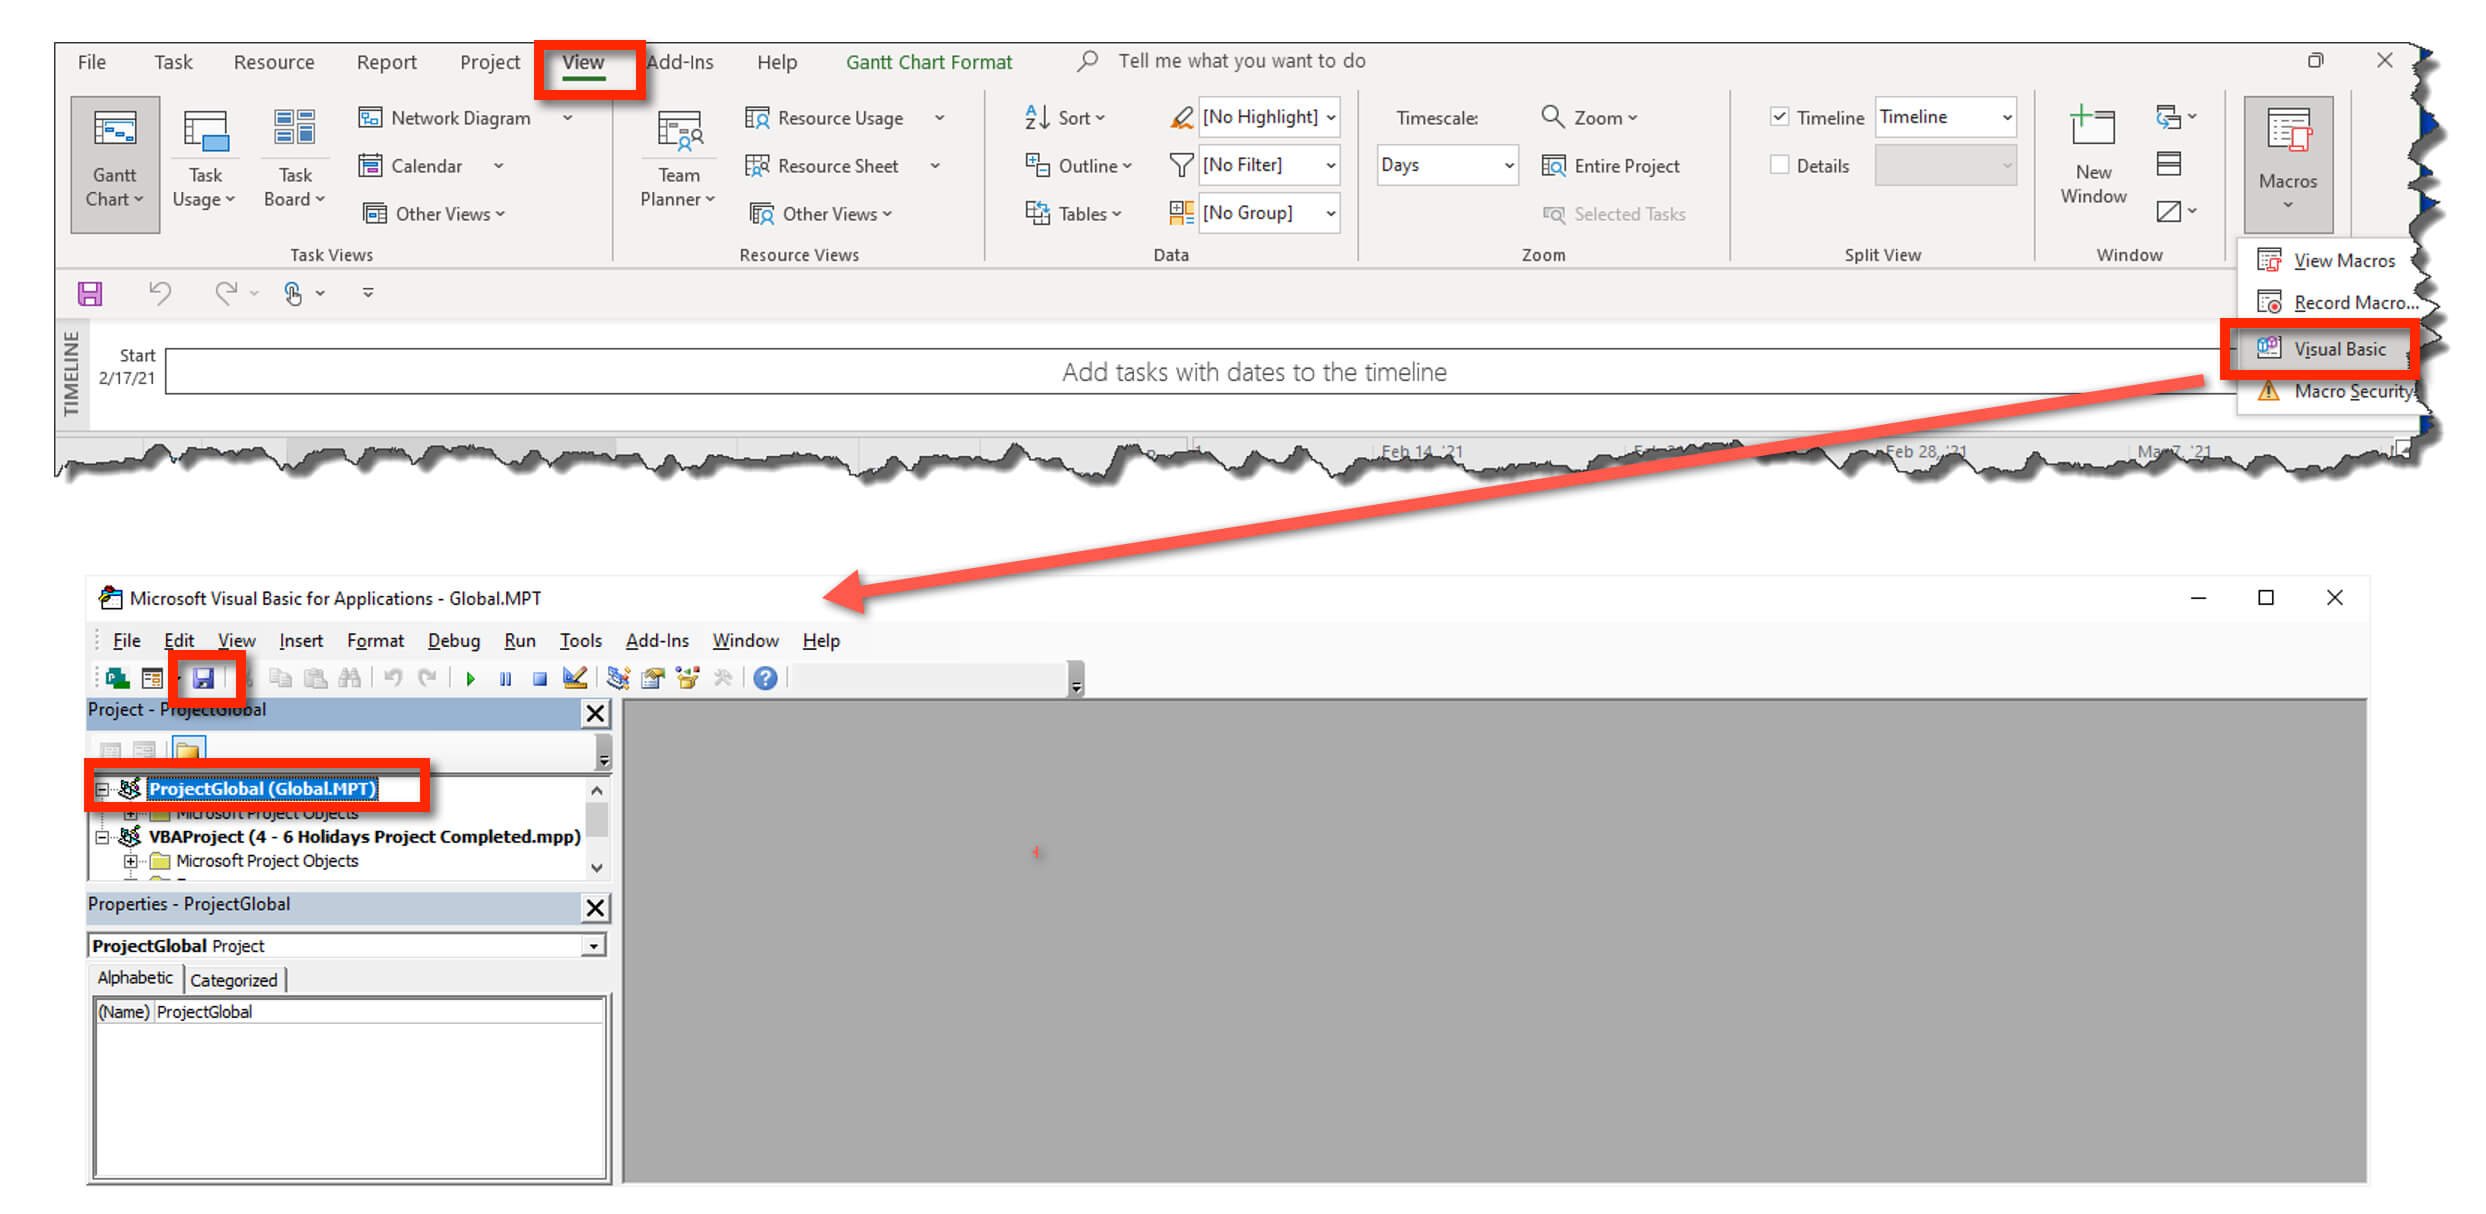
Figure 23. Saving the Global.MPT file.
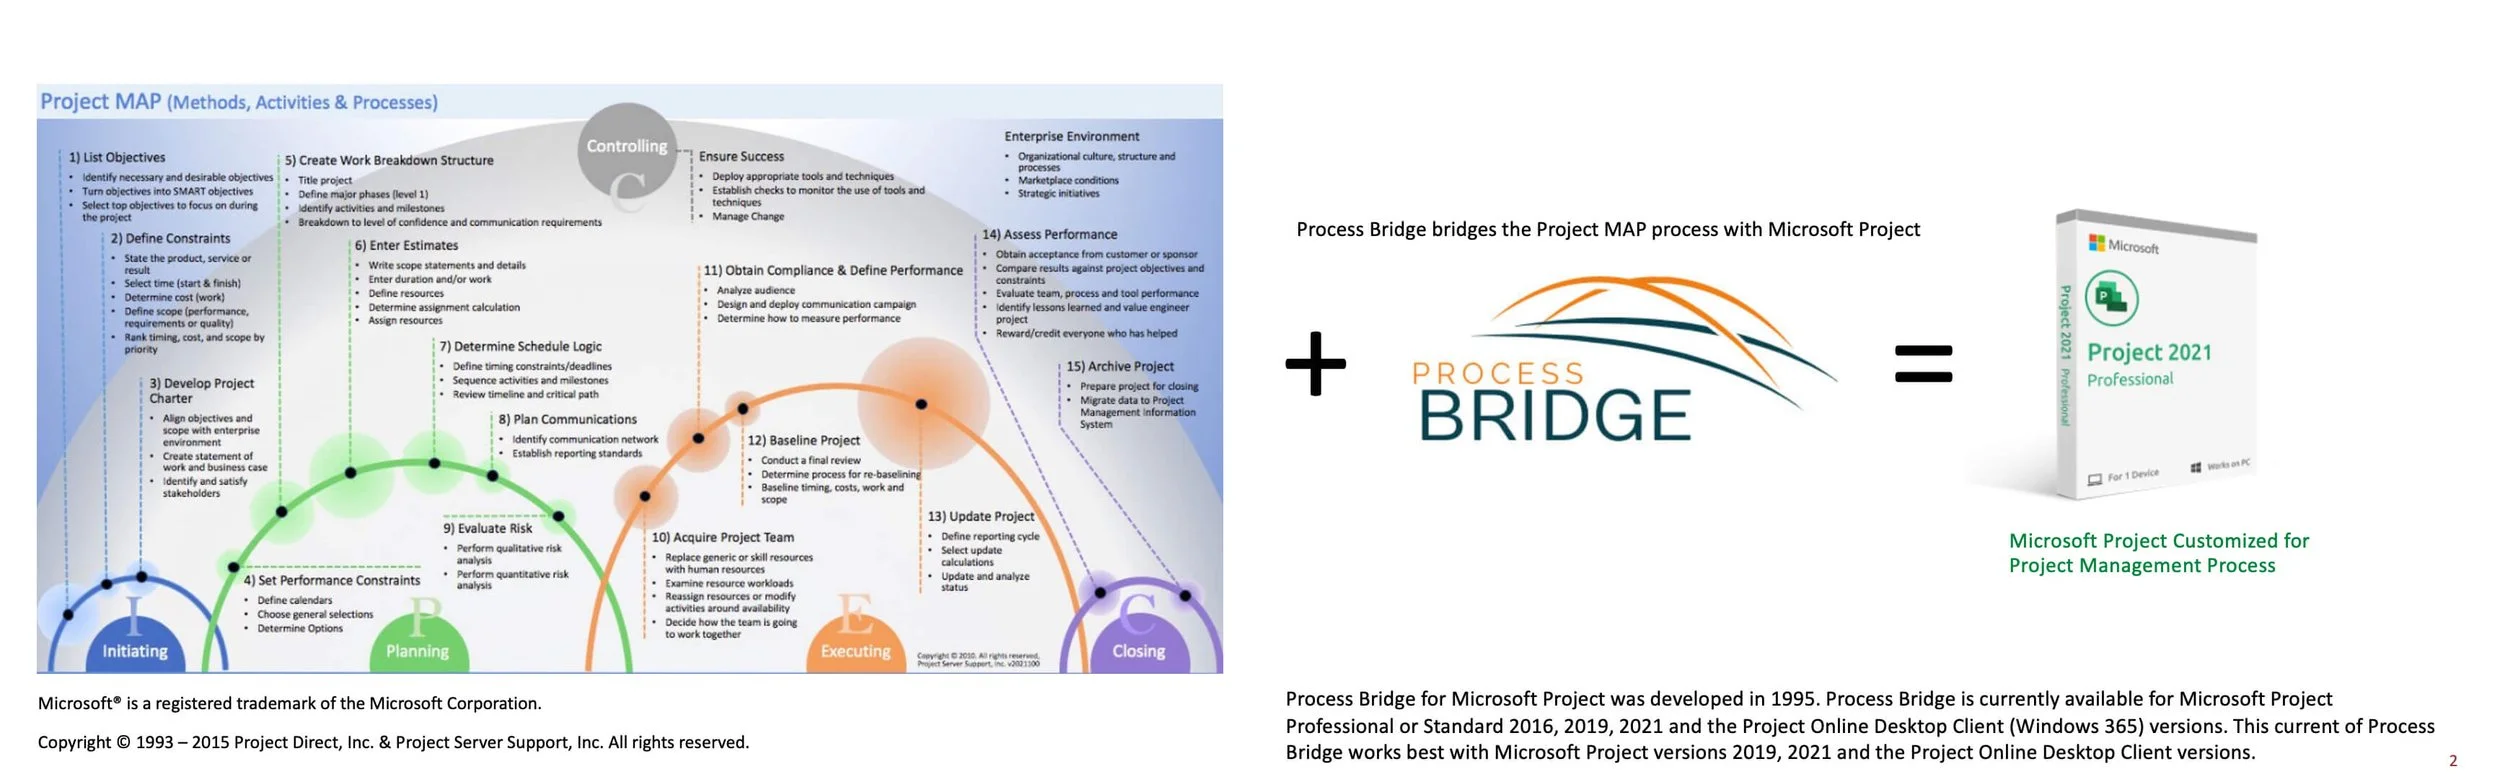
Figure 24. Process Bridge
Setting up Process Bridge (15 minutes)
Process Bridge for Microsoft Project comes with this Master Class.
There is an idea in the training industry that when you invest time and money in a class, you should get a measurable return on your investment. A return separate from the knowledge you gained by your participation. The closer the return is to 100%, the more valuable the class or workshop.
For example, suppose you paid $500 for a one-day financial planning workshop. At the end of the workshop, you will evaluate the content and determine if you think the workshop was worth your time and money. But, suppose you were also given access to a proprietary financial planning portal that included:
A current ranking and analysis of the top free apps for a particular financial activity. For example, the top three trading apps.
Online training for each app.
Up to date tax analysis recommendations for a given activity such as an investment property.
Legal documents for a given activity, such as estate planning.
All of that combined could make the workshop extremely valuable.
Process Bridge includes over 150 custom views, tables, filters, fields, macros, ribbons, and reports, all organized by the best process to use Microsoft Project. These custom elements are associated with a custom Ribbon and Quick Access Toolbar, and custom Floating Toolbars. We believe using Process Bridge will move you toward building more expert plans, and if you find that half of the custom elements are valuable, creating all of those elements yourself might be another 50 hours saved. We think using Process Bridge with your first few projects will cut more than 100 hours off the learning curve.
Process Bridge is our approach to providing a return on your investment. You are not required to use Process Bridge during this Master Class, but if you do, there is a section on using the tool at the end of each Activity.
Right now, setting up Process Bridge to use in Microsoft Project relates to the topic at hand, so we will set it up, and you can decide if you want to use it. Even if you choose not to use it, we hope you find the many Microsoft Projects views, tables, and reports valuable.

Download .mpp and .exportedUI
First, there are two files to download for this simulation.
Bridge19_v2.3.mpp (this Microsoft Project file contains all of the custom elements. You are going to use the Organizer to copy all of the elements to your Global.MPT file).
Bridge19_v2.3.exportedUI (This is a custom Microsoft Project ribbon that you will import).
The following figures are wide, to view closely, click the figure to zoom in.
Important: If you are logged into Project Server your Global.MPT is integrated with the Enterprise Global, so exit Microsoft Project, open again, and log into Computer. Complete this simulation logged into Computer. When finished exit, and open again to log in to Project Server again.
Process Bridge builds the Project MAP process, a traditional project life-cycle shown below, into Microsoft Project using a custom ribbon, toolbar, custom views, tables, filters, reports, floating toolbars, and macros.
Figure 25. Process Bridge for Project Overview
Setting up Process Bridge in Three Steps
Step 1: Copy the Process Bridge custom elements to your Global.MPT file. Don’t worry, we have labeled all of the custom elements, except the custom fields, with the word Bridge, so that you can easily delete them if you wish.
Open the Bridge19_v2.3.mpp file (enable macros when asked). This file is hidden from view, but the custom elements are still visible in the Organizer.
Open the Organizer (File / Info / Organizer)
Select all of the elements in the Bridge19_v2.3.mpp and then copy them to the Global.MPT file.
In the View tab, copy over 30 custom views. All views start with the word Bridge so that you know they are part of Process Bridge. The custom fields that are not identified with the word Bridge are an exception.
In the Reports tab, copy the custom reports.
In the Tables tab, copy the 50+ custom Task and Resource tables. Be sure to copy both types, task tables and the resources tables.
In the Fields tab, copy the 10 custom fields.
Close the Organizer, and then exit Microsoft Project to save changes to the Global.MPT file and then reopen Microsoft Project. Or, save the Global.MPT file by using the Visual Basics Editor.
Figure 26. Copy custom elements to the Global.MPT file.
Step 2: Import the Process Bridge custom ribbon.
Warning: If you have already customized the ribbon or the Ribbon Quick Access Toolbar importing the Process Bridge Ribbon will wipe out that customization. To save your current ribbon export the ribbon by selecting File / Options / Customize Ribbon / Import/Export / Export all customization. This exported ribbon file can be imported at any time.
Note: The out-of-the-box Microsoft Project Ribbon can be reset at any time.
Import the Process Bridge Ribbon by:
Selecting File / Options / Customize Ribbon / Import/Export / Import Customization file.
Import (Open) the Bridge19_v2.3.exportedUI file.
Select Yes to Replace all existing “Ribbon and Quick Access Toolbar customizations for this program?”
Click OK.
The custom ribbon will not change unless you edit the ribbon. Again, you can reset the ribbon to the factory default settings whenever you want.
Figure 27. Import custom Ribbon.
Step 3: Open the Bridge19_v2.3.mpp file. Macros in this file run most of the commands on the Process Bridge Ribbon and the Floating Toolbars.
First, make sure macros are enabled by selecting File / Options / Trust Center / Trust Center Settings / Macro Settings / Disable all macros with notification.
Open the Bridge19_v2.3.mpp file and enable macros.
Open the Bridge19_v2.3.mpp file whenever you want to use Process Bridge.
Suggestion: Put the Bridge19_v2.3.mpp file on your desktop or create a shortcut to the file. Double-clicking on the file or shortcut will launch Microsoft Project. The Bridge19_v2.3.mpp file is hidden from view so that it does not distract from your work on project files.

Figure 28. Trust Center settings.
To complete this simulation, download the New Product Launch template. Save the project as 4 - 7 New Product Launch.mpp. The template opens with a report applied to the window. Apply the Gantt Chart view.
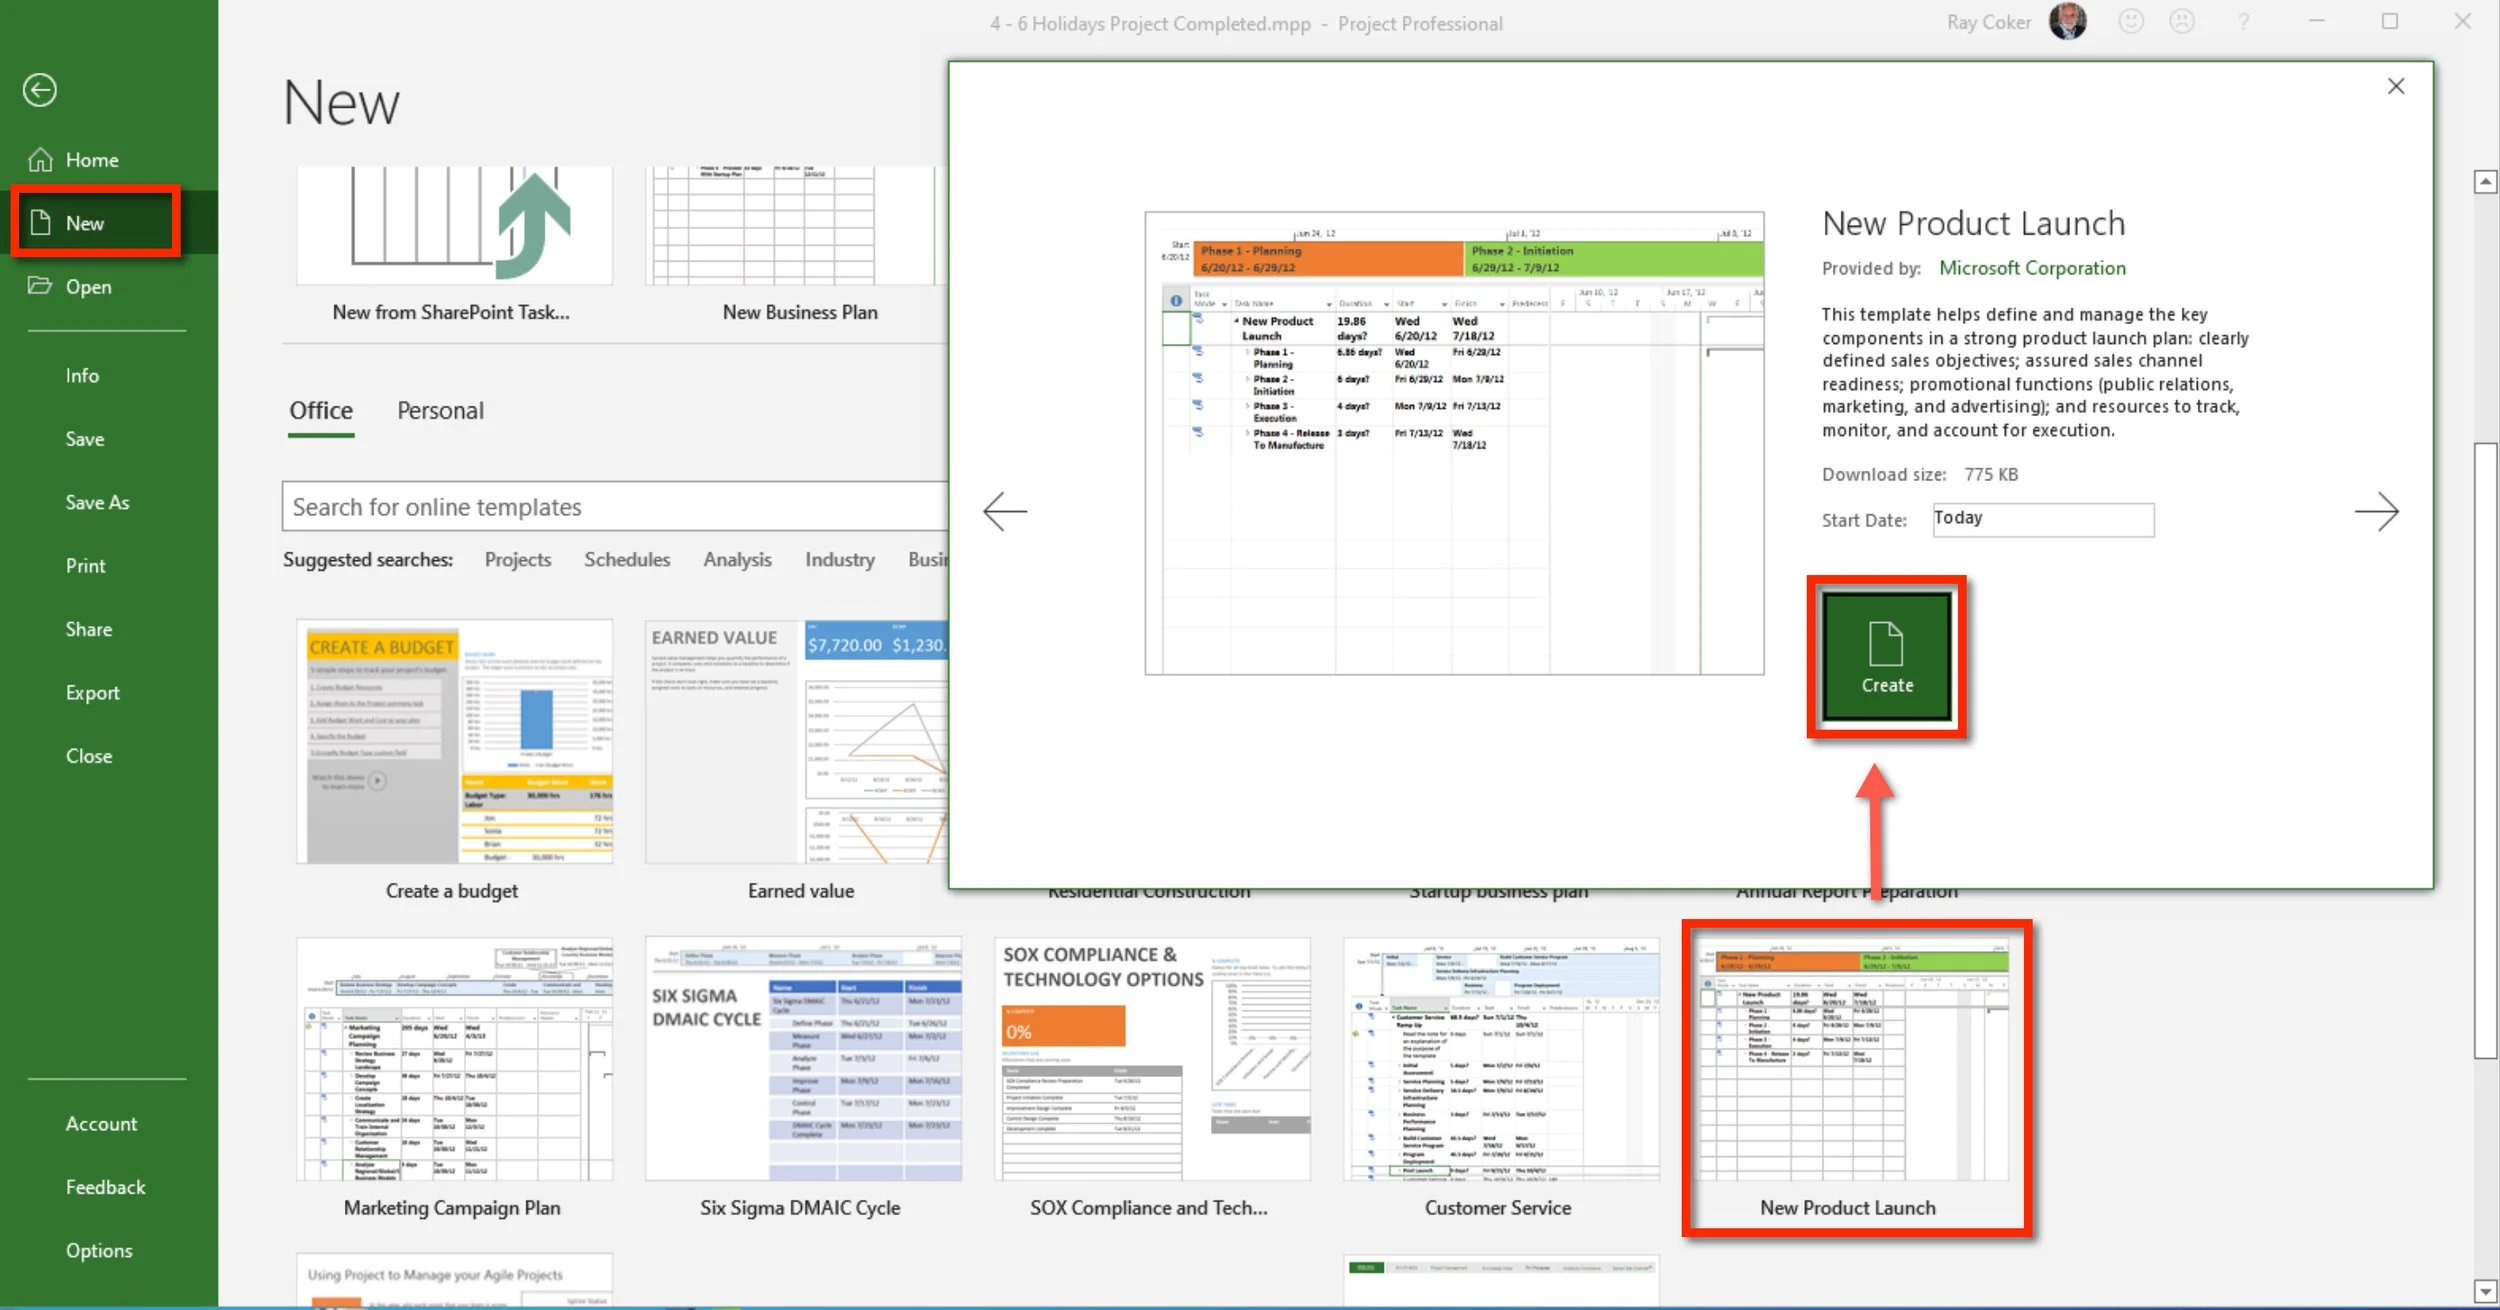
Figure 29. New project from a Microsoft Project template.
Click on the Planning tab, and notice that all of the groups run to Activity 4, where we now, to Activity 9: Evaluate Risk.
A - Click on the Set Performance Constraints Bar and a floating toolbar opens. The toolbar is floating, like the toolbars that were replaced by the Windows Ribbon Framework. You can move the toolbar whenever you want on your screen and access the commands on the toolbar. The commands on this toolbar are Microsoft Project commands that we have been using to set the performance constraints.
B - On the ribbon toolbar, the commands are clustered in categories and are the commands more frequently used. You can, of course, edit this toolbar.
On the floating toolbar, click on the Project Information command. The date in the Start date field suggests that this Microsoft Template has not been updated for 17 years. Enter a Start Date of 4/1/23.
C - On the ribbon, or quick access toolbar, click on the Zoom Entire Project command.
D - The Hide All Floating Toolbars command will quickly close any toolbars you might have open.
If any of the commands are not working, repeat the previous three setup steps.
To finish this simulation, use the Gridlines command on the floating toolbar to format the state date in a solid blue line.
Simulation Results
The 4 - 7 New Product Launch.mpp should start on 4/1/23 and the start date should be formatted in a blue solid line.
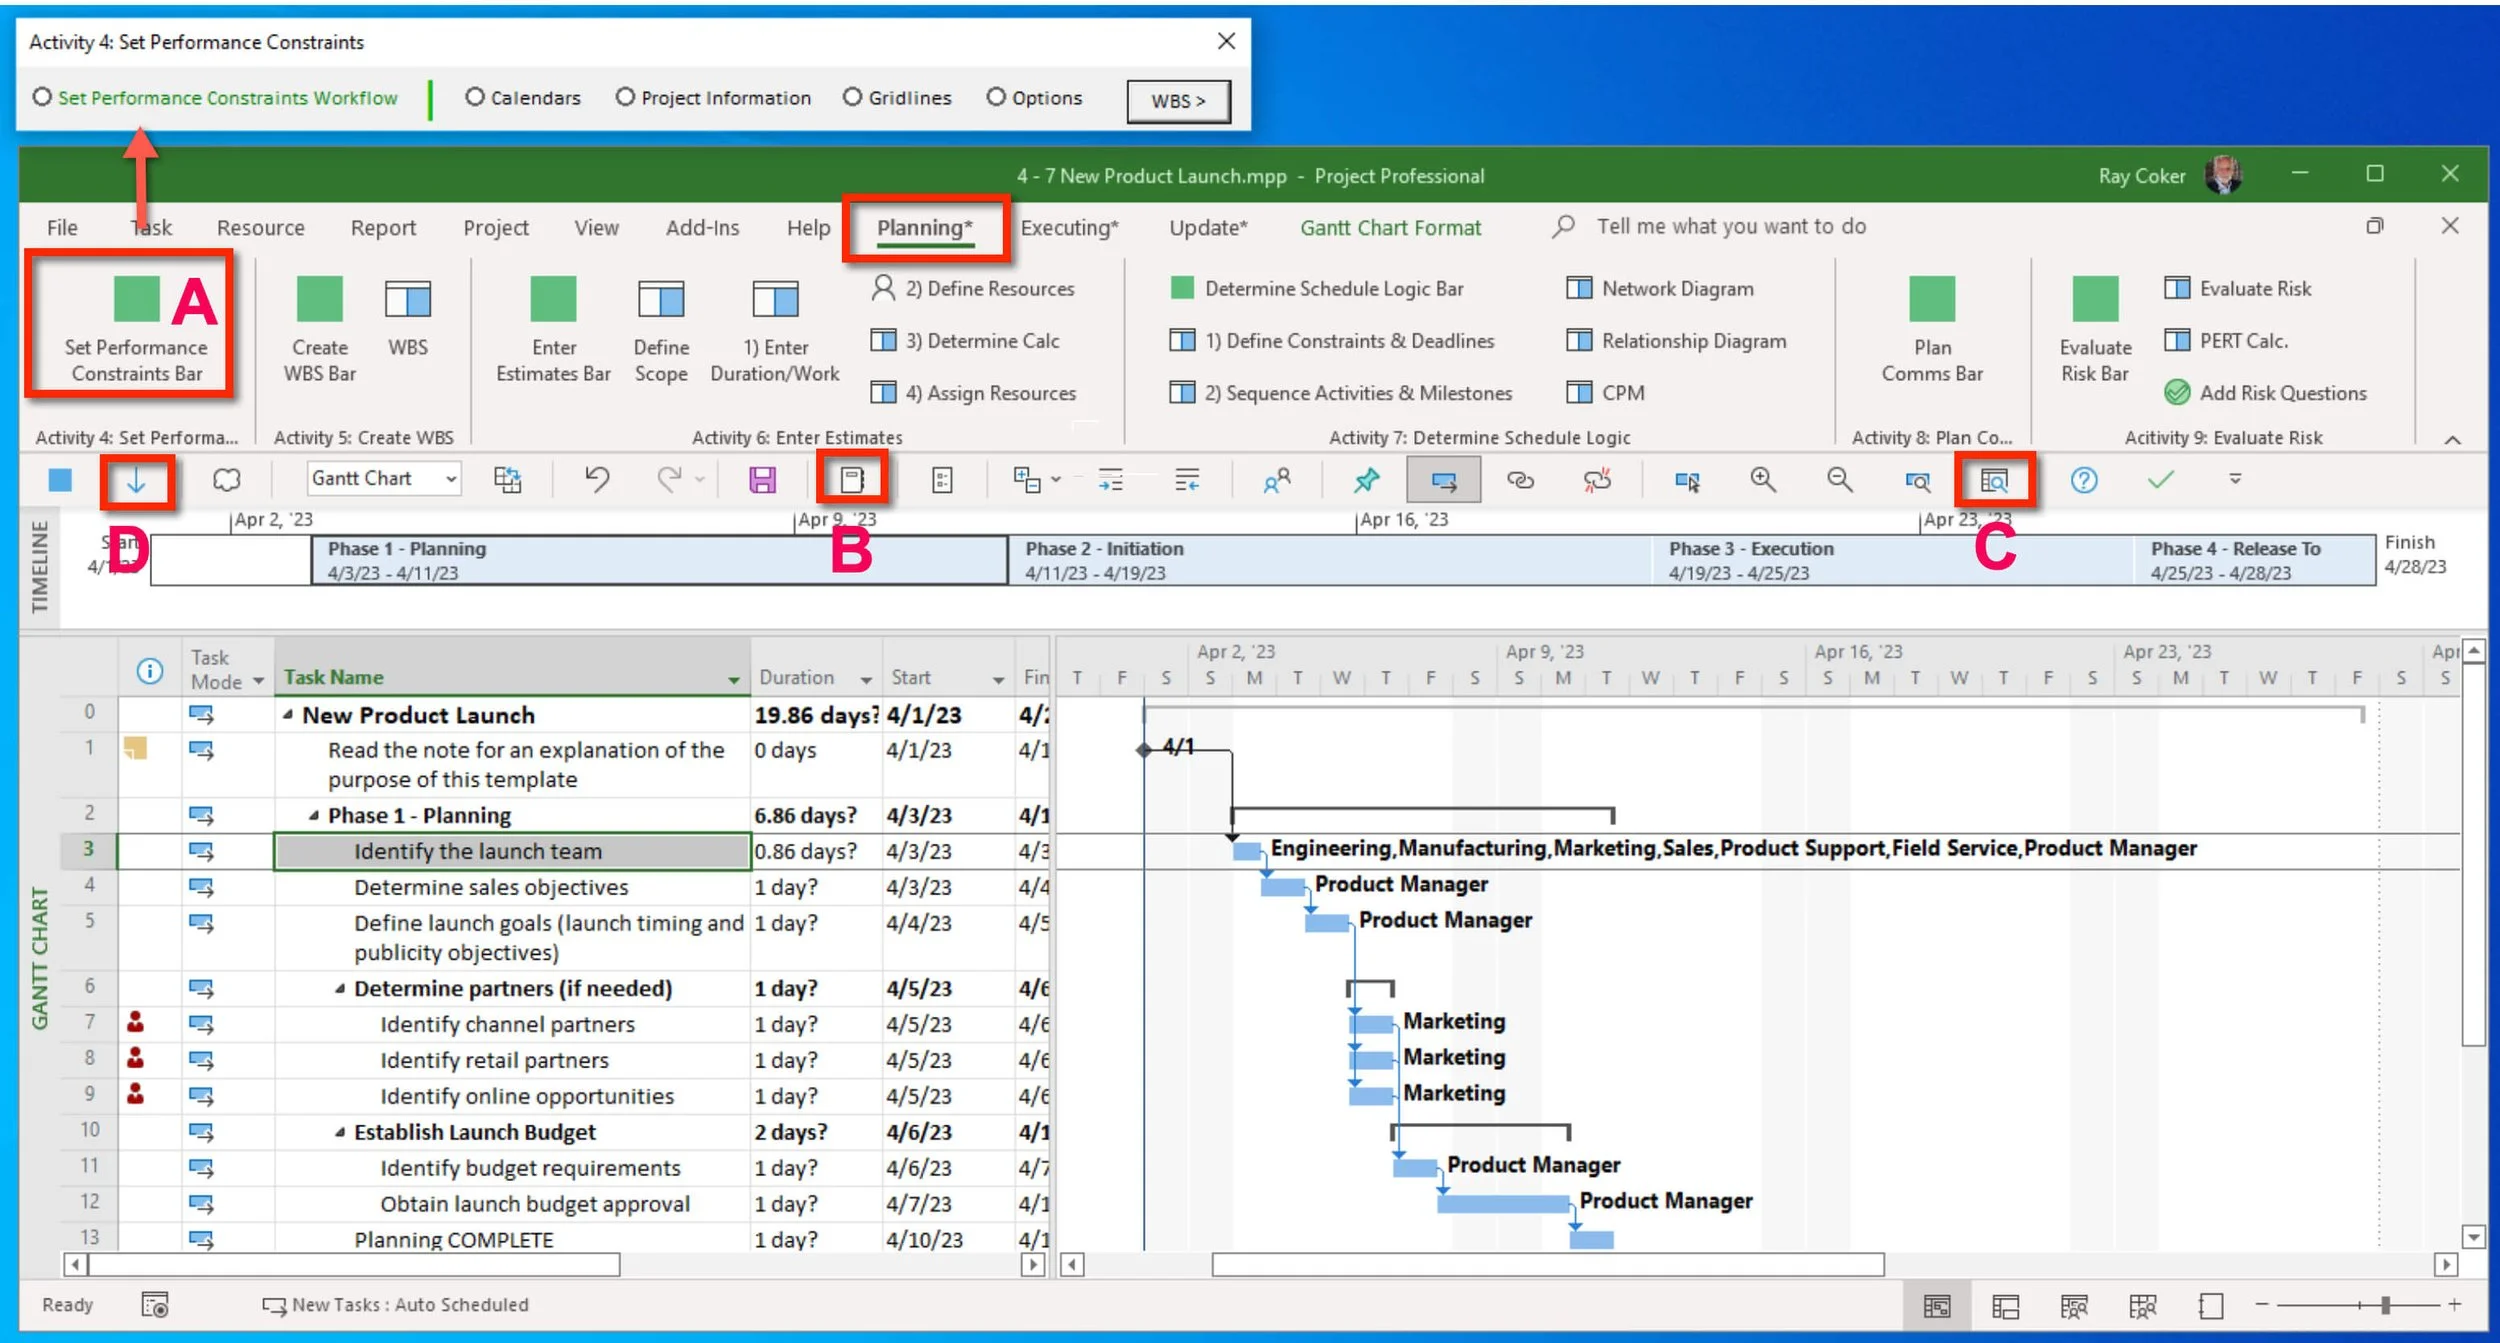
Figure 30: Set Performance Constraints.
The following is an illustration regarding the idea of Process Bridge being a training tool and helping you learn Microsoft Project.
We know that of the millions of Microsoft Project users, less than 20% do anything meaningful with resource management other than assigning resource names to tasks. Even fewer people understand that resource assignments are meant to be part of the Microsoft Project estimating model.
Because almost everyone wants resource management and to use the software correctly, we assume it takes most people too long to figure out how it works. We estimate that it takes a person, on their own, about 20 disjointed hours to figure out resource assignment as part of estimating, well enough to find enough value to keep using it.
We did some research to figure out why it was taking people so long to understand how this works and developed a little four-step routine. You can see the routine under Active 6: Enter Estimates and follow along in the Master Class Book to explain each step in the routine. We now believe it tasks a person about one hour to learn this area of Microsoft Project, and so we build this routine into Process Bridge.
This is the routine:
Open a project like 4 - 7 New Product Launch.mpp.
In Process Bridge, click 1) Enter Duration/Work and read about what you do in the Master Class Book in Activity 6: Enter Estimates.
Click 2) Define Resources and read about what you do.
Click 3) Determine Calc and read about what you do.
Click 4) Assign Resources and read about what you do.
Repeat. Repeat these four steps ten times or until you get how it works. We suggest people do this ten times. Our experience tells us most people get it in about four repeats.
The number of clicks to move through this routine in Microsoft Project would be in the hundreds. It would be tiresome, boring clicks. With Process Bridge, it is just Click 1, 2, 3, 4.

Journal
Do you think it is reasonable to ask self-motivated adult learners to memorize certain things in a class? I am not sure of the answer, but there are a few things that you will learn eventually, so getting that exercise out of the way seems prudent. In this section, I asked you to remember the five Organizer Rules.
Understanding how the Organizer works is one of the more important features to know about Microsoft Project. In this Activity, I introduce everyone to the feature, and it will be referred to again throughout the Master Class.
Explain the primary function of the Global.MPT file.
When are changes made to the Global.MPT file saved?
What are “Elements” in Microsoft Project?
What are the five Organizer Rules?
In general, when you create a custom Element and you want that Element to be available to any project you open, what do you need to do?

Best Practice
Don't let strangers throw stuff in the back seat of your car, and don't let Microsoft Project automatically save new custom elements to the Global.MPT file. Keep this file clean and organized.
Feel free to rename, using the Organizer, any custom Elements you create. Do not rename any view or table elements that come standard with Microsoft Project, such as the Gantt Chart view or Entry table.
Take the time to learn the basic functionality of the Organizer even though it has nothing to do with planning or executing a project. The time spent learning will reward you with greater productivity and ease of use.

If you are working with a coach, save and email them these files (4 - 5 Global Simulation.mpp should look like Figure 22, 4 - 6 Holidays Project.mpp, should have almost all of the U.S. Federal Holidays, 4 - 7 New Product Launch.mpp should look like Figure 30 ). If you are not working with a coach and you are planning to apply to either MS Master Class certificate, archive these completed simulation files so that you can submit them for review.

Return to the Master Class Book and review the next section for this Activity.


Saving a Template *.mpt Simulation (15 minutes)

Download *.mpp file
To start this simulation, download the Software Development-2.mpp file by using the icon above and opening it in Microsoft Project. Rename the file to 4 - 8 Software Devlopment.mpp. Ensure your global settings in Project Options are correct and that you are using Microsoft Project 2019, 2021, or Microsoft 365 updated for best results.
Let’s suppose this was a successful project plan, and you want to turn the project into a project template so that software development project managers in your group can use it to plan a new development project. This has become your expert plan for most new software projects.
First, the resources (people) have been renamed as generic (skill-based) resources like Analyst and Project Manager. There is no tool available to do this for you; simply rename individuals by the skill or position required to complete their assignments.
Notice that for task ID #8, there is a $1,000 fixed cost. Insert the Fixed Cost Column to see this. When you save this project as a template, you may want to keep resource rates but consider removing unique costs specific to a certain task like this $1,000 fixed cost.
In Project Options, you can decide on a default location for your template files. If you have a place in mind, enter that location in Options. See the Save page in Project Options.
As a reminder, all local settings in Project Options will be saved with the project template. Any custom elements you can see are associated with the project in the Organizer.
Before saving a template, it is usually best to clean up first. Let’s spend a minute and clean up any elements the Organizer no longer wanted. First, you can not delete a view that is is active, so apply a view you are not likely to use again, such as the Calendar view. Then go to the Organizer and delete any element associated with this 4 - 8 Software Development.mpp file. That is right, delete all elements associated with the project, not those associated with the Global.MPT file. The All Tasks filter and the No Group group are active in the Calendar view, so you will not be able to delete them.
When finished, reapply the Gantt Chart view.
Next, check the project calendar and notice that there are no exceptions. Remedy that by replacing the Standard calendar with the Standard calendar in the US Federal Holidays.mpp. You just did that in the simulation above.
Finally, I think you are ready to save this project as a template. Save it as a template (File / Save As - pick a location / and then select Project Template (*.mpt) in the Save as type field. You should be able to find your 4 - 8 Software Development.mpt file.
Strip out everything except Resource Rates.
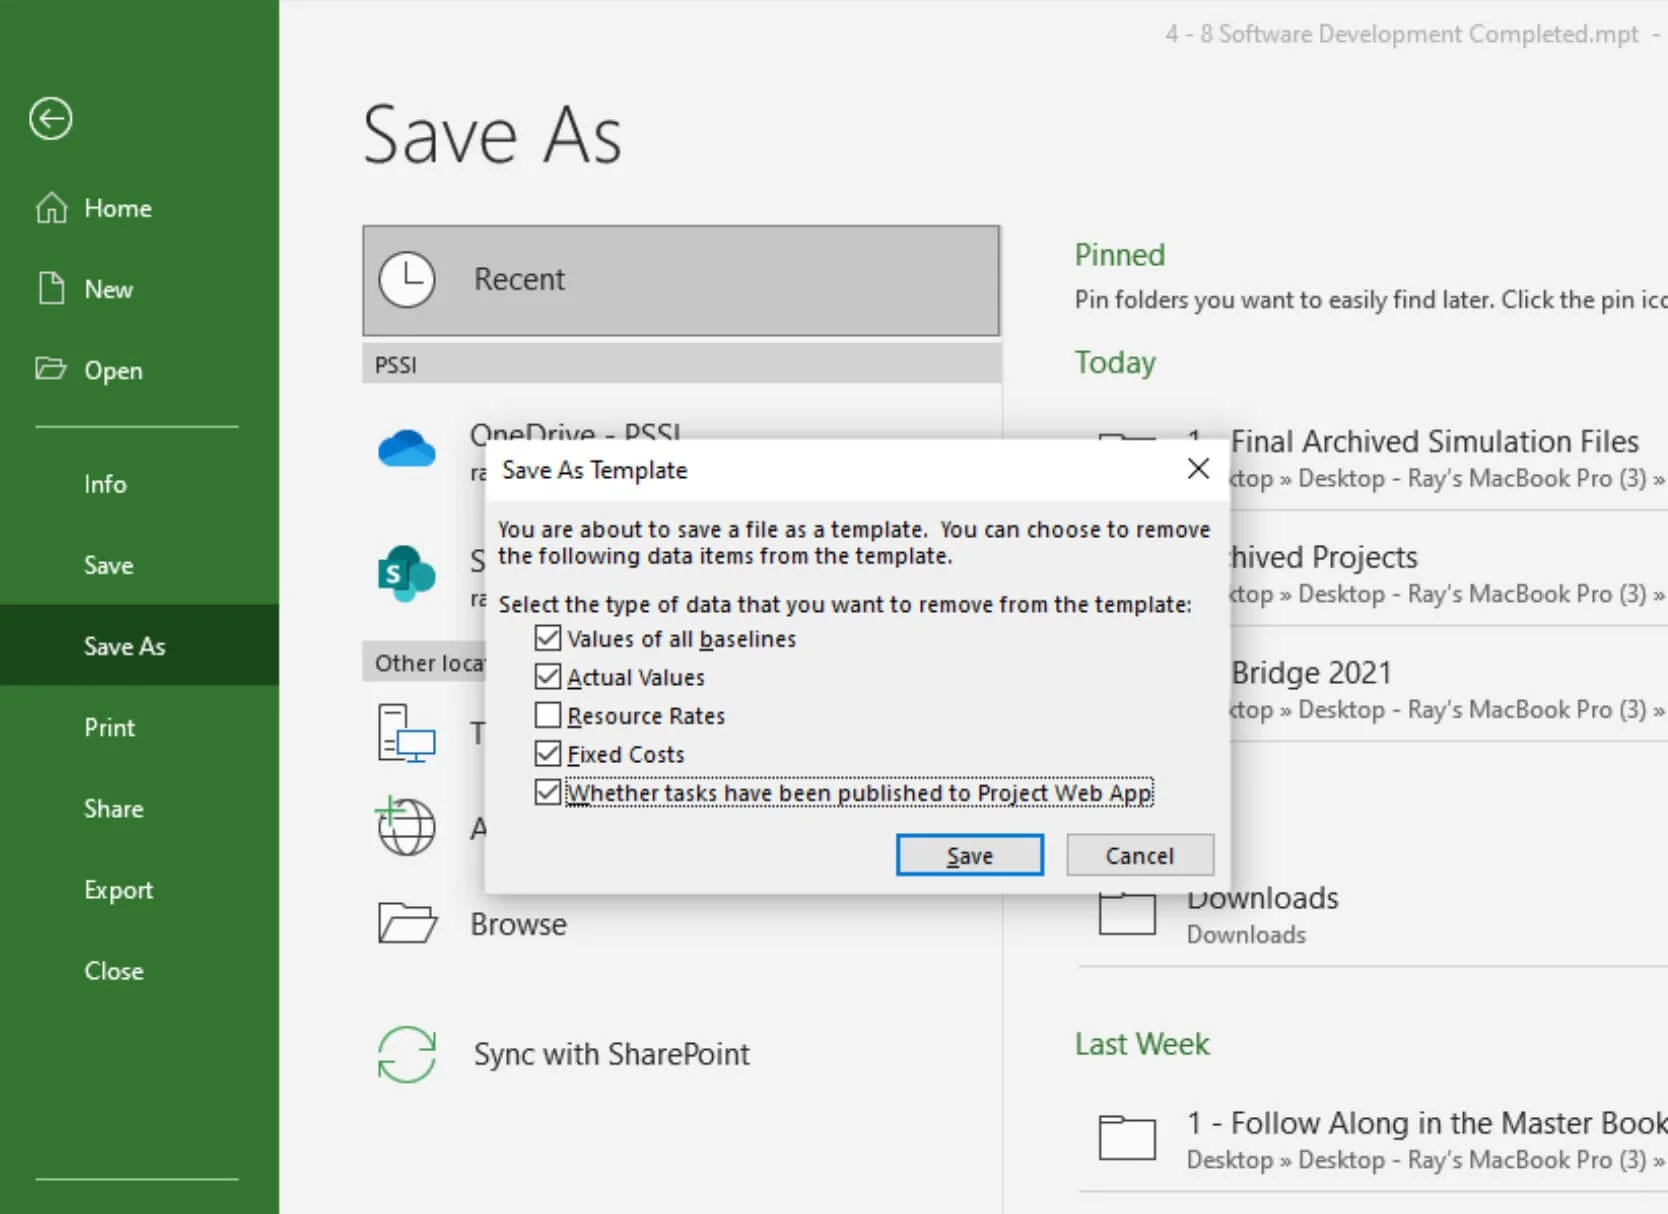
Figure 31. Save As Template checklist.
Notice the update history, baseline and fixed cost have been stripped. Resource rates are still there because those were not checked to be removed.
If not in your current table, insert these columns: Actual Cost, Fixed Cost, Baseline Costs, Costs. All columns should have zero values except the cost column.
Save and exit the template. Then open the template as if you are going to start a new project. Click the save button, Microsoft Project will want you to save this file as a new *.mpp file. If you made changes to this template and wish to update your “.mpt template file, save the file as a template and overnight the existing file with the save.
Simulation Results
The 4 - 8 Software Development.mpt file should have a Standard Calendar with U.S. Federal Holidays. There should be no baseline, actual, or fixed costs and shown in the figure below.

Figure 32. Baseline, fixed cost field data and status information stipped out of a project that has been saved as a template *.mpt file.

Note: To make changes to a Template, open the Template, make your changes and then Save As a Project Template (*.mpt) again.

Journal
Ever wonder why there are about 30,000,000 copies of Microsoft Project? It isn’t cheap at around $600 a year if you are using Microsoft 365. True, Project is backed by the second richest company in the world when considering market capitalization. Another reason is the ease of taking data in and out of the product and being able to start a new project from other project management data sources, such as Visio or a mind mapping tool. A third reason is templates. This idea of starting a project from a well-defined template, or expert plan, is a mainstay in many organizations.
What is a project template?
How do you save a project template?
How do you make edits to a project template?
How do you start a new project from a project template?

If you are working with a coach, save and email them this file (4 - 8 Software Development.mpt should look like Figure 32). If you are not working with a coach and you are planning to apply to either MS Master Class certificate, archive this completed simulation file so that you can submit it for review.

Return to the Master Class Book and review the next section for this Activity.

Copy and Import a New Project
Another important strength of Microsoft Project is that almost every product on the market that might contain a project can be directly imported or opened. In addition, projects can be copied software like Word and pasted into Project and imported into Project from Excel.

Copying a WBS and Importing a WBS Simulation (15 minutes)

Download *.doc and *.xlsx
To start this simulation, download the WBS.docx and WBS.xlsx file by using the icon above and opening it in Microsoft Project. Ensure your global settings in Project Options are correct and that you are using Microsoft Project 2019, 2021, or Microsoft 365 updated for best results.
Copy and Paste a Project
Let’s say that at lunch you started to outline a project in Word on your tablet and now you want to keep working on it in Project. Follow these steps:
Open the WBS.docx.
Select the content and turn it into an outline.
Copy the content.
Start a new project in Microsoft Project.
Click the first Task Name cell and paste.
Make sure all of the tasks are auto scheduled. Select the Task Mode header. Select the Task tab / Auto Scheduled command.
Save this project as 4 - 9 Copy WBS.mpp.

Figure 33. Outline, or WBS in Word.
Simulation Results.
The 4 - 9 Copy WBS.mpp file looks like the WBS below. All tasks are auto scheduled. The taskbars may be different.
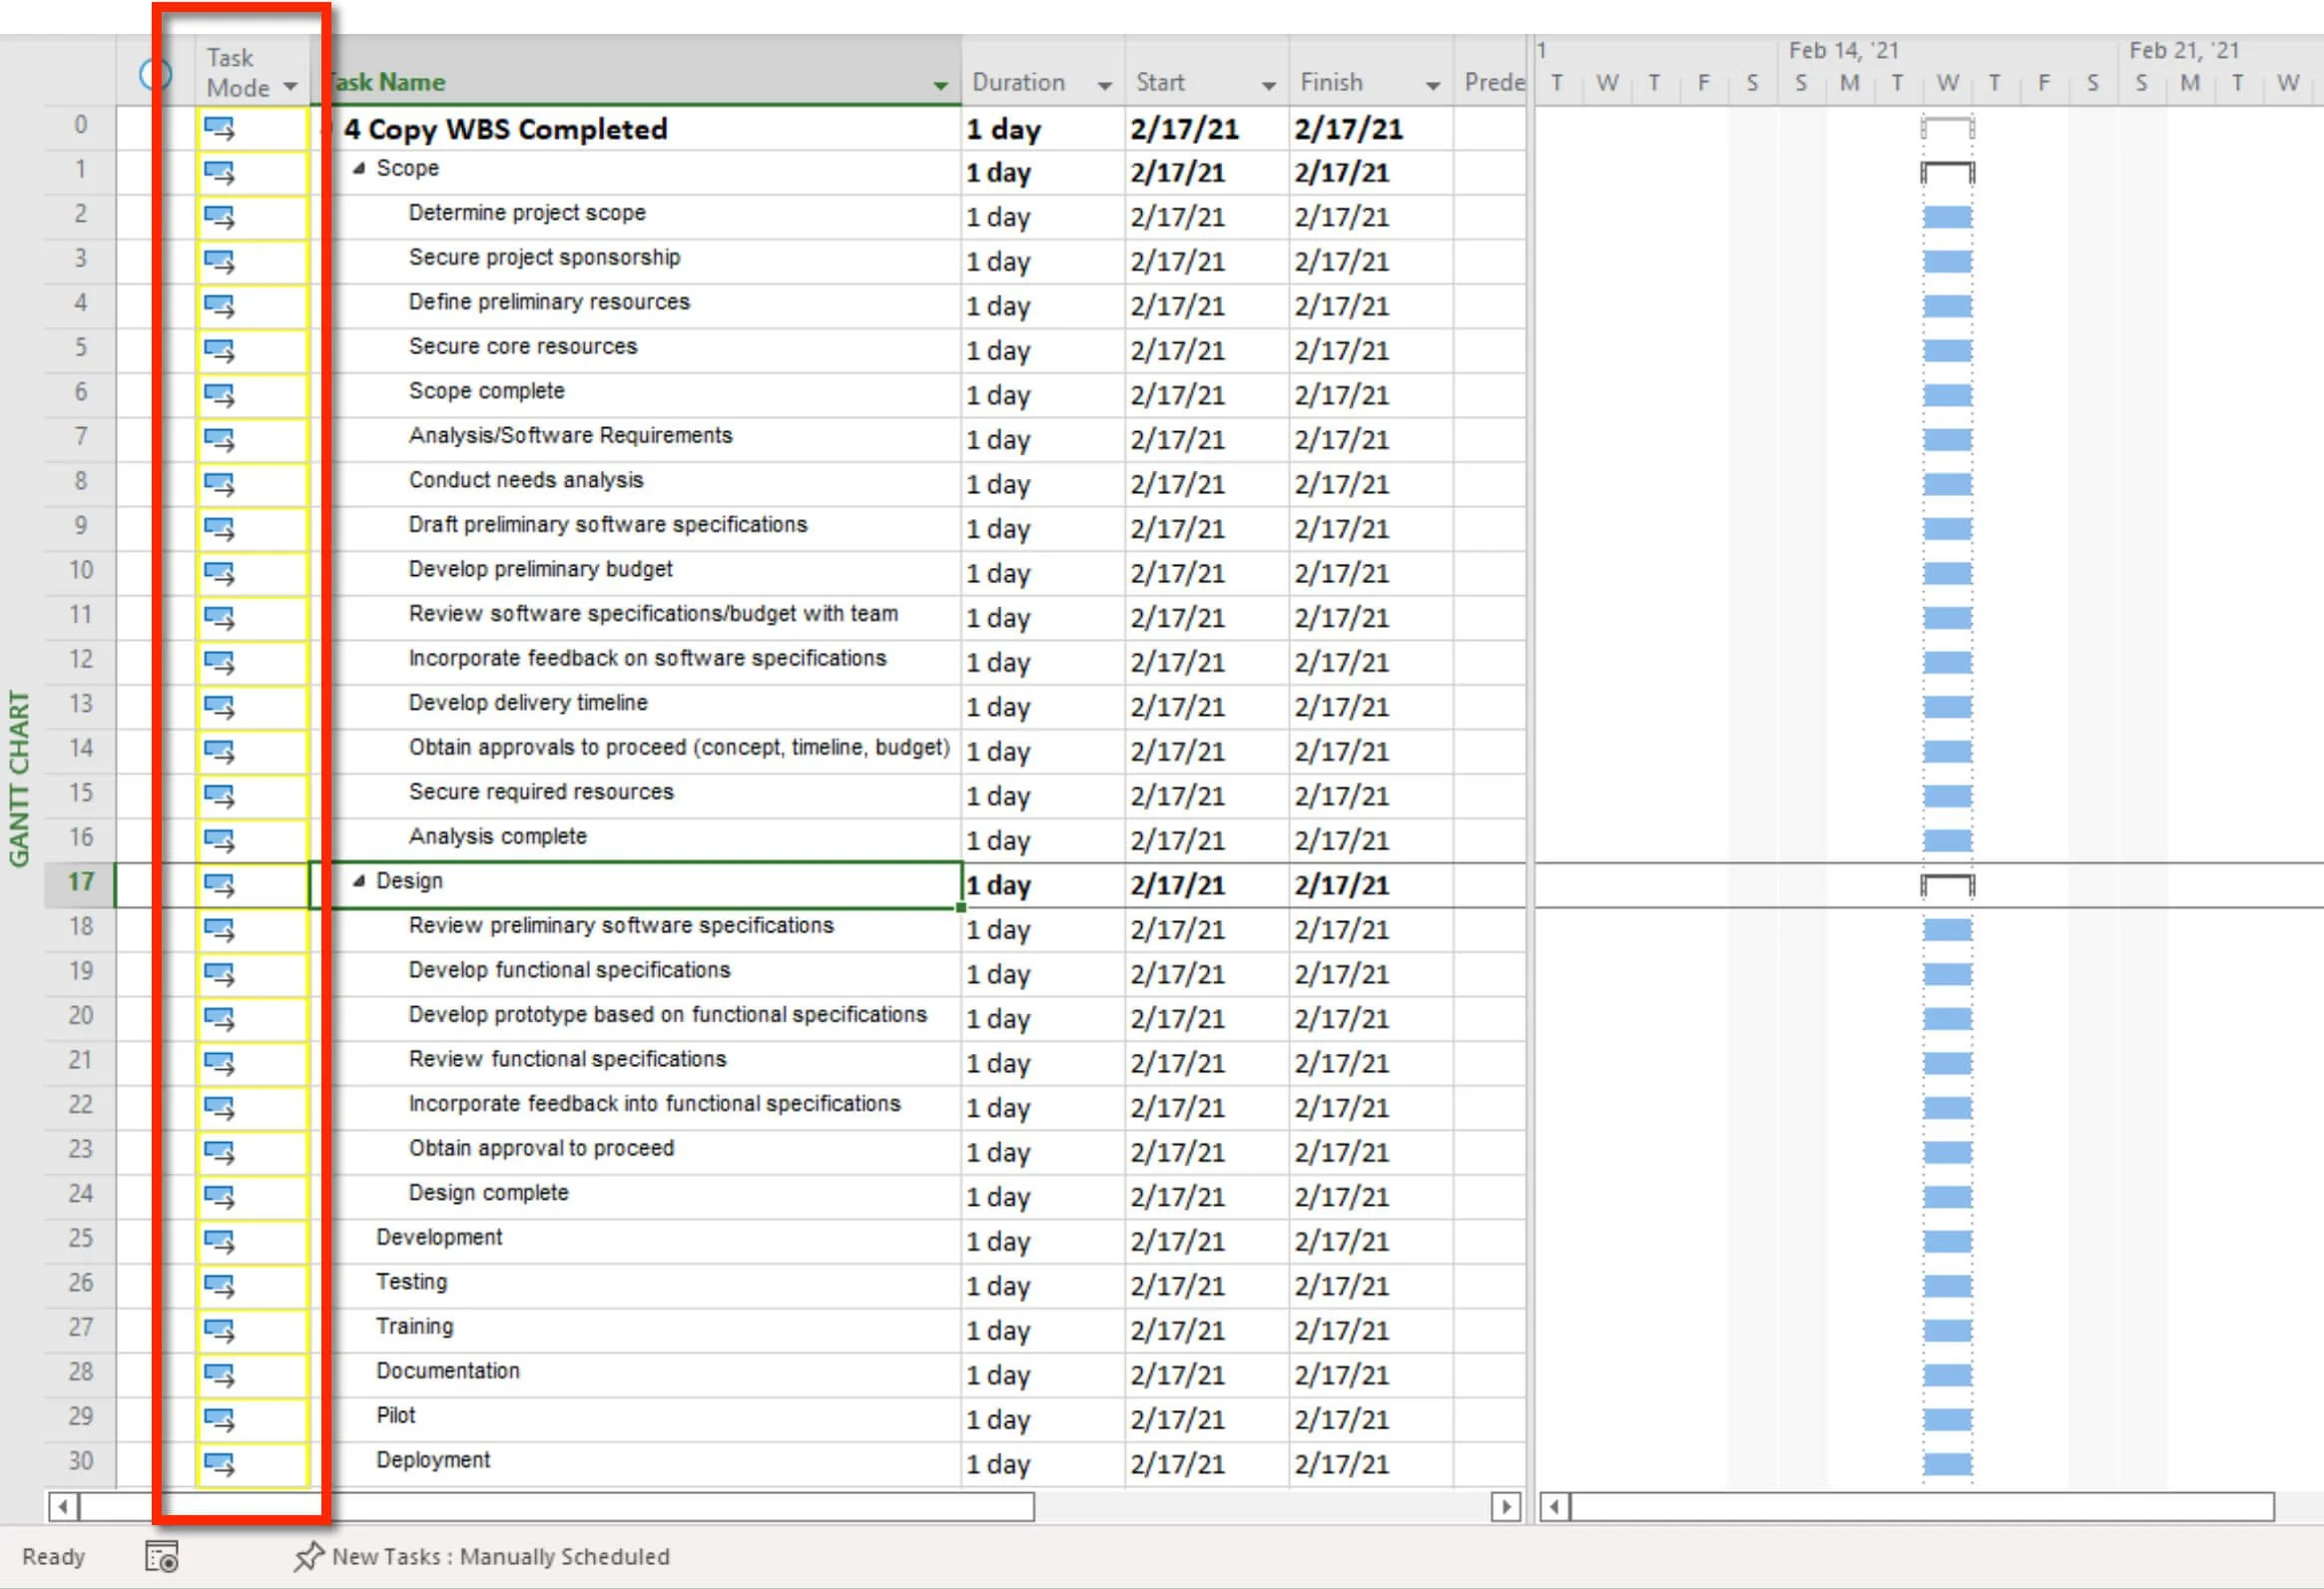
Figure 34. Microsoft Word outline copied and then pasted to start a new project in Microsoft Project
Import a Project
Another way to start a new project is to import data from another tool like Excel, Visio, or a Mind Mapping software. In many cases, there is a feature that exports the data as an *.mpp file. With Excel the data has to be mapped during the import process.

Note: Most all project management related products, such as process mapping, or mind mapping tools will have an option to save a file as a Microsoft Project *.mpp file. This is an industry standard.
Let’s say that you were given a project plan in Excel. Theoretically, as long as you can Map the columns of data in Excel, and that data is consistent with the way data is used in particular fields in Project, you can import a project.
First, open the WBS.xlsx file and review the content. Notice that the column headers represent data that would fill Microsoft Project fields such as Task Name and Resource Names.
Close the file and then follow these steps. I am going to give you minimal help on importing this data. Follow these general steps:
Open the WBS.xlsx from Microsoft Project. (File / Open)
An Import Wizard opens that will walk you through the import steps.
In this case, use an existing Map to import the data as a new project. The name of the Map to use is Default Task Information. If you are going to be importing as a routine, you can easily create your own Maps. Maps are custom elements managed by the Organizer.
Import as a new project. Import just Tasks and check the Import includes headers. This Map does not include one important field information that is in the Excel file.
IMPORTANT - Insert the Outline Level field above the TaskName field in the From Excel list of rows. Do this by selecting the Task_Name field and clicking the Insert Row button. Select the Outline_Level field.
Finish the import and Zoom the entire project. All of the detail tasks have been imported with Start No Earlier than a date timing constraint. That can be easily fixed in less than 10 seconds and we will show you how to do that later in the Master Class.
Notice that the project with imported with Start No Earlier Than timing constraints. We will work with timing constraints in Activity 7. If the Excel file had a column for timing constraints, this file could be imported with your choice of constraints.

Figure 35. Importing an Excel into Microsoft Project. If Start Dates are importing, a timing constraint of Start No Earlier Than than the date will be applied even if there are dependencies.
But right now, correct this by selecting all of the tasks. Easily do that by clicking on the square grey box in the ID column. This selection will always select every visible task. Then click on the Task tab and then Information. This command opens the Task Information dialog box, but it becomes Multiple Task Information when more than one task is selected. Selections in this dialog box will be applied to all selected tasks.
On the Advanced tab, select As Soon as Possible. Click OK. With these semi-flexible constraints removed, you can now change the project start date to 1/1/23.
Save the project as 4 - 10 Import WBS.mpp.
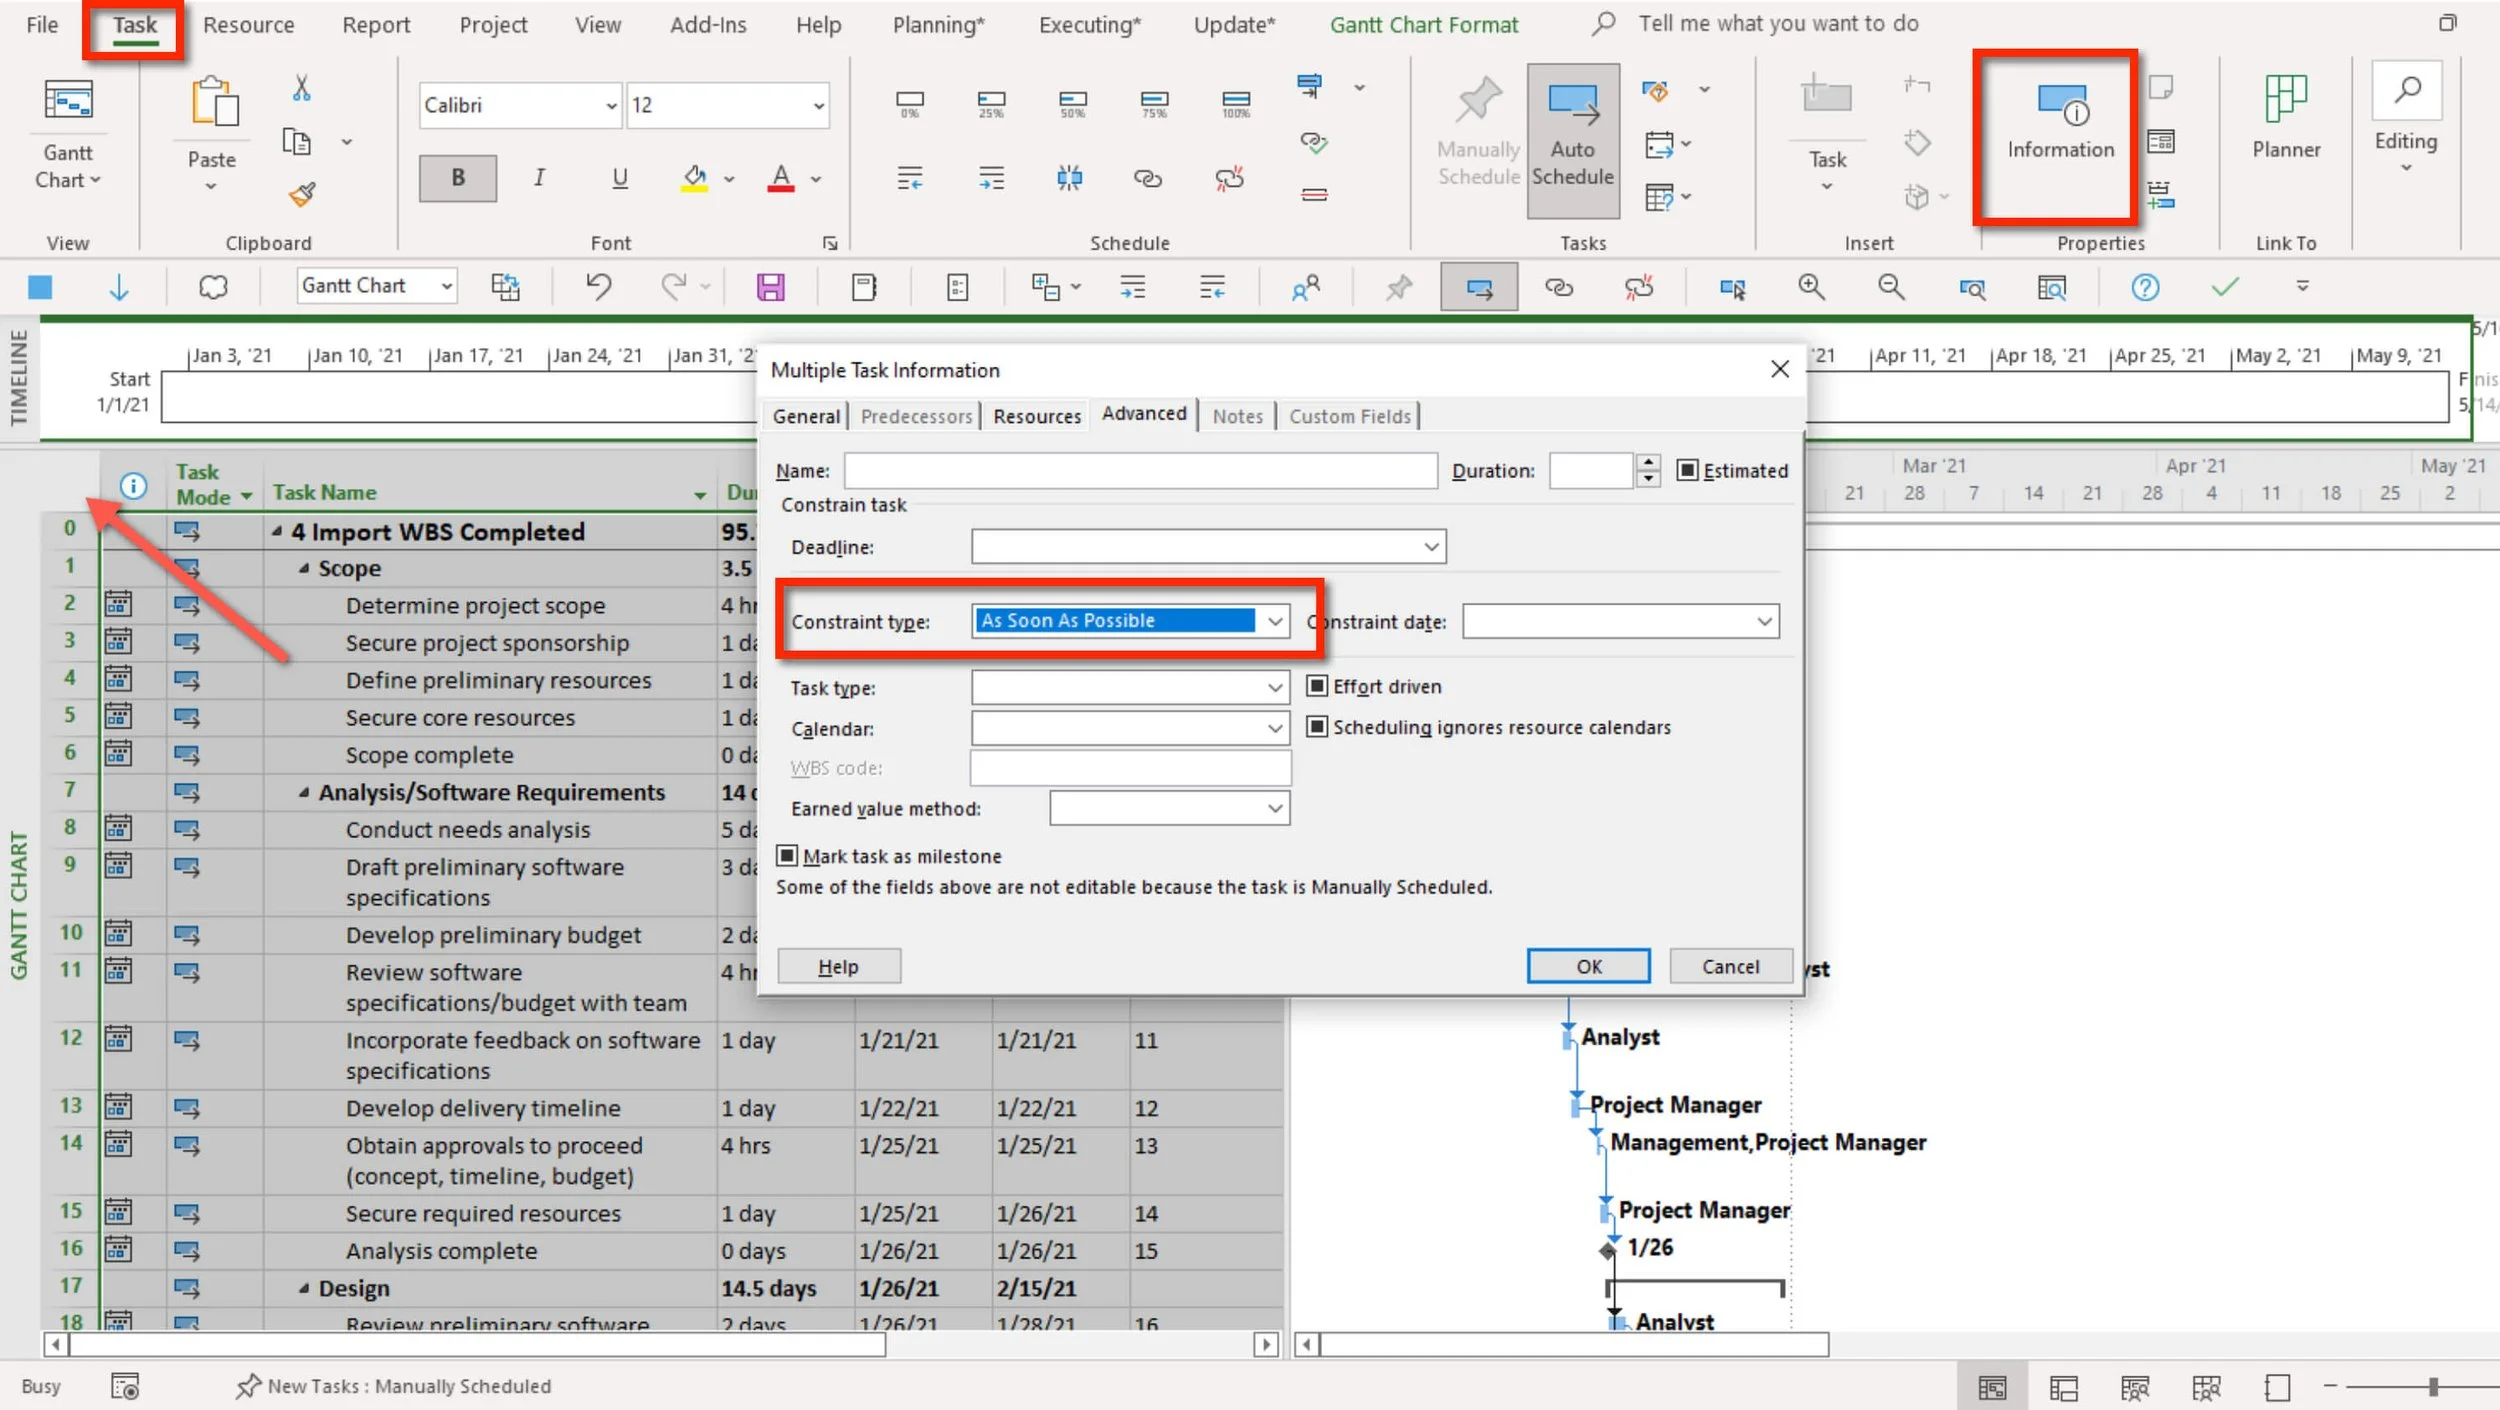
Figure 36.
Importing is like starting a new project. After the import, the applied view the Default view. In the figure below, the view is a split window with a Timeline and the Gantt Chart view. The default view can be selected in Project Options.

Figure 37. Default view selection in Project Options.
Finally, zoom the entire project and then use the Outline command to show Level 1. Then expand the Scope task. Activity 5 is on working with this outline or WBS.
Save the project.
Simulation Final
The 4 - 10 Import WBS.mpp file should look like the figure below. When you import, you are just importing data, you are not importing taskbar formats. Your taskbar might be different than those in the next figure. The start date of the project should be 1/1/23 and the outline levels below should match.

Figure 38. Outline command.
Finalized Updates to the MS Project Master Class Plan.mpp
In the Timesheet column, enter how much actual time you spent on these tasks. Don’t enter information on a summary task (a task with task indented below it).
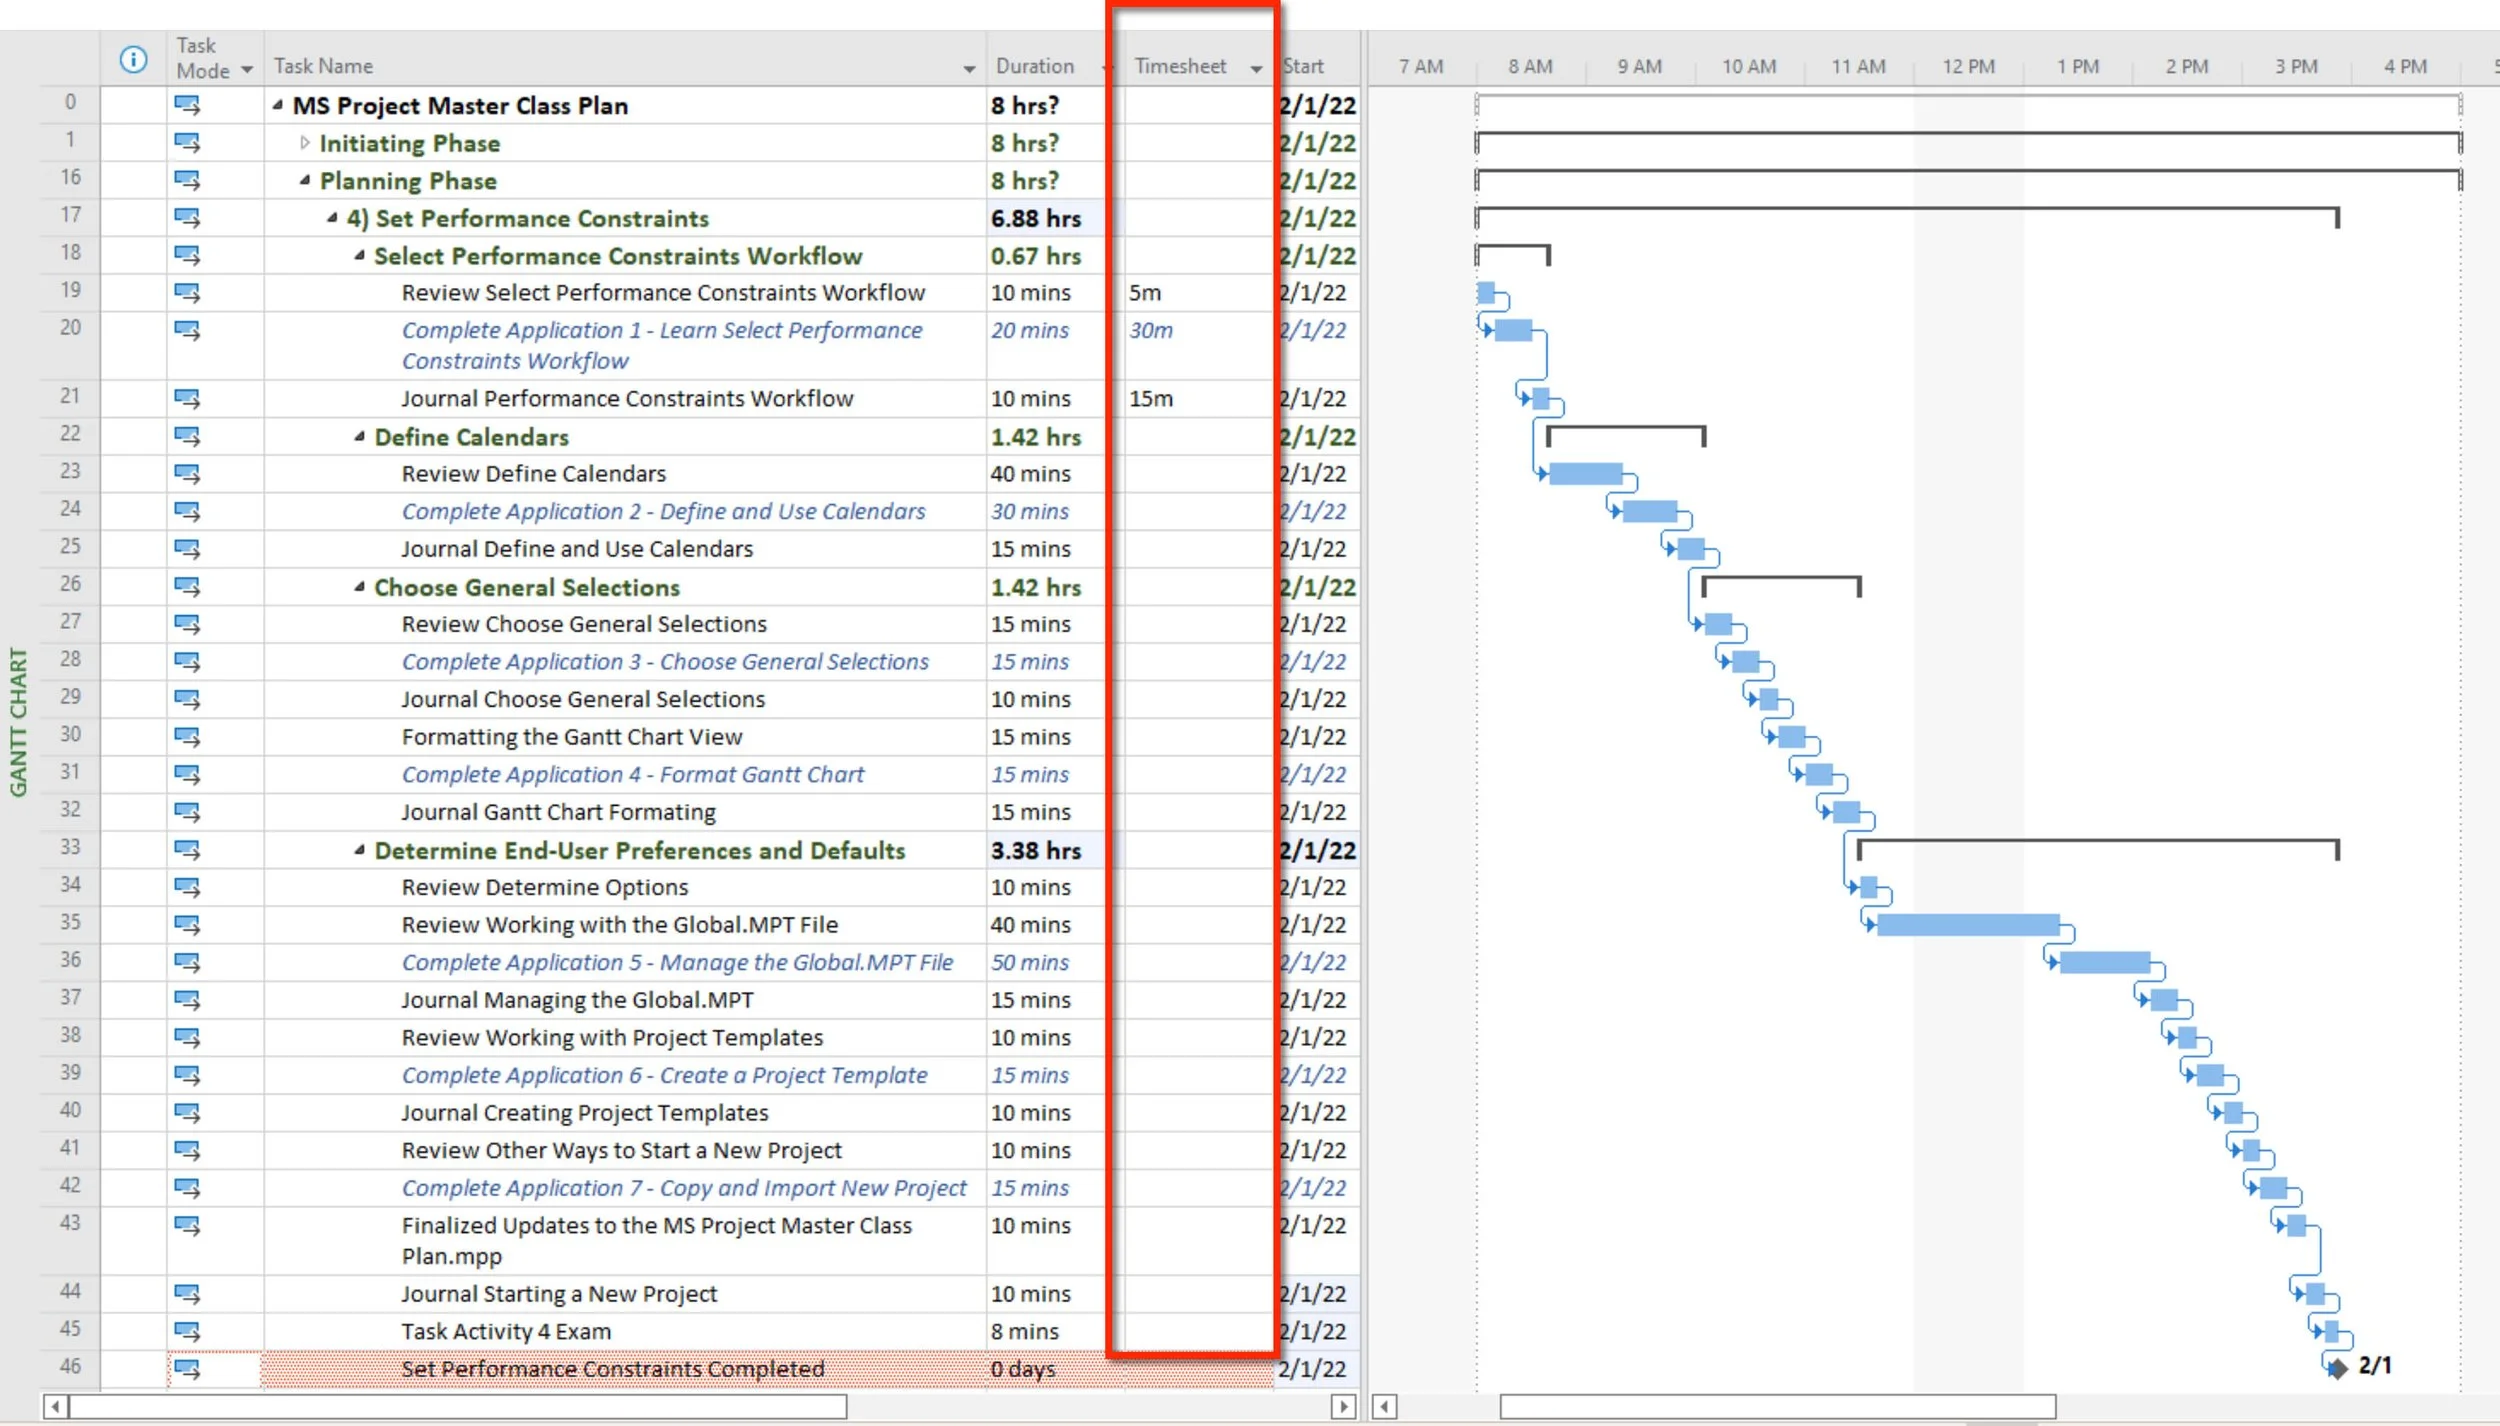
Figure 39. MS Project Master Class Plan.

Journal
There is a shortlist of reasons for deploying Microsoft Project in an organization. One item on the list is a desire to create, over time, expert plans for doing common or repeatable projects. I remember hearing a famous positive-thinking minister once remark, "Starting is 35% done."
There isn't much that is better than a great start.
What are the various ways to start a new project?
How do you start a new project from Word?
What are Map elements in the Organizer?
What is the "best" way to start a new project?

Best Practice
In general, it is best practice not to copy and paste with Office products. Even between *.mpp files and within a project because you never know what you are copying that might cause problems like formatting code or the history of those tasks in the case of Microsoft Project tasks.
If you are using Project Server and would like to create all kinds of havoc for yourself, copy and paste tasks that have been published.

If you are working with a coach, save and email them these files (4 - 9 Copy WBS.mpp should look like Figure 34, 4 - 10 Import WBS.mpp should look like Figure 38, and the MS Project Master Class Plan.mpp which should have your timesheet updates). If you are not working with a coach and you are planning to apply to either MS Master Class certificate, archive these completed simulation files so that you can submit them for review.

Return to the Master Class Book and review the next section for this Activity.

Review of Best Practices
Calendars
Keep it simple.
In most cases, make sure the Project Calendar definition matches the Calendar Options for a project in Options.
I do not recommend that you attempt to continuously update resource calendars with vacation and other non-work days without first evaluating the value vs. effort involved.
Most project managers in the U.S. use a standard 8 to 5, Monday through Friday, defined work holidays type of project calendar. They still realize it is common for professionals to work on weekends or evenings. For many, scheduling to the workday or workweek is good enough. In manufacturing, that is seldom the case, so often, the organization and context determine how precisely calendars are used.
On long-duration projects, neglecting to schedule around holidays can significantly skew the duration of a project.
Seldom do we finish a project with time to spare, so defining holidays should always be a consideration when calculating the duration of a project.
Having a good sense of a resource’s availability is a cornerstone of good scheduling. Avoiding resource bottlenecks and the inverse, underutilized resources, are critical skills associated with good planning and execution.
Use the Standard Calendar for the Project Calendar. If the calendar is different, make the changes.
Global.MPT (Organizer)
Whatever is in the Global.MPT file is available to all projects. Don’t let Microsoft Project determine what is in the file. Turn off “Automatically add new views, tables, filters and groups to the global” in Options.
Know the location of the Global.MPT and make sure it is routinely backed up.
Don't let strangers throw stuff in the back seat of your car, and don't let Microsoft Project automatically save new custom elements to the Global.MPT file. Keep this file clean and organized.
Feel free to rename, using the Organizer, any custom Elements you create. Do not rename any view or table elements that come standard with Microsoft Project, such as the Gantt Chart view or Entry table.
Take the time to learn the basic functionality of the Organizer even though it has nothing to do with planning or executing a project. The time spent learning will reward you with greater productivity and ease of use.
Copy / Paste
In general, it is best practice not to copy and paste with Office products. Even between *.mpp files and within a project because you never know what you are copying that might cause problems like formatting code or the history of those tasks in the case of Microsoft Project tasks.
If you are using Project Server and would like to create all kinds of havoc for yourself, copy and paste tasks that have been published.
Scheduling from a Finish Date
Scheduling from a finish date is a scheduling technique available in the software and used by a few project managers. Most people schedule from a project start date. If they have a hard finish date, for the last task in the project they enter a Must Finish On timing constraint for that task or a Deadline date.
Suppose you schedule from the Finish Date; once you are far enough along with planning to determine when the project should start, schedule from the Start Date. When you are ready for execution, you should be scheduling from a start date.
Scheduling from a Start Date
Scheduling from a finish date is a scheduling technique available in the software and used by a few project managers. Most people schedule from a project start date. If they have a hard finish date, as most of us typically do, enter a Must Finish On timing constraint a Deadline date for the project finish milestone task.
Templates
Start a new project from a project template (*.mpt).
There are few things better than starting fast with an expert plan. In a project group or larger organization, templates help drive standards and consistency. If they are fully developed they can significantly cut the time and effort involved in planning.

Activity 4: Select Performance Constraints Exam
Complete this Activity by taking the first exam in this Master Class. Take the exam here.

Figure 40. Activity 4 Exam.
Simulation Files
MS Project Master Project Plan.mpp (This file should have your timesheet entries or updates).
4 - 1 Activity 4 Overview.mpp (This file should look like Figure 6).
4 - 2 Calendar Rules.mpp (This file should look like Figure 13).
4 - 3 Schedule From.mpp (This file should look like Figure 15).
4 - 4 Dataco Custom.mpp (This file should look like Figure 17).
4 - 5 Global Simulation.mpp (This file should look like Figure 22).
4 - 6 Holidays Project.mpp (This file should have almost all of the U.S. Federal Holidays).
4 - 7 New Product Launch.mpp (This file should look like Figure 30).
4 - 8 Software Development.mpt (The file should look like Figure 32).
4 - 9 Copy WBS.mpp (The file should look like Figure 34,).
4 - 10 Import WBS.mpp (This file should look like Figure 38).

Using Process Bridge? Its easy to follow the workflow…

Figure 41. Activity 4: Set Performance Constraints commands.
A - The Set Performance Constraints Bar command is under the Planning tab on the ribbon.
B - Select the Set Performance Constraints Bar command to open the Set Performance Constraints floating toolbar.
C - From the floating toolbar…
Review the workflow online
Open Change Working Time (calendars) to view, edit and create
Open Project Information to enter meta data
Open Gridlines to format Gantt Chart lines for start, finish and status dates
Open Project Options to set global and local end-user selections and defaults.
This is a good time to explain how Process Bridge works. Using Process Bridge is not necessary for completing this MS Project Master Class, however, it does build in planning and executing processes into using Microsoft Project. We also believe that by using Process Bridge you will learn Microsoft Project much faster, perhaps cutting the learning curve in half.
Review Process Bridge and how to install and use Process Bridge by clicking on the button below.

Figure 42. Set Performance Constraints Workflow command.
Click the Set Performance Constraints Workflow radio button to review the workflow for this activity.
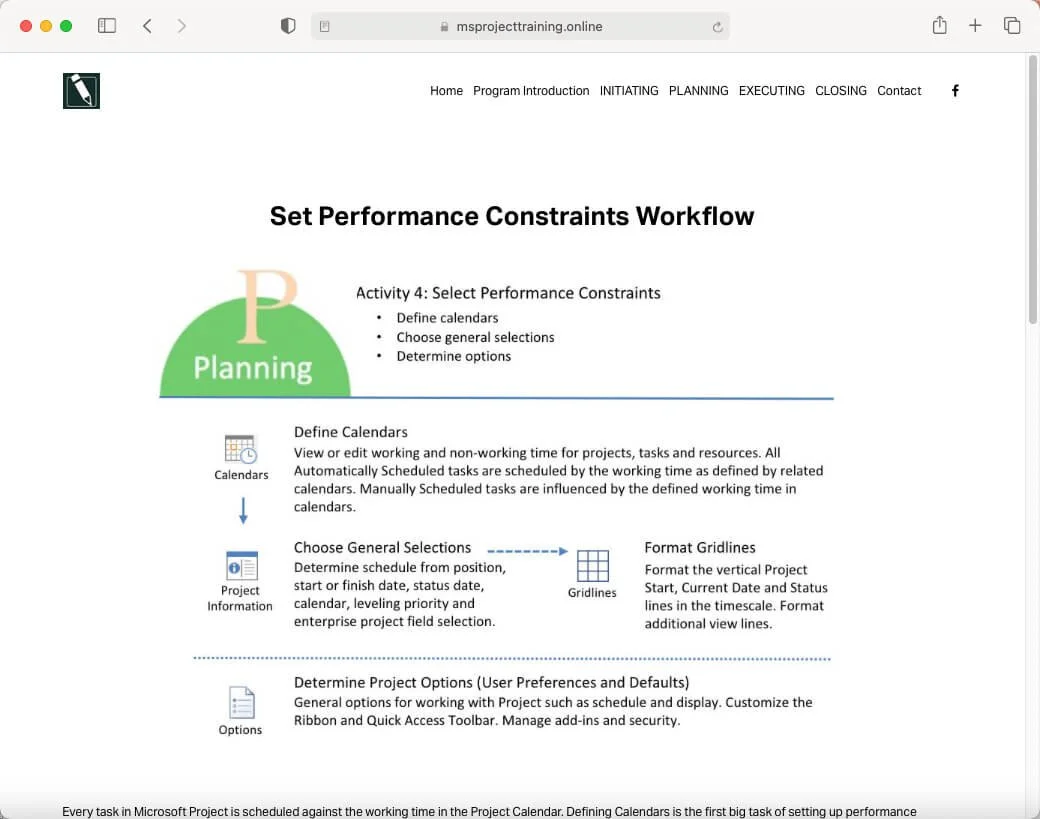
Figure 43. Activity 4: Select Performance Constraints workflow online.
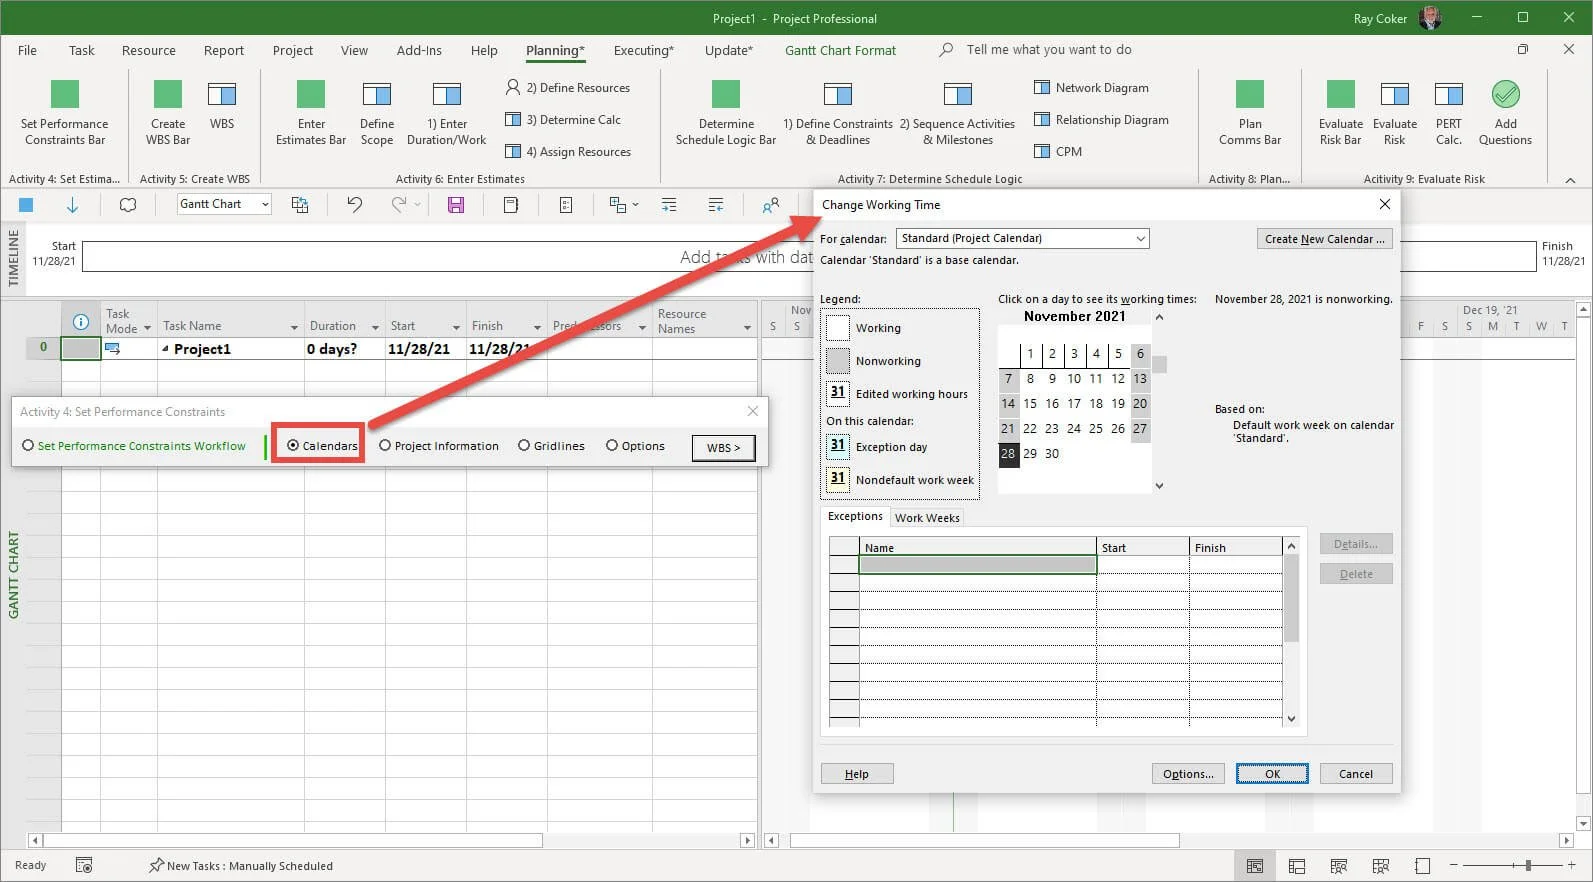
Figure 44. Calendars (Change Working Time) command.
Click the Calendars radio button to open the Change Working Time dialog box and view, edit and create calendars for projects, tasks and resources.
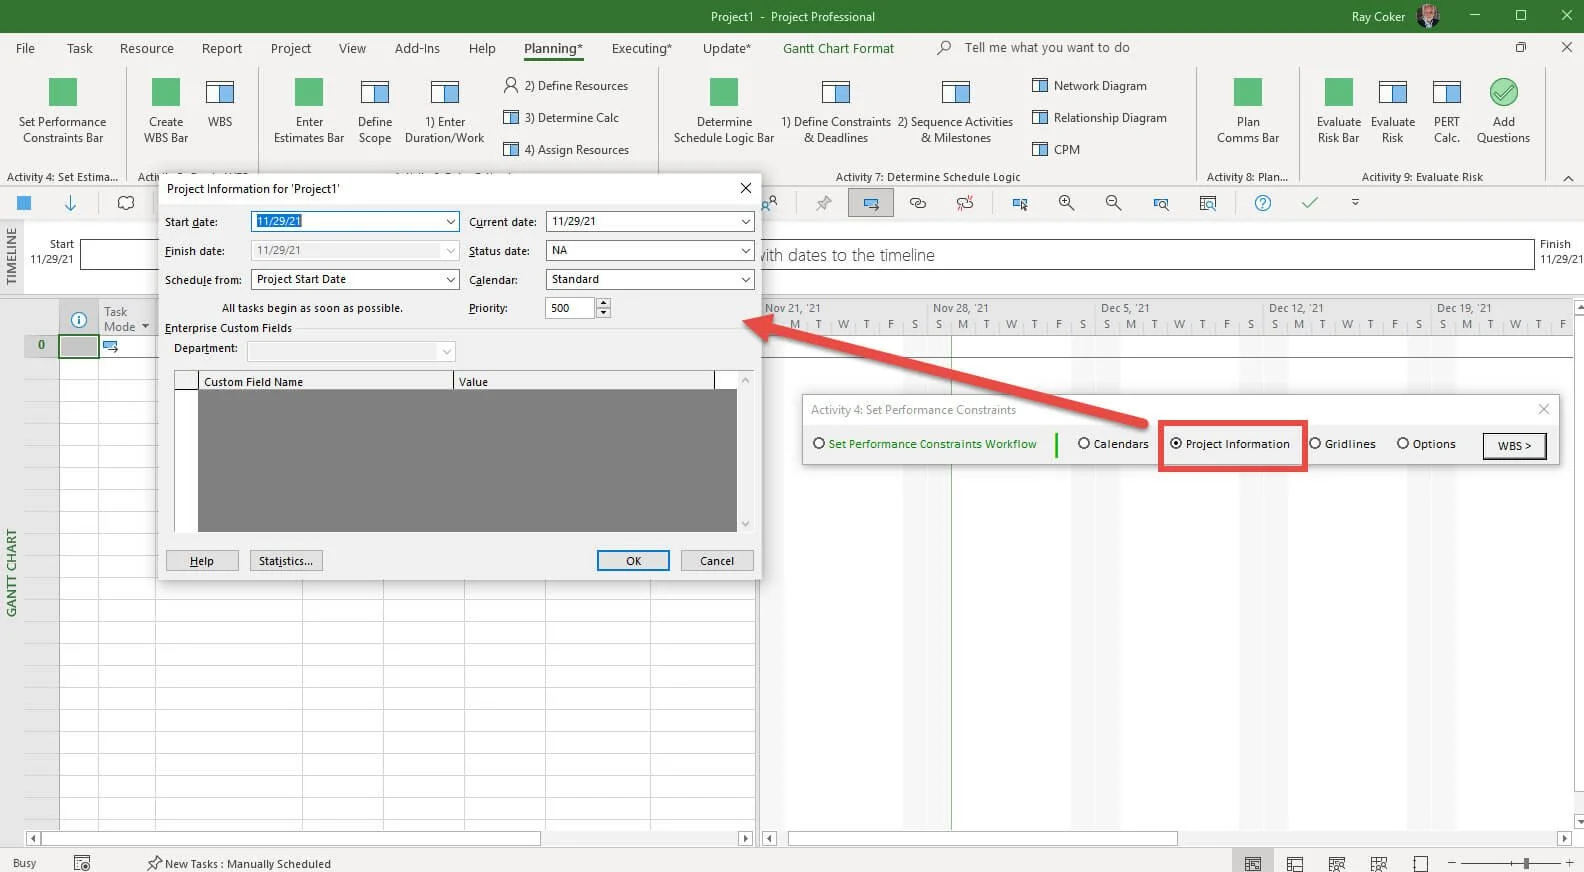
Figure 45. Project Information command.
Click the Project Information command.
The Project Information dialog box opens for determining how to schedule, temporarily changing the current date, entering the status date, selecting the project calendar, the priority of the project if resource leveling across projects and for selecting project fields if working in the enterprise.

Figure 46. Gridlines command.
Click the Gridlines command.
Consider formatting the Project Start, Current Date and Project Finish in a type and color that are consistent across all of your projects.
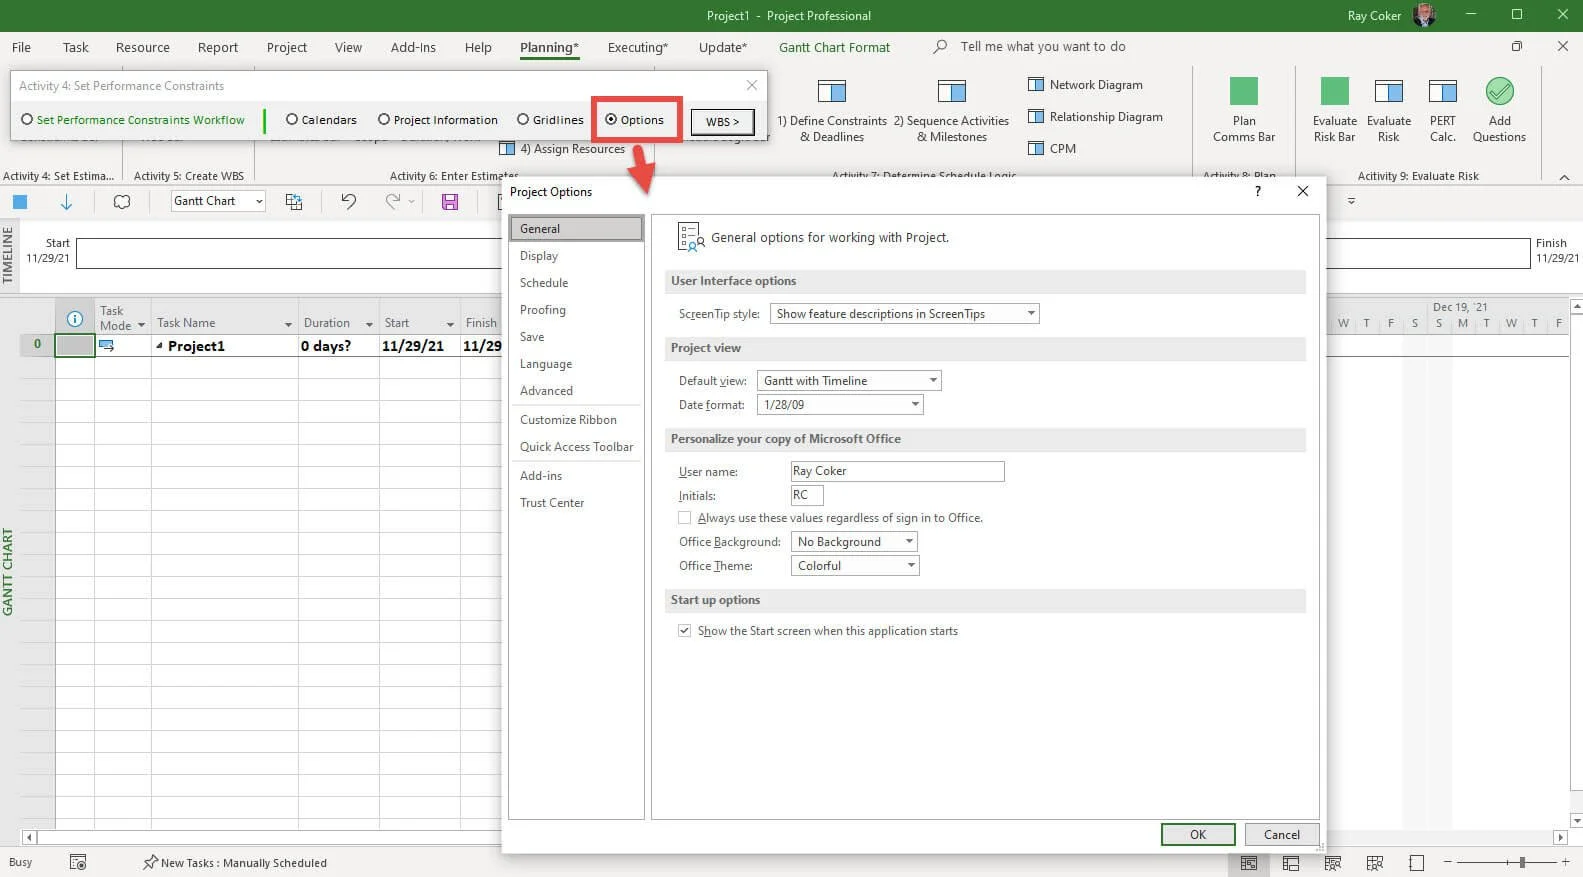
Figure 47. Project Options command.
Click the Options command.
Select the appropriate global selections and the local selections for this project across eight categories in the Project Options dialog box.

Figure 48. Project MAP command.
Click the Project MAP command on the ribbon toolbar.
The Project MAP floating dialog box opens. Open any of the nine floating toolbars, open or hide all toolbars, review Project MAP online or review the MS Project Master Class online.
Figure 49. Hide All Floating Toolbars command.
The Hide All Floating Toolbars command will hide (close) any open Process Bridge floating toolbars.
Figure 50. MS Project Training Online command.
Click the MS Project Training Online command on the ribbon toolbar to open the MS Project Master Class Online Application in your default browser.